Get 50% Discount Offer 26 Days

Recommended Services
Supported Scripts
WordPress
Hubspot
Joomla
Drupal
Wix
Shopify
Magento
Typeo3
How to Order Managed WordPress Hosting?

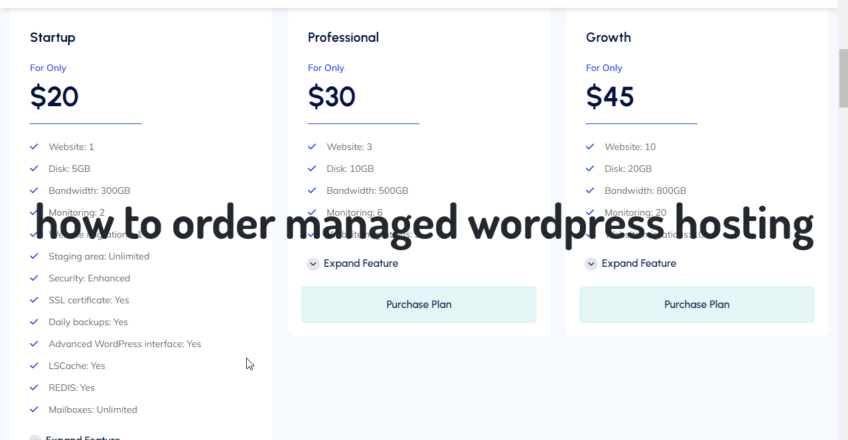
Managed WordPress hosting plans are designed to meet the specific needs of WordPress websites. These plans offer a variety of features and optimizations to enhance performance, security, and usability. Starting from an affordable $20, the pricing varies based on the number of websites you want to host and the required disk space. You should know how to order managed wordPress hosting?

Users can also choose their preferred billing cycle, adding flexibility to payment arrangements. This article will guide you through the process of ordering managed WordPress hosting, using Voxfor as an example. Self-hosted WordPress setup offers unparalleled control and flexibility for your website. You can select your own hosting provider, install custom themes and plugins, and fully customize your site’s functionality and design.

Step 1: Understand Your Hosting Needs

  • Number of Websites: Determine how many websites you plan to host. Voxfor offers plans that can accommodate various numbers of websites, which affects the cost.
  • Disk Space: Assess the amount of disk space your websites will need. Larger websites with high-quality media files will require more storage.
  • Traffic Expectations: Estimate the amount of traffic your websites are likely to receive. Higher traffic may require more robust hosting plans.
  • Budget: Set a budget for your hosting expenses. While managed WordPress hosting starts at $20, the final cost will depend on your specific needs and the plan you choose.

Step 2: Explore Voxfor Hosting Plans

Voxfor offers a range of managed WordPress hosting plans. Here’s how to explore their options:

Explore Voxfor Hosting Plans
  1. Visit the Voxfor Website: Go to the Voxfor website and navigate to their managed WordPress hosting section.
  2. Compare Plans: Review the different plans available. Pay attention to the number of websites each plan supports, the amount of disk space provided, and any additional features included.
  3. Read Reviews: Look for customer reviews and testimonials to gauge the reliability and performance of Voxfor’s hosting services.

Step 3: Choose the Right Plan

Once you have a clear understanding of your needs and have explored Voxfor’s offerings, it’s time to choose a plan:

explored Voxfor plans
  1. Select a Plan: Based on your requirements and budget, select the most suitable plan. Voxfor offers a range of plans to fit different needs and budgets.
  2. Check Features: Ensure the plan includes essential features like automatic backups, security monitoring, and performance optimization. Once you’ve set up your managed WordPress hosting, you might want to optimize your site’s performance. You can Speed Up Your WordPress Site to enhance loading times and user experience.

Step 4: Place Your Order

With your plan selected and billing cycle chosen, you can proceed to place your order:

Voxfor Checkout Process
  1. Add to Cart: Click on the “Add to Cart” button for your chosen plan.
  2. Review Order: Double-check the plan details, billing cycle, and total cost.
  3. Create an Account: If you’re a new customer, create an account by providing your email address and creating a password.
  4. Payment Information: Enter your payment details. Voxfor accepts various payment methods for your convenience.
  5. Confirm Order: Review all the information and click “Confirm Order” to complete your purchase.

Step 5: Set Up Your Hosting

After placing your order, follow these steps to set up your managed WordPress hosting:

Set Up Your Hosting
  1. Access Control Panel: Log in to your Voxfor account and navigate to the hosting control panel.
  2. Install WordPress: Use the one-click installer to set up WordPress on your hosting account.
  3. Migrate Existing Site: If you have an existing WordPress site, use Voxfor’s migration tools or seek assistance from their support team to transfer your site.
  4. Configure Settings: Customize your WordPress settings, install necessary plugins, and choose a theme to get your website up and running.

Benefits of Managed WordPress Hosting with Voxfor

Choosing Voxfor for managed WordPress hosting comes with several advantages:

Benefits Managed WordPress Hosting
  • Managed Services: Voxfor handles server management tasks such as software updates, security monitoring, backups, and performance optimization. This allows you to focus on content creation and website management.
  • Enhanced Security: Voxfor employs advanced security measures to protect your website from malware, hacking attempts, and brute force attacks. Their robust security protocols ensure the safety of your data.
  • Performance Optimization: Voxfor’s hosting plans are optimized for WordPress, ensuring fast load times and smooth performance even under high traffic.
  • User-Friendly Interface: Voxfor’s control panel is intuitive and easy to use, making it simple to manage your website.

Conclusion

Ordering managed WordPress hosting from Voxfor is a straightforward process that starts with understanding your needs and ends with setting up your website. By following the steps outlined in this guide, now you know how to order managed wordPress hosting. Also, you can select the perfect hosting plan, customize your billing cycle, and enjoy the benefits of managed services, enhanced security, and optimized performance.

Voxfor’s comprehensive solutions ensure a reliable and hassle-free hosting experience for WordPress enthusiasts. Advanced threat detection utilize cutting-edge technologies like machine learning, behavioral analysis, and real-time monitoring to identify and mitigate potential security breaches. These solutions help prevent data loss, minimize downtime, and ensure compliance with security regulations.

Leave a Reply

Your email address will not be published. Required fields are marked *

Lifetime Solutions:

VPS SSD

Lifetime Dedicated Servers