Allowing remote connections to MySQL is important for those who need centralized database access, whether for web applications, remote management, or collaborative development. However, configuring MySQL for remote access must be done carefully to maintain security. In the following guide, you will find step-by-step instructions on how to enable remote access, how to secure your connection, and how to fix any problems you might face.
MySQL is typically configured to allow only local connections by default, restricting access to users or applications on the same server. When you allow remote connections, any users or applications on other machines can talk to your database. However it’s critical for web applications, data warehousing, or centralized database administration, but it also has security problems.
Allowing remote access to MySQL is particularly valuable for:
Warning: Always consider security before allowing remote connections. By default, MySQL’s local-only access setting is a security feature that prevents unauthorized access from outside the server.
The following requirements need to be set before diving into the configuration to have a smooth setup.
The server that will host the database has MySQL installed. Use the following command to verify the installation:
mysql --version
Since configuring remote access involves making changes to MySQL’s setup, it’s recommended to back up your databases. Use the following command to create a full backup:
mysqldump -u root -p --all-databases > alldatabases_backup.sql
Having a backup makes sure that you can restore your database in case of accidental configuration issues.
To enable MySQL, you need to configure it so it listens on all network interfaces (as opposed to just localhost). For applications or users that need access to the database on different machines in a network, this setup is important. However, running a database over a remote connection is not without risk; the database must be enabled before risk, otherwise. If you are going to encrypt your data, apply proper controls to do so and to protect your data, ensure that your access control is in place (such as firewalls, secure passwords, etc., restricting access to specific IP addresses). It does a deep dive into how to get it up and running securely, step by step.
The MySQL configuration file location varies based on the operating system you’re using. Common locations include /etc/mysql/mysql.conf.d/mysqld.cnf
/etc/mysql/mysql.conf.d/mysqld.cnf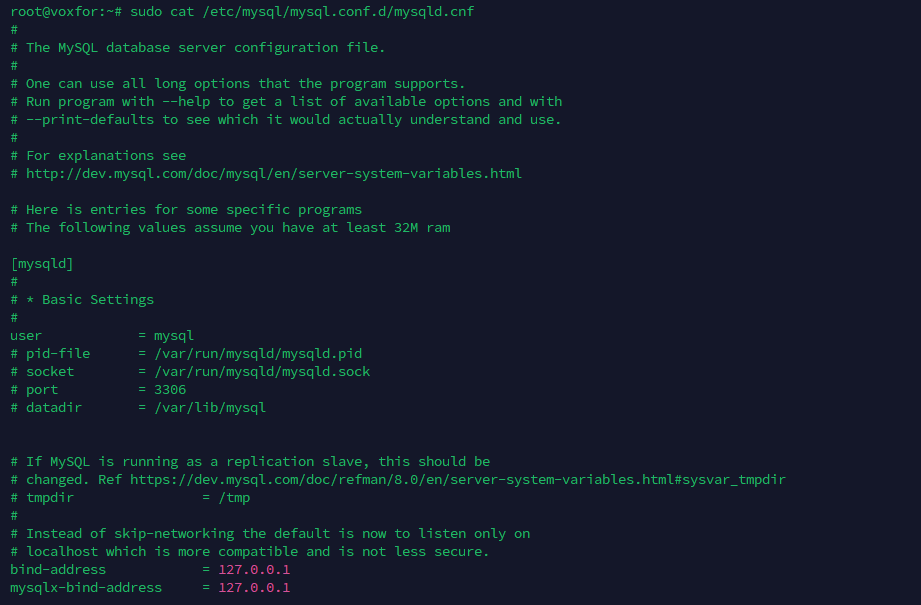
/etc/my.cnf or /etc/mysql/my.cnfTo locate the exact configuration file, you can use the following command:
sudo find / -name 'my.cnf'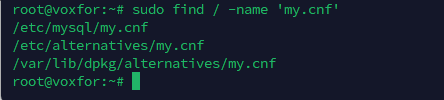
This file contains critical settings for MySQL, including network configurations and database settings. To view and modify this file, you will require administrator privileges (e.g., sudo). First, set up the remote connection and find the file that we are able to update its bind-address parameter. If you make mistakes configuring your MySQL, you can get stuck or get MySQL doing things that you didn’t expect.
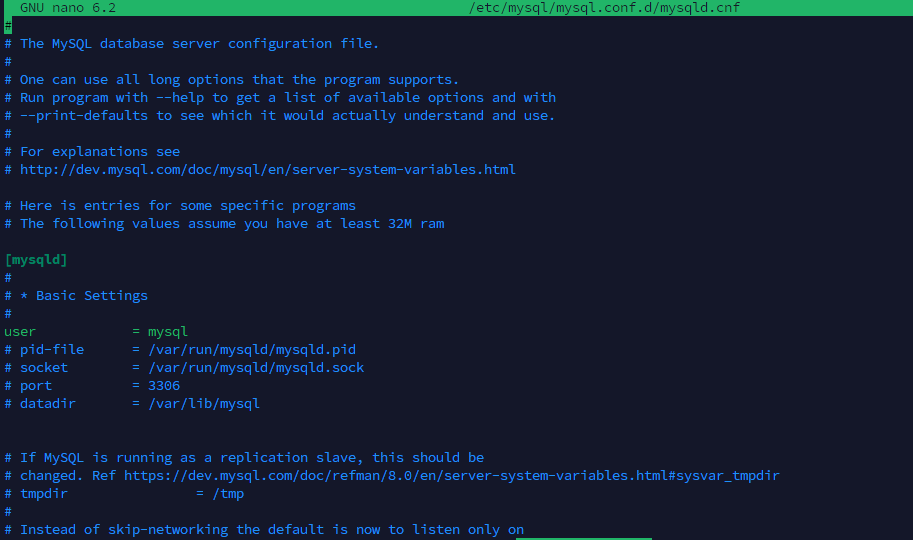
Once you have found the configuration file, open it with root privilege in a Text editor nano.
sudo nano /etc/mysql/mysql.conf.d/mysqld.cnfLook for the bind-address parameter, which is usually set to 127.0.0.1, meaning MySQL only listens to local connections. Replace this value with 0.0.0.0 allowing MySQL to listen on all network interfaces it’s available on. This setting is risky — it allows for remote access while allowing network connections into MySQL. Once you’ve edited, change that, save and close the file to apply changes.
The bind-address setting is important in configuring MySQL’s networking behavior. By default, bind-address=127.0.0.1 restricts MySQL access to local connections. Changing it to
bind-address = 0.0.0.0allow MySQL to accept connections from any IP address. For increased security, you can specify a particular IP address instead of 0.0.0.0 if only specific machines need access. This step makes MySQL available over the network, but it makes additional security work: firewall rules and IP-based access control to prevent unauthorized connections.

Tip: If you have multiple applications on different servers needing database access, using 0.0.0.0 simplifies the configuration.
After updating the configuration file, save your changes. In most tTexteditors, you can save by pressing Ctrl + O (in nano) or selecting the save option from the menu, then close the file using Ctrl + X or by exiting the editor. Ensuring that your changes are saved correctly is vital; otherwise, MySQL will continue using the previous settings. After saving, proceed to restart the MySQL service to apply the changes. If MySQL does not restart, it will fail to apply the updated configurations, and the changes made will not take effect.
To apply your configuration changes, restart the MySQL service. You can do this by running a command like
sudo systemctl restart mysql
Or, on older systems:
sudo service mysql restart
Restarting MySQL reloads the configuration file, allowing the database to recognize the new settings. Be cautious if you’re working in a production environment, as restarting MySQL can briefly interrupt database access for connected clients. Verify that MySQL restarts successfully; if there are issues, double-check the configuration file for errors before restarting again.
After restarting, it’s important to verify that MySQL is listening on the correct IP address. You can use
sudo netstat -plunt | grep mysqldSee if MySQL is bound to 0.0.0.0 or a specific IP address. This command provides a list of active network connections and listening ports, helping confirm that MySQL is configured to accept remote connections. If MySQL is still bound to 127.0.0.1, check for typos or issues in the configuration file and restart the service again. Proper verification: Make sure that remote connections will function as expected.

Allowing remote access also requires setting up user permissions in MySQL. Remote users need specific privileges, so log into MySQL as root and grant appropriate permissions. Limiting access to necessary databases and actions increased security. For instance, using commands like GRANT ALL PRIVILEGES ON database.* TO ‘username’@’host’; allows specific users access from designated IP addresses, reducing the risk of unauthorized connections. Controlling user access to permission relative to the user role reduces risk based on the least privilege principle.
To grant permissions, first, log into MySQL using root privileges with a command like
sudo mysql -u root -pEnter the root password when prompted. For administrative changes such as setting up new users or editing permissions for an existing one, you need root access itself. When logged in as root, you should be careful what you do; misuse of root permissions can change things accidentally or break your security. After logging, you go through giving certain permissions to user accounts that require MySQL database access remotely.

To allow remote access, grant specific privileges to MySQL users for secure remote connections. Two options are available: granting access to a specific IP or allowing access from any IP.
For increased security, grant access only to specific IP addresses that require it:
CREATE USER 'username'@'12.11.12.54' IDENTIFIED BY 'Nbd@1234';
GRANT ALL PRIVILEGES ON mysql.* TO 'username'@'12.11.12.54';
FLUSH PRIVILEGES;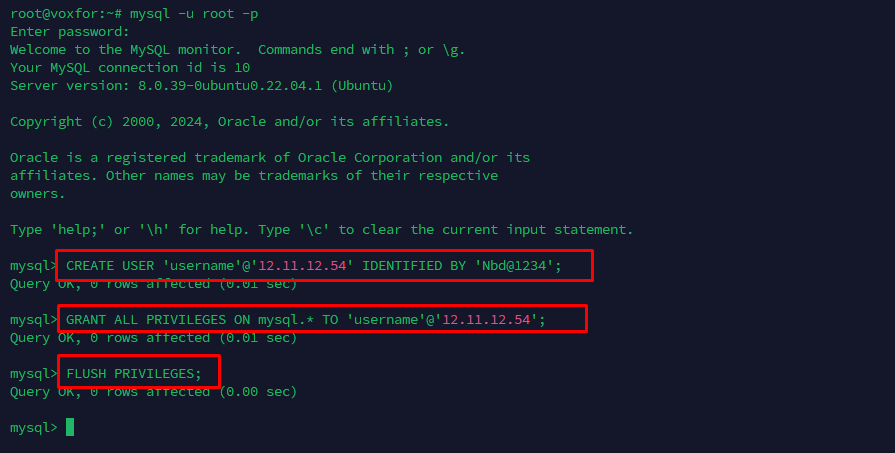
Replace:
If you want to allow a user to connect from any IP address, use % as a wildcard:
GRANT ALL PRIVILEGES ON database_name.* TO 'username'@'%' IDENTIFIED BY 'password';Since We are on the latest MySQL (version 8).
GRANT ALL PRIVILEGES ON database_name.* TO 'username'@'12.11.12.54';
After creating users and granting privileges for remote access, you need to apply these changes to Make sure MySQL recognizes the new permissions. To do this, use the command :
FLUSH PRIVILEGES;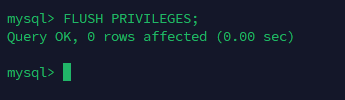
This command reloads privilege tables in MySQL, and that will be effective at once. For example, without this step, changes will not be applied until MySQL is restarted. One quick and easy way to invoke user permissions is running FLUSH PRIVILEGES, which is also helpful if you’re managing multiple users in a dynamic environment. The whole process is to ensure easy functioning with the latest security protocol of remote connections.
After completing the configuration and applying changes, you should Exit the MySQL shell to finalize the process and return to the command prompt.
exit
Press Enter to log out of the MySQL session. Exiting not only secures the session but also prevents unauthorized access by closing the database interface. It is important when working on a server accessed by multiple users. Exiting MySQL after making changes is a best practice in database management, as it reinforces security and helps prevent unintended commands from being executed in the MySQL environment.
Security Note: Avoid granting global access unless necessary. Granting access to specific IPs is generally safer.
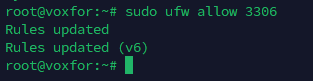
Now that MySQL is set up to listen for remote connections, it is time to set up your firewall to allow traffic on MySQL’s default port (3306). At this step we make sure remote clients can connect to MySQL server by firewall. There are many ways to enable it, depending on your operating system and your firewall utility. Here’s how to adjust firewall settings on Ubuntu with UFW, CentOS, and using iptables.
For UFW (Ubuntu)
If you’re using Ubuntu’s Uncomplicated Firewall (UFW), granting access is simple. Run the command
sudo ufw allow 3306to allow traffic on port 3306. This rule applies universally, meaning any IP can connect.
To limit access to a specific IP, use:
sudo ufw allow from remote_ip to any port 3306Replacing [remote_ip] with the allowed IP address. This added layer of security makes sure only authorized IPs can connect, reducing potential vulnerabilities from unrestricted access.

If your system uses firewalld, use:
sudo firewall-cmd --permanent --add-port=3306/tcpsudo firewall-cmd --reloadTo restrict access to a specific IP:
sudo firewall-cmd --permanent --add-rich-rule='rule family="ipv4" source address="remote_ip" port port="3306" protocol="tcp" accept'
sudo firewall-cmd --reloadIf you’re managing the firewall with iptables, add the following rule:
sudo iptables -A INPUT -p tcp --dport 3306 -j ACCEPT
To restrict access to a specific IP:
sudo iptables -A INPUT -p tcp -s remote_ip --dport 3306 -j ACCEPT
Testing Firewall Changes: To verify that your firewall settings are active, use
iptables -L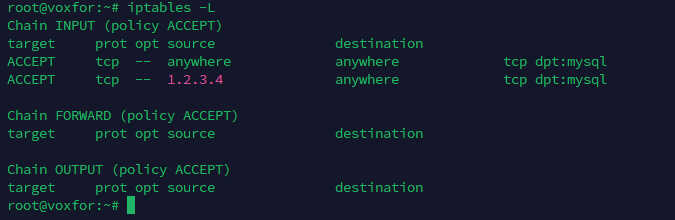
or
ufw status
With MySQL and the firewall configured, it’s time to test the remote connection.
From the remote machine, open the MySQL client and attempt to connect to the server:
mysql -u username -p -h server_ipYou’ll be prompted to enter the password. If the connection succeeds, you’ll enter the MySQL shell, confirming that remote access is working.
While Remote Connections to MySQL are useful, they can also be a security risk. Here are some best practices to keep your MySQL server secure:
MySQL users, especially with remote access, ensure they use hard to guess and lengthy passwords.
Whenever possible, grant access only to specific IP addresses rather than allowing connections from any IP. Use % sparingly, as it increases security risks.
Allowing root remote access is a major security risk. To restrict the root account to local connections:
UPDATE mysql.user SET Host='localhost' WHERE User='root';
FLUSH PRIVILEGES;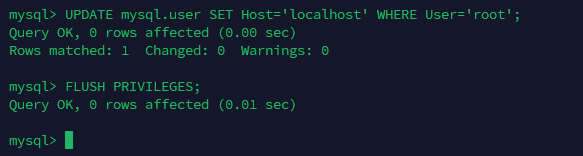
Encrypting MySQL connections with SSL/TLS protects data in transit, which is critical if your Remote Connections to MySQL server are accessible over the internet. Configure SSL in the MySQL server and enforce its use for clients by updating user privileges.
New versions of MySQL often include security patches. Keeping MySQL up to date minimizes vulnerabilities.
Remote MySQL connections can be disrupted for many reasons. Here are some troubleshooting tips:
Run the following command to verify that MySQL is bound to the correct IP address:
sudo netstat -plunt | grep mysqld
You should see 0.0.0.0:3306 or the specific IP you configured.
If the connection is refused, Make sure the firewall is configured to allow port 3306 traffic for Ubuntu use.
ufw status
for CentOS, use
firewall-cmd --list-all.MySQL logs provide valuable insights into connection issues. The error log is often found at /var/log/mysql/error.log. View it with:

Use telnet from the remote machine to test if the MySQL port is accessible:
telnet server_ip 3306
If telnet fails, there may be firewall or network issues blocking the connection.
Remote Connections to MySQL provide great advantages for a database management system. With this guide, you learn how to allow remote access to MySQL, manage permissions, secure connections, and troubleshoot common problems. It is also a good idea to constantly keep check on and update your MySQL security settings so that you know they continue to protect you.
For more advanced setups yet, you can set up MySQL replication, try out database auditing tools, or set up automatic backup and recovery systems.

Vinayak Baranwal wrote this article. Use the provided link to connect with Vinayak on LinkedIn for more insightful content or collaboration opportunities.


 Lifetime VPS Europe
 Lifetime VPS Asia
 Lifetime Hosting
 France Lifetime Dedicated Servers
 Germany Lifetime dedicated servers
 Lifetime Game Dedicated Servers
 Chicago, US
 Singapore
 Hong Kong
 Seoul, South Korea
 Amsterdem, Netherlands
 London, UK
 Zurich, Switzerland
 Sydney, Australia
 DDOS Protection
 Submit Ticket
 Full Management
 Videos and Podcasts
 Voxfor Advanced Price Management For WooCommerce
 Voxfor AI Content Summary


