Self-signed certificates are pivotal in securing connections when you need an SSL/TLS certificate quickly and without incurring costs from a Certificate Authority (CA). This resource delivers an all-encompassing explanation of creating, installing, and managing self-signed certificates, covering everything from fundamental concepts to advanced best practices. By the end, you will be equipped to confidently deploy self-signed certificates for your development environments, staging servers, or internal network use.
Inbound Marketing Strategy
Helpful tutorials attract qualified visitors, but reliable hosting keeps those readers engaged. Voxfor VPS gives growing websites the speed, uptime, and control needed to support stronger inbound marketing campaigns.
A self-signed certificate is a type of SSL/TLS credential you sign yourself rather than having it signed by a trusted third-party CA such as DigiCert or Let’s Encrypt. When a browser encounters a CA-signed certificate, it checks the issuer against its trust store. Since a known issuer does not back self-signed certificates, browsers label them untrusted by default. However, they still provide encryption, ensuring the data between client and server is secure.
Even though self-signed certificates are not ideal for public-facing websites, they are handy for local development, testing, or staging environments. They allow developers and system administrators to encrypt communications without waiting for certificate validation or spending money on official certificates.
Self-signed certificates can be a powerful tool when used properly, but you must be aware of their limitations and address the warnings that browsers display.
Self-signed certificates are not a one-size-fits-all solution. Understanding the pros and cons can help you decide whether they suit your needs.
Use self-signed certificates when you need secure channels in a controlled setting. For public-facing sites, it is best to obtain a CA-signed certificate to avoid security warnings and build visitor confidence.
PKI is the framework used to manage certificates and cryptographic keys. It governs roles, policies, and procedures that ensure a reliable trust chain.
Modern SSL/TLS certificates typically rely on strong cryptographic algorithms:
CAs validate the identity of the certificate requester. Examples include Let’s Encrypt, GlobalSign, and DigiCert. They ensure the certificate is only issued to the legitimate owner of the domain.
A typical CA-signed certificate relies on a chain of trust that begins with a root certificate, may include one or more intermediates, and ends with the end-entity certificate (the website certificate). In contrast, a self-signed certificate acts as its root and end entity.
OpenSSL is the most common command-line utility for generating keys, creating certificate signing requests (CSRs), and managing certificates. Linux and macOS usually include OpenSSL by default. You can install an OpenSSL package or rely on built-in PowerShell commands for Windows.
Installing certificates at the system or server level often requires root or administrator privileges. Ensure you have the necessary permissions to avoid errors.
While this guide covers fundamentals, having a baseline understanding of SSL/TLS, public/private keys, and certificate files makes the process smoother.
The private key is at the heart of your certificate. Keep it secure because it is used to sign the certificate and decrypt information.
openssl genrsa -out mydomain.key 2048
This command creates a 2048-bit RSA private key. Adjust the size if you need stronger encryption (e.g., 4096 bits).
A CSR is traditionally sent to a CA to request a certificate, but you will sign it in self-signed scenarios.
openssl req -new -key mydomain.key -out mydomain.csrOpenSSL prompts you for details like Country, State, Organization, and Common Name. The Common Name field should match the domain or hostname you wish to secure.

Configure the Subject Alternative Name field to secure multiple subdomains or hostnames under one certificate. This can be done via a custom OpenSSL configuration file:
[ req ]
default_bits       = 2048
distinguished_name = req_distinguished_name
req_extensions     = req_ext
prompt             = no

[ req_distinguished_name ]
C  = US
ST = California
L  = Los Angeles
O  = MyOrganization
OU = MyOrgUnit
CN = example.com

[ req_ext ]
subjectAltName = @alt_names

[ alt_names ]
DNS.1 = example.com
DNS.2 = www.example.com
Then, generate the CSR:
openssl req -new -key mydomain.key -out mydomain.csr -config openssl-san.cnf
This approach includes multiple domain names in your CSR, allowing you to use a single certificate for multiple subdomains or aliases.
Once you have your private key and CSR, you can self-sign the certificate using OpenSSL.
openssl x509 -req -in mydomain.csr -signkey mydomain.key -out mydomain.crt -days 365
You now have a self-signed certificate (mydomain.crt) and private key (mydomain.key).
Installation depends on your server or platform. Below are common examples.
a2enmod ssl
service apache2 restart
/etc/apache2/sites-available/default-ssl.conf):
<VirtualHost _default_:443>
ServerName example.com
    SSLEngine on
    SSLCertificateFile /path/to/mydomain.crt
    SSLCertificateKeyFile /path/to/mydomain.key
</VirtualHost>
a2ensite default-ssl
service apache2 restart
server {
    listen 443 ssl;
    server_name example.com;
    ssl_certificate /path/to/mydomain.crt;
    ssl_certificate_key /path/to/mydomain.key;
}
nginx -t
service nginx reload
Convert .crt and .key to a .pfx (PKCS#12) file if necessary:
openssl pkcs12 -export -in mydomain.crt -inkey mydomain.key -out mydomain.pfx
Open your browser and navigate to https://example.com. You will see a warning about the certificate not being trusted. This is normal for self-signed certificates.
openssl x509 -in mydomain.crt -noout -text
This command details the certificate’s subject, issuer, and validity period.
curl -k https://example.comThe -k (insecure) flag bypasses certificate validation warnings. Without -k, cURL will complain about an untrusted certificate.

Windows comes with PowerShell commands that can generate self-signed certificates without installing OpenSSL.
New-SelfSignedCertificate `
    -DnsName "example.local" `
    -CertStoreLocation "cert:\LocalMachine\My" `
    -FriendlyName "ExampleLocal Self-Signed Certificate"
Locate the new certificate’s thumbprint, then export it to a .pfx file:
$pwd = ConvertTo-SecureString -String "P@ssw0rd" -Force -AsPlainText
Export-PfxCertificate -Cert "cert:\LocalMachine\My\<Thumbprint>" -FilePath "C:\cert\examplelocal.pfx" -Password $pwdAlternatively, you can download a Windows-compatible OpenSSL and follow the same steps as on Linux or macOS.
Most Linux distributions include OpenSSL or make it readily available through package managers like apt or yum.
Install OpenSSL if needed:
sudo apt-get update
sudo apt-get install openssl
openssl genrsa -out mydomain.key 2048
openssl req -new -key mydomain.key -out mydomain.csr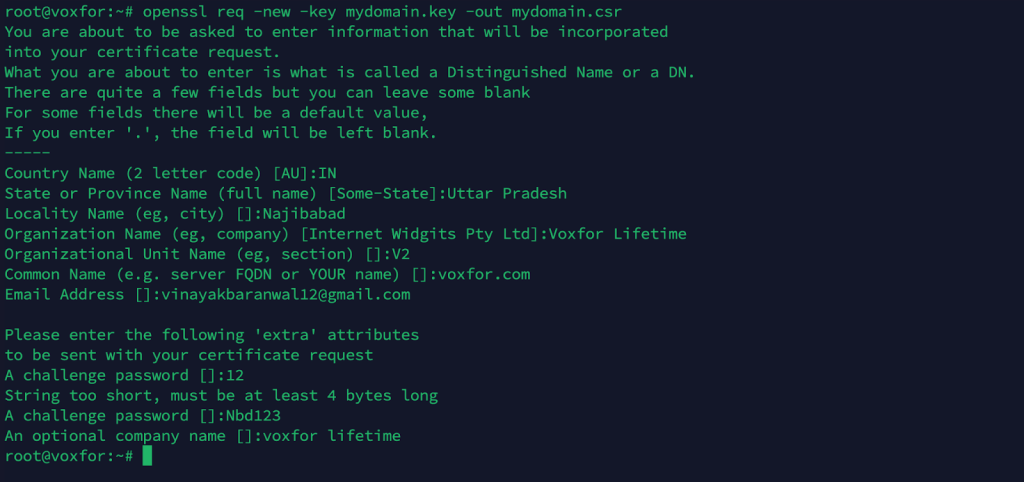
openssl x509 -req -in mydomain.csr -signkey mydomain.key -out mydomain.crt -days 365
macOS often ships with a version of OpenSSL-like tools, though you can install an updated OpenSSL via Homebrew for more recent features.
Install or update OpenSSL (optional):
brew install opensslopenssl genrsa -out mydomain.key 2048
openssl req -new -key mydomain.key -out mydomain.csr
openssl x509 -req -in mydomain.csr -signkey mydomain.key -out mydomain.crt -days 365
If you see “Permission Denied,” make sure the server user has the right to read your certificate and key. For instance, run chmod 600 mydomain.key to restrict access on Linux.
Ensure you generate an RSA or ECC key suitable for your server. If you see errors about an unsupported key, regenerate with the proper parameters.
If your server logs say the key does not match the certificate, verify you used the same key to create both the CSR and the final certificate.
Browsers often label self-signed certificates as untrusted. To remove warnings, import the certificate into the local trust store or create an exception.
Generate a new CSR and self-signed certificate with updated expiration dates.
Self-signed certificates lack a recognized chain of trust. Browsers warn users that a trusted entity cannot verify the site’s authenticity.
Regenerate the certificate before it expires. You can reuse the same private key or generate a new one. For example:
openssl req -new -key mydomain.key -out mydomain-new.csr
openssl x509 -req -in mydomain-new.csr -signkey mydomain.key -out mydomain-new.crt -days 365Self-signed certificates do not have a public revocation list. To revoke:
Self-signed certificates are valuable for creating secure communication channels when you control the environment. They offer quick deployment and cost savings and are ideal for testing, local development, or internal applications. Despite the strong encryption they provide, they lack the backing of a recognized authority, so browsers will continue to display security warnings for them. Always weigh the convenience of a self-signed certificate against the trust issues it may create.
If you manage a public-facing site that handles user data, consider a trusted CA-issued certificate to ensure visitors see your site as secure and legitimate. A self-signed certificate is an efficient and flexible solution when used in the proper context—development, staging, internal services, or proof-of-concept demos.
Follow the guidance here to generate your keys, create CSRs, sign the certificates, and install them on various platforms. Practice ongoing security vigilance: protect private keys, watch for certificate expirations, and carefully consider the environments in which self-signed certificates are deployed. Doing so will allow you to confidently harness the power of self-signed certificates while keeping your systems secure.

Vinayak Baranwal wrote this article. Use the provided link to connect with Vinayak on LinkedIn for more insightful content or collaboration opportunities


 Lifetime VPS Europe
 Lifetime VPS Asia
 Lifetime Hosting
 France Lifetime Dedicated Servers
 Germany Lifetime dedicated servers
 Lifetime Game Dedicated Servers
 Chicago, US
 Singapore
 Hong Kong
 Seoul, South Korea
 Amsterdem, Netherlands
 London, UK
 Zurich, Switzerland
 Sydney, Australia
 DDOS Protection
 Submit Ticket
 Full Management
 Videos and Podcasts
 Voxfor Advanced Price Management For WooCommerce
 Voxfor AI Content Summary


