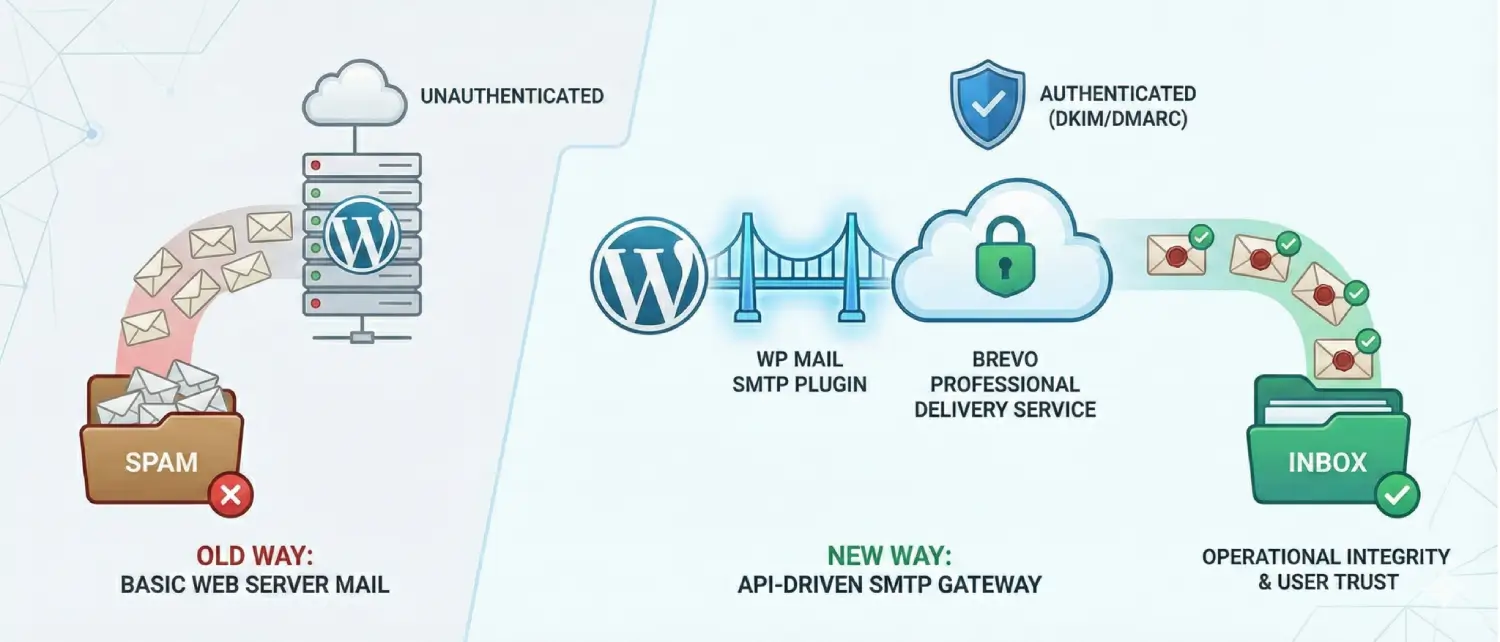
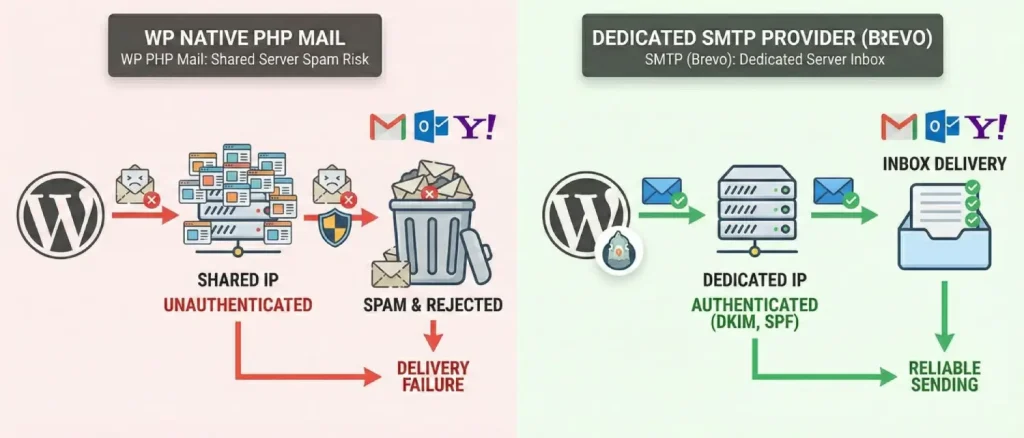
WordPress relies on a standard PHP function to handle all automated emails, including password reset links, admin alerts, and e-commerce receipts. While this native method is fine for private testing, it struggles significantly on a live, public website. It sends emails directly from your web server without the proper digital authentication needed to prove your identity. Furthermore, it usually relies on a shared IP address. This means your site’s email reputation is tied to hundreds of other websites on the same server, greatly increasing the chance your messages will be blocked or sent to spam.
As a result, major email services like Gmail, Outlook, and Yahoo often flag these unsecured, shared-server emails as spam. Worse still, their strict security filters might reject the messages entirely, causing your critical emails to vanish into thin air without ever notifying you that they failed to send. To solve this delivery nightmare, website owners need to bypass the default WordPress email setup completely. The best way to guarantee your emails reach the inbox is by connecting a dedicated email service (like an SMTP provider) to send your messages reliably.
By connecting to an SMTP provider, you reroute all your website’s outgoing emails through dedicated, high-reputation servers. This eliminates delivery failures because your messages are properly authenticated and sent from trusted sources, rather than a crowded shared server. One of the leading platforms that makes this incredibly easy to set up is Brevo, formerly known within the industry as Sendinblue.
Today, Brevo is an all-in-one marketing platform. While it is well-known for sending standard email newsletters, it also features a lightning-fast and secure system built specifically to deliver your website’s most important automated emails instantly. The company actually changed its name from Sendinblue to Brevo to reflect how much it has grown, it now offers a full suite of business tools, including customer management (CRM), SMS messaging, and sales automation. But even with all these fancy new features, its rock-solid email delivery system remains the number one reason WordPress site owners choose to use it.
Most high-quality email delivery services charge you based on exactly how many emails you send. If you are just starting, those costs can add up fast and break your budget. Brevo stands out because it offers a highly reliable, “forever-free” plan. This free tier is incredibly generous, providing more than enough daily email power to handle the needs of solo developers, freelancers, and growing small businesses without costing a single dime.
The only catch with Brevo free plan is that it has a strict daily limit: you can only send 300 emails every 24 hours. While this adds up to about 9,000 free emails a month, which is much more generous than most other services, you still need to keep that daily cap in mind. If your website suddenly gets a huge spike in activity, like a massive flash sale, a ton of new user signups, or a large newsletter blast, and tries to send more than 300 emails in a single day, Brevo will automatically block and drop any extra messages until your limit resets the next day.
It is also important to know that your 300 daily emails do not roll over. If you only send 50 emails today, you don’t get 550 tomorrow, the limit resets every 24 hours, and any unused emails are lost. Furthermore, if you do hit your daily limit, Brevo won’t automatically send the leftover emails the next day. You will need to log into your dashboard and use Brevo’s “Requeue” button to manually send out the rest of your delayed messages once your limit resets.
On the bright side, Brevo is incredibly generous when it comes to storing your audience. The free plan lets you save up to 100,000 contacts in your database without paying a dime. You can also run up to 2,000 of those contacts through automated email sequences (like a welcome series). If you get close to that automation limit, Brevo will send you a heads-up at 80%, and another warning when you hit the cap, and no new contacts can be added. Ultimately, Brevo’s strategy is simple: they give you massive storage space for free so you can comfortably grow your list on their platform. Then, as your website gets busier and you naturally need to send more than 300 emails a day, you can easily upgrade to one of their paid plans.
| Feature Parameter | Brevo Free Tier Specification | Architectural Implication |
| Daily Sending Quota | 300 emails/day | Suitable for baseline transactional needs; requires application-side throttling or queuing for larger bursts. |
| Monthly Capacity | ~9,000 emails/month | Highly competitive compared to industry averages for zero-cost solutions, providing vast utility. |
| Contact Storage | Up to 100,000 contacts | Allows extensive audience segmentation and database building without immediate financial overhead. |
| Quota Rollover | Not supported | Daily limits are hard-capped; unused capacity is permanently lost at the midnight reset. |
| Automation Limits | 2,000 unique contacts | Complex behavioral triggers are capped, prioritizing basic onboarding and transactional sequences over massive automated funnels. |
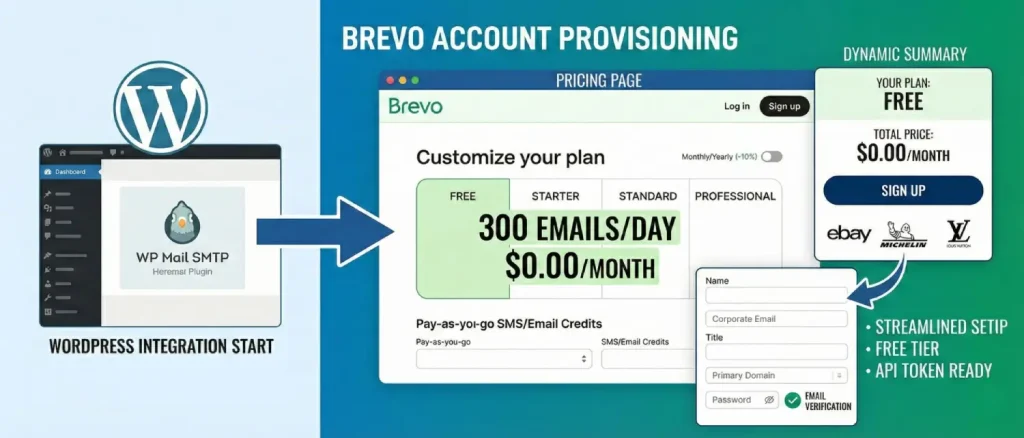
The integration process fundamentally begins outside the WordPress environment. Administrators must first provision an account on the Brevo platform, a process that has been highly streamlined to reduce friction for new integrators of both beginner and advanced skill levels.
The initial operational protocol requires navigating directly to the Brevo pricing page via the URL https://www.brevo.com/pricing. Visual analysis of the Brevo pricing interface reveals a structured, tiered matrix approach to resource allocation. The interface is headlined with the directive “Customize your plan,” accompanied by a toggle switch allowing administrators to view billing cycles on a “Monthly” or “Yearly (-10%)” basis.
When you visit Brevo’s pricing page, you will see four main plans laid out in a grid: Free, Starter, Standard, and Professional. The Free plan is easy to spot because it’s highlighted in light green. Right there in the Free column, Brevo clearly lists the limit we just talked about: “300 emails/day” for all your marketing and automated messages. If you scroll down just a bit, you will also find links to buy SMS text campaigns or extra email credits. These work on a simple pay-as-you-go basis, meaning you only pay for what you use, completely separate from the monthly subscription plans.
To the right of this tier breakdown, a dynamic “Your plan” summary box aggregates the user’s selection. For the free tier, this box explicitly states a “Total price” of “$0.00/month,” reinforcing the absence of financial commitment. The administrator must click the prominent, dark-colored “Sign up” button located at the bottom of this summary box to proceed. The interface further establishes brand authority by displaying the logos of prominent enterprise clients, including eBay, Michelin, and Louis Vuitton, signaling the infrastructure’s capacity to handle massive corporate workloads.
Upon engaging the “Sign up” mechanism, the system initiates the registration workflow. The provisioning sequence demands basic corporate and personal nomenclature. The user is required to input their name, corporate email address, organizational title, and the primary domain of the WordPress installation. Security protocols strictly require the establishment of robust cryptographic credentials, followed immediately by an out-of-band verification challenge dispatched to the provided email address. Activating this external verification link confirms ownership of the address, validates the administrator’s identity, and finalizes the instantiation of the Brevo workspace, preparing it for the generation of API tokens.
Now that your Brevo account is completely set up, it is time to connect it to your WordPress site. Our main goal here is to stop WordPress from using its default, unreliable email system. Instead, we want to create a secure, direct connection so your website sends everything straight through Brevo. To do this, all we need to do is install a simple WordPress plugin to act as the bridge between the two.
The easiest way to make this connection is by using a popular free plugin called WP Mail SMTP. It is the industry favorite for safely rerouting your emails away from WordPress and over to a secure service like Brevo. To get started, just log into your WordPress admin dashboard, go to Plugins, click Add New, and search for WP Mail SMTP. From there, simply install and activate it.
Once activated, the middleware establishes a centralized settings interface located under the primary settings hierarchy within the WordPress dashboard, typically accessed via the navigational path WP Mail SMTP » Settings » General. The configuration of this specific interface dictates the global behavior of all outbound payloads generated by the entire WordPress ecosystem, including third-party plugins.
The crux of the integration relies on selecting the appropriate transport mechanism within the WP Mail SMTP interface and subsequently authorizing it via a secure, high-entropy cryptographic token.
Scrolling down the WP Mail SMTP configuration panel, the user encounters the “Mailer” section, which visually presents a comprehensive grid of supported third-party integrations. This grid encompasses a wide array of industry providers, including native PHP, SendLayer, SMTP.com, Amazon SES, Elastic Email, Google/Gmail, Mailgun, Mailjet, MailerSend, Mandrill, Microsoft 365/Outlook, Postmark, Resend, SendGrid, SMTP2GO, SparkPost, and Zoho Mail.
Once you are in the plugin settings, scroll down to the list of email providers and click on Brevo. You might notice that Brevo has a “Recommended” badge on it (along with a couple of other providers like SendLayer and SMTP.com). This just means it is highly reliable and works perfectly with WordPress. As soon as you click the Brevo logo, the page will automatically update below it to show the exact fields you need to connect your account.
In the past, setting up a dedicated email service meant typing your actual account username and password directly into WordPress. Today, modern tools use an API key instead. Think of an API key as a highly secure, temporary digital passcode. It is a much safer method because your real login details are never actually saved on your website, keeping your core account completely protected from hackers.
To facilitate this, the WP Mail SMTP interface prompts the user for a specific API Key. The configuration panel presents a text field labeled “API Key.” Directly beneath this field, the plugin provides a hyperlinked instructional text reading: “Follow this link to get an API Key: Get v3 API Key.” A red directional arrow in the visual evidence highlights this exact link.
To get your API key, simply click the “Get v3 API Key” link in the plugin. This will safely take you out of WordPress and bring you exactly where you need to be inside your Brevo account. If you’d rather find it yourself, you can just log into Brevo, click your account menu in the top right corner, and go to Settings > SMTP & API.
Within the Brevo SMTP & API interface, the architecture differentiates between legacy SMTP credentials and modern API tokens. The administrator must ensure they are viewing the API Keys tab (frequently denoted as API Keys & MCP). The user is presented with an action button labeled “Generate a new API key”.
To get your API key, simply click the “Get v3 API Key” link in the plugin. This will safely take you out of WordPress and bring you exactly where you need to be inside your Brevo account. If you’d rather find it yourself, you can just log into Brevo, click your account menu in the top right corner, and go to Settings > SMTP & API.
A critical security mechanism is strictly enforced at this precise juncture: the interface explicitly warns the administrator that the generated API key is visible exclusively during this singular step. The administrator must immediately copy the alphanumeric string to their local device clipboard. If the modal window is dismissed before the token is copied, the key is permanently obscured by the system, and the generation sequence must be completely repeated.
Holding the active v3 API key in the clipboard, the administrator navigates back to the active WordPress tab containing the WP Mail SMTP configuration. The token is pasted into the designated API Key text field. Upon pasting, the field typically masks the key with dotted characters to prevent shoulder-surfing or unauthorized viewing by other users with dashboard access.
Right below where you pasted your API key, you will see a box for your Sending Domain. You can just type in your website’s main address (like yoursite.com). While you don’t have to fill this out to make things work, it is highly recommended. If you enter your domain, the plugin will automatically check your website’s behind-the-scenes settings and warn you if anything is set up incorrectly. Once you are done, just scroll down and click Save Settings to lock everything in.
Even though your website is now successfully connected to Brevo, your emails might still end up in the spam folder. Why? Because providers like Gmail need proof that Brevo is actually allowed to send messages using your domain name. To build that trust and guarantee your emails reach the inbox, you need to add a few special security “ID tags” (called DNS records) to your domain settings.
Returning to the Brevo dashboard, the administrator must navigate to the Senders, Domains & Dedicated IPs module, located under the primary company profile dropdown menu. Accessing the Domains tab, the user initiates the “Add a domain” sequence.2 The interface prompts for the exact root domain (e.g., example.com), after which the user selects the manual authentication pathway (“Authenticate the domain yourself”).
The Brevo system subsequently generates a matrix of unique TXT records that must be injected into the domain’s authoritative DNS zone. These records serve distinct, highly technical cryptographic functions:
The administrator must log into their specific domain registrar or web hosting provider (e.g., Cloudflare, GoDaddy, Namecheap, SiteGround) and carefully append these precise records to the DNS zone file, ensuring the Host/Name and Text/Data fields perfectly match Brevo’s output.
After you add these records to your domain, you have to play the waiting game. The internet takes a little time to update its global address book, a process that can take anywhere from a few minutes to 48 hours. Once you think enough time has passed, head back to your Brevo account and click the “Authenticate this email domain” button. Brevo will scan the internet for your new settings. If it finds them, you will see a green “Configured” or “Success” badge next to your records, meaning you are officially ready to send!
The final phase of the entire integration process involves empirical system validation. Within the WordPress dashboard, specifically inside the WP Mail SMTP plugin, the administrator navigates to the Tools module and selects the Email Test tab. A destination email address is provided, and a test payload is dispatched by clicking “Send Email”.
A success message within the WordPress UI confirms that the plugin successfully negotiated the API handshake with Brevo. Furthermore, for advanced users, analyzing the raw email headers of the received test email within the destination inbox should definitely confirm the presence of valid DKIM signatures and passing DMARC alignment, proving the infrastructural soundness of the deployment.
While Brevo presents a formidable, highly accessible, and economically viable solution, every website is different. If you run a massive online store, you are a developer who loves digging into the code, or you manage websites for multiple clients, you might need a different kind of tool. To give you the full picture, let’s look at three other popular email platforms that work perfectly with the WP Mail SMTP plugin: Mailgun, Postmark, and SendLayer.
Acquired by Sinch, Mailgun is widely recognized throughout the industry as the premier infrastructure for highly technical deployments, complex programmatic email manipulation, and massive-scale routing. Unlike Brevo, which balances marketing automation suites with transactional tools, Mailgun is engineered almost exclusively for developers interacting with RESTful APIs, inbound parsing mechanisms, and complex routing architectures.
Economic Parameters and Trial Structures: Mailgun free options have changed a lot over the years. Right now, their basic free plan is quite limited, only allowing you to send 100 emails a day. However, their real value is in their “Foundation Trial.” This gives you 30 days to send up to 50,000 emails for free so you can see if the service is right for you. Just keep in mind that once those 30 days are up, the plan automatically switches to a paid subscription of $35 a month.
Architectural and Security Advantages: Mailgun is excellent if you have a team helping you manage your website. It uses a “Role-Based” security system, which is a fancy way of saying you can give each person exactly the access they need, and nothing more. For example, you can give your accountant access to just the billing and invoices, while your developer gets access to the technical “keys” they need to link the site. This keeps your account safe because a team member can’t accidentally delete a critical setting or see private information they don’t need for their job.
Furthermore, Mailgun offers unparalleled inbound routing capabilities. For advanced WordPress setups that require parsing incoming emails (e.g., a custom support ticketing system where users reply directly to an email notification), Mailgun can intercept the incoming payload, parse the complex MIME data, and execute a POST request directly to a WordPress webhook as a cleanly structured JSON object.
| Mailgun Feature Matrix | Specification Details |
| Entry Level Pricing | $0/mo (100 emails/day limit) |
| Trial Capabilities | 30-Day Foundation Trial (50,000 emails/month allowed) |
| Log Retention | Scales from 1 day (Free tier) up to 30 days (Scale plan) |
| Access Control Security | 5-tier RBAC system (Admin, Developer, Support, Billing, Analyst) |
| Inbound Routing | Advanced programmatic support for receiving, parsing, and webhooking incoming email |
Integration Context for WordPress: Connecting Mailgun to WordPress is a lot like the Brevo process, you just copy an API key into your plugin settings. However, there is one major catch: Mailgun is much stricter about security. While some platforms might let you send a few test emails right away, Mailgun will flat-out refuse to send anything until you’ve officially verified your website. This means you must add those special security “ID tags” (DNS records) to your domain settings before you can even get started. This extra step makes it a little more complicated for absolute beginners compared to Brevo.
Acquired by ActiveCampaign, Postmark occupies a unique, highly respected niche in the deliverability sector by aggressively prioritizing transactional email speed, latency reduction, and reliability over mass marketing capabilities. Postmark’s defining architectural philosophy relies on strictly segregating different types of traffic to protect the pristine reputation of its delivery IPs.
Economic Parameters and Developer Tiers: Postmark does things a little differently. They don’t have a typical “free plan” for your live website. Instead, they offer a “Developer” account that is free forever, but limits you to just 100 emails per month. This is designed for builders to test out their website’s features—like password resets and welcome emails, before they actually launch. Once your site is live and needs more power, their paid plans start at $15 a month for up to 10,000 emails.
Architectural Innovations: Postmark defining innovation is the mandatory implementation of “Message Streams.” Recognizing that bulk promotional emails inherently generate more spam complaints than standard password resets or receipts, Postmark forces administrators to segregate these payloads into distinct infrastructural streams (e.g., a “Transactional” stream utilizing one set of IPs, and a “Broadcast” stream utilizing another). This isolation ensures that a poorly performing marketing campaign cannot bottleneck, delay, or damage the deliverability of critical, time-sensitive system alerts.
Furthermore, Postmark is renowned for its granular data retention policies, allowing administrators on Pro tiers to maintain comprehensive logs of message activity and full payload content for up to 365 days. This is a critical feature for financial, healthcare, or legal organizations subject to strict compliance and auditing regulations.
| Postmark Feature Matrix | Specification Details |
| Entry Level Pricing | $0/mo Developer Tier (100 emails/month limit); Paid starts at $15/mo for 10k emails |
| Traffic Segregation | Mandatory use of distinct Message Streams (Transactional vs. Broadcast traffic isolation) |
| Data Retention | 45-day default retention; highly customizable up to 365 days on Pro tiers |
| Deliverability Speed | Industry-leading sub-second delivery targets prioritized |
| Account Approvals | Strict manual review process for new accounts to violently prevent network abuse |
Integration Context for WordPress:
Postmark integrates seamlessly with the WP Mail SMTP plugin via its proprietary API. However, the setup process is notably more rigorous than its competitors. Because Postmark actively guards its infrastructural reputation, new accounts are subject to stringent manual approval processes, and administrators must meticulously verify both the sending domain and individual sender signatures before the system will authorize any API handshakes from WordPress.
SendLayer is one of the newest players on the scene, and it was built specifically to work perfectly with WordPress. In fact, it’s actually made by the same team that created the WP Mail SMTP plugin itself! Because they are part of the same family, the setup is incredibly smooth, almost like they were “made for each other.” It’s a great default choice if you want the easiest, most stress-free installation possible.
Economic Parameters and Sandbox Limits: SendLayer is designed to be very affordable for small businesses and people new to managing websites. When you first sign up, you get a free trial that lets you send up to 200 emails. It’s important to note that this is a one-time gift to help you test your setup, not a monthly allowance. Once you’ve used up those 200 emails, their basic “Starter” plan is only $5 a month for up to 1,000 emails. It is one of the cheapest ways to get professional, reliable email for a small website.
Architectural Advantages and Rate Limiting Mechanics: SendLayer intentionally sacrifices some of the hyper-technical developer tools found in platforms like Mailgun to prioritize extreme usability, deeply insightful analytics, and streamlined bounce management directly within its dashboard. The interface provides immediate, intuitive visibility into blocklist statuses, open rates, and click tracking without requiring the administrator to execute advanced API queries.
A critical technical consideration for SendLayer is its implementation of stringent rate-limiting algorithms, which are engineered to logically prevent abusive bursts and maintain global network stability. Even on paid tiers, the platform enforces strict velocity governors. For instance, the $5 Starter plan caps dispatch velocity at a maximum of 50 emails per minute, 300 per hour, and 500 per day.
Administrators attempting to process a massive queue of newsletter subscribers simultaneously may encounter “email sending limit” errors within WordPress. Overcoming this requires either implementing complex application-side throttling to slow the outbound queue or upgrading to the Business or Growth tiers, which significantly relax these temporal restrictions (e.g., the Growth plan permits up to 200 emails per minute).
| SendLayer Feature Matrix | Specification Details |
| Entry Level Pricing | Free Trial (200 emails total limit); Paid tiers start at $5/mo for 1,000 emails |
| Log Retention Policies | 3 days (Starter), 15 days (Business), 30 days (Growth) |
| Rate Limiting (Starter Plan) | Maximum allowed velocity: 50/minute, 300/hour, 500/day |
| Ecosystem Synergy | Deeply integrated UI/UX with WP Mail SMTP due to shared corporate lineage |
| Support Paradigm | VIP Support accompanied by a strict 14-day zero-risk money-back guarantee |
When building your email setup on a free tier, it’s important to stay alert. The costs of maintaining these high-end email servers are constantly rising, and providers often adjust their free offerings to keep up with the market. These sudden changes, like a drop in daily email limits, can instantly break your website’s ability to send critical messages. As your business grows, consider moving to a paid plan to ensure your email delivery remains stable and unaffected by market shifts.
A great example of how quickly things can change is MailerSend. They used to be a favorite for developers because they offered 3,000 free emails every month. However, they recently decided to stop offering that free deal. Now, if you want to stay on that plan, you have to pay a monthly fee. If you don’t pay, they move you to a much smaller “free” plan that only allows 500 emails a month (and no more than 100 in a single day). To make matters worse, they also started adding a “Delivered with MailerSend” advertisement to the bottom of every email you send.
This sudden change at MailerSend is exactly why Brevo is such a winner. While other companies are cutting back, Brevo has stayed consistent with its offer of 300 free emails every single day. That adds up to about 9,000 emails a month! For anyone running a website on a tight budget, this kind of reliability is gold. It means you can build your site with confidence, knowing you won’t wake up one morning to find your email system broken by a sudden price hike.
Solving the common problem of WordPress emails ending up in spam requires a change in how your website sends data. Instead of relying on your web server’s basic email function, you should connect your site directly to a professional delivery service like Brevo. Using the WP Mail SMTP plugin to bridge these two systems ensures your emails are digitally signed and
Following these steps, from setting up your Brevo account to adding those final security signatures, is the best way to make sure your website’s emails actually work. By moving away from the old way of sending mail and using this modern API method, you’re giving your site a “gold standard” setup. Whether it’s a new user signing up or a customer getting a receipt, you can rest easy knowing your messages are skipping the spam folder and landing right where they belong: the inbox.
Ultimately, establishing an API-driven, authenticated SMTP gateway is no longer merely a recommended optimization; it is a non-negotiable prerequisite for maintaining operational integrity and user trust for any WordPress environment deployed in the modern digital landscape.

Hassan Tahir wrote this article, drawing on his experience to clarify WordPress concepts and enhance developer understanding. Through his work, he aims to help both beginners and professionals refine their skills and tackle WordPress projects with greater confidence.


 Lifetime Hosting
 France Lifetime Dedicated Servers
 Germany Lifetime dedicated servers
 Lifetime Game Dedicated Servers
 Chicago, US
 Singapore
 Hong Kong
 Seoul, South Korea
 Amsterdem, Netherlands
 London, UK
 Zurich, Switzerland
 Sydney, Australia
 DDOS Protection
 Submit Ticket
 Full Management
 Videos and Podcasts
 Voxfor Advanced Price Management For WooCommerce
 Voxfor AI Content Summary


