OpenClaw is a free, open-source autonomous AI agent that runs on your machine or a server and connects to the messaging apps you already use every day. Rather than just answering questions like a traditional chatbot, OpenClaw takes real action on your behalf, executing shell commands, automating browser tasks, reading and writing files, managing your calendar, and sending emails, all triggered by a simple text message. It gained over 68,000 GitHub stars within weeks of its launch in early 2026, making it one of the fastest-growing open-source repositories in GitHub history.
What makes OpenClaw genuinely unique is its combination of three properties most AI agents lack: it is fully MIT-licensed and open-source, local-first (all memory and data stored as plain Markdown files on your own machine or server), and autonomously scheduled through a heartbeat daemon that acts without prompting. Created by PSPDFKit founder Peter Steinberger, OpenClaw bridges the gap between powerful AI models and the tools and data you already use.
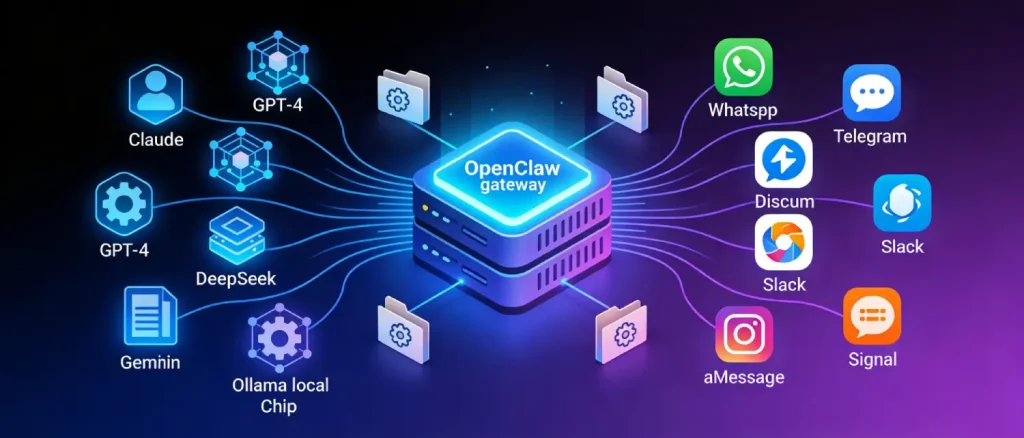
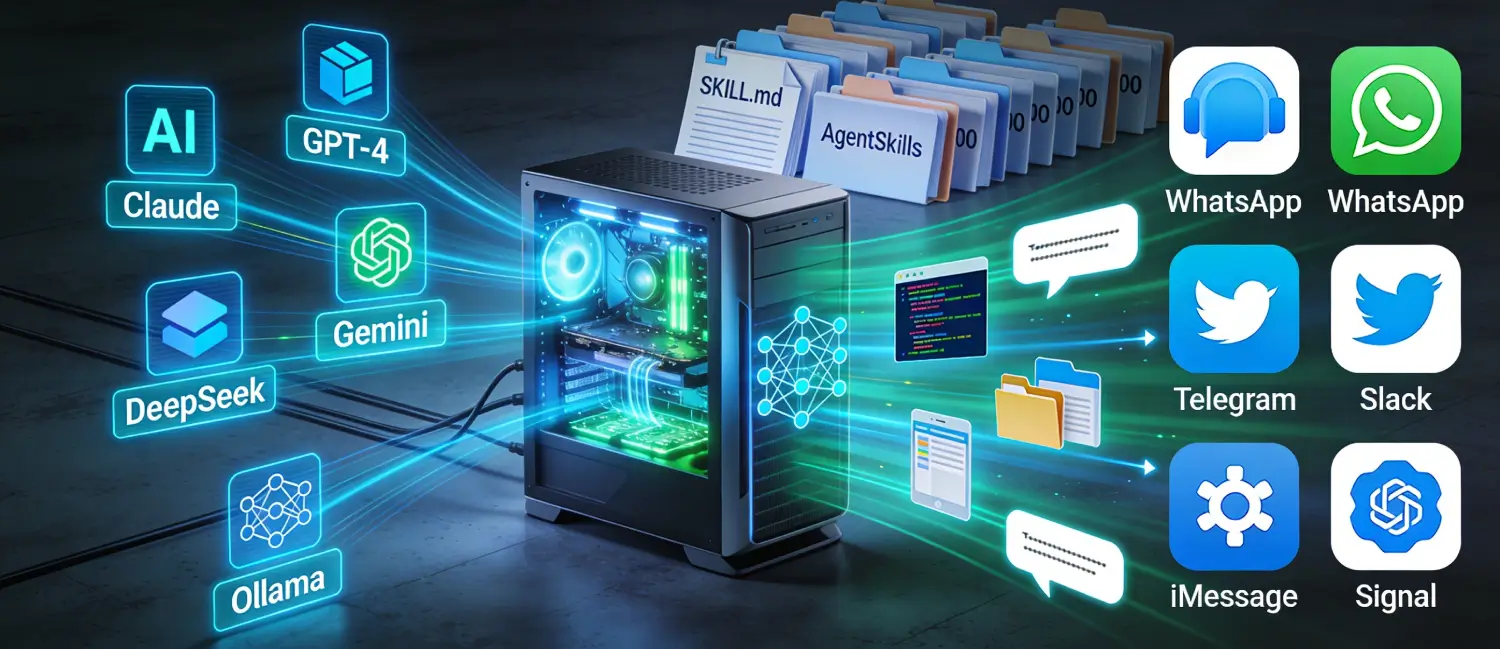
OpenClaw operates as a local gateway that provides AI models, including Claude, GPT-4, DeepSeek, Gemini, or local models like Ollama, with direct access to your system resources. You interact with it through your preferred messaging platform: WhatsApp, Telegram, Discord, Slack, iMessage, or Signal. OpenClaw listens for your messages, decides on the best course of action using a connected LLM, and then executes tasks autonomously on your behalf.
Its skills system is one of its most powerful features. Skills are stored as directories that hold a SKILL. Metadata and instructions in an MD file, where anyone can create, share and install their own capabilities. Using more than 100 prebuilt AgentSkills, customers can expand OpenClaw to execute shell commands, manage file systems, web automation, and so on. Configuration history and interaction history are localized, allowing constant and adaptive behavior across sessions.
OpenClaw’s versatility makes it applicable across personal productivity, business workflows, DevOps, content creation, and research. Below are the most impactful categories of use.
OpenClaw is an unremitting operational assistant that operates in any channel of messaging, enabling users to execute tasks remotely without having to touch their workstation. Being off-desk, a developer can send a message to their OpenClaw instance to retrieve logs, execute scripts, or monitor file outputs. Practical examples include:
OpenClaw has seen rapid adoption among small businesses and freelancers for automating lead generation workflows, including prospect research, website auditing, and CRM integration. Content marketers can leverage it for:
For developers and system administrators, OpenClaw transforms routine technical tasks into automated pipelines:
OpenClaw browsing capabilities, combined with local execution, enable powerful research-driven workflows:
For users and businesses that prioritize data privacy, OpenClaw Ollama integration enables fully local AI workflows that never send data to external cloud APIs. Browser automation use cases include form filling, web scraping, data extraction, and navigating multi-step web workflows entirely on autopilot.

Running OpenClaw on a Virtual Private Server (VPS) rather than a local machine offers significant advantages:
For OpenClaw, a minimum of 2 vCPU cores and 2 GB RAM is recommended for smooth operation.
The first step is selecting a reliable VPS provider with the right specifications for OpenClaw. For an easy, hassle-free setup, including technical support to get OpenClaw running quickly, Voxfor VPS is an excellent choice. Voxfor offers high-performance managed VPS plans on AMD EPYC processors with SSD NVMe storage, 10Gbps uplink speeds, and a 24/7 expert support team available via email, live chat, or phone to assist with your OpenClaw installation and configuration.
Recommended Voxfor VPS plans for OpenClaw:
| Plan | CPU | RAM | Storage | Bandwidth | Monthly Price |
| VPS 1 | 2 AMD | 2 GB | 40 GB SSD | 20TB 10Gbps | $35/mo |
| VPS 2 | 2 Intel | 4 GB | 40 GB SSD | 20TB 10Gbps | $50/mo |
| VPS 3 | 3 AMD | 4 GB | 80 GB SSD | 20TB 10Gbps | $55/mo |
| VPS 4 | 4 Intel | 8 GB | 80 GB SSD | 20TB 10Gbps | $65/mo |
| VPS 5 | 4 AMD | 8 GB | 160 GB SSD | 20TB 10Gbps | $90/mo |
For most OpenClaw setups, VPS 2 or VPS 3 provides a comfortable balance of performance and cost. Voxfor also offers Lifetime VPS plans starting from a one-time payment of $250, meaning you pay once and own the server indefinitely, a significant long-term saving for always-on OpenClaw deployments.
Once you purchase your Voxfor VPS plan, you will receive login credentials and access to your server control panel. Voxfor technical support team is available 24/7 and can assist you with the entire OpenClaw setup process if needed.
After your VPS is provisioned, connect to it using SSH from your terminal:
ssh root@your-server-ipReplace your-server-ip with the IP address provided by Voxfor in your welcome email.
Before installing OpenClaw, update your server package list to ensure all dependencies are current:
sudo apt update && sudo apt upgrade -yRun the official OpenClaw installer script. This automated script detects your operating system, installs Node.js 22, installs prerequisite packages (git, curl, gnupg, ca-certificates), installs OpenClaw globally, and launches the onboarding setup:
curl -fsSL https://openclaw.ai/install.sh | bashThe onboarding process presents a text-based user interface that walks you through initial configuration. Read through each prompt carefully before responding.
During onboarding, when prompted for Gateway auth, press ENTER to auto-generate a secure token. This token is what you will use to access the OpenClaw Control UI dashboard through your browser. Copy and save this token securely, you will not be able to retrieve it later.
OpenClaw works with your choice of AI model. Configure your preferred provider and API key during setup:
Connect OpenClaw to your preferred messaging platform so you can send it commands from anywhere. Popular options include:
To ensure OpenClaw restarts automatically after server reboots, set it up as a systemd service:
sudo nano /etc/systemd/system/openclaw.servicePaste the following configuration:
[Unit]
Description=OpenClaw Gateway (always-on)
After=network-online.target
Wants=network-online.target

[Service]
User=ubuntu
WorkingDirectory=/home/ubuntu
Environment=PATH=/home/ubuntu/.npm-global/bin:/usr/local/sbin:/usr/local/bin:/usr/sbin:/usr/bin:/sbin:/bin
ExecStart=/home/ubuntu/.npm-global/bin/openclaw gateway --bind loopback --port 18789 --verbose
Restart=always
RestartSec=5

[Install]
WantedBy=multi-user.target

Enable and start the service:

sudo systemctl daemon-reload
sudo systemctl enable openclaw
sudo systemctl start openclawOpenClaw runs on port 18789 but is bound to localhost for security. Create an SSH tunnel from your local machine to access the web interface:
ssh -L 18789:localhost:18789 root@your-server-ipThen open http://localhost:18789 in your browser and enter your gateway token to log in.
For production deployments, configure a domain and SSL certificate for secure access without SSH tunneling:
sudo apt install nginx -ysudo apt install certbot python3-certbot-nginx -y && sudo certbot --nginx -d yourdomain.comThis makes your OpenClaw instance accessible at https://yourdomain.com from any browser.
Why Choose Voxfor VPS for OpenClaw?
Voxfor VPS is particularly well-suited for hosting OpenClaw for several reasons:
Before going live with your OpenClaw VPS deployment, follow these essential security steps:
OpenClaw represents a significant leap forward in personal and business AI automation. Its open-source, local-first architecture, combined with autonomous scheduling, extensible skills, and multi-platform messaging integration, makes it one of the most powerful and flexible AI agents available today. Hosting it on a reliable VPS ensures it runs 24/7, stays secure, and scales with your workload.
For a smooth OpenClaw deployment with minimal friction, Voxfor VPS offers the right combination of performance, managed hosting options, lifetime plans, and dedicated technical support to get your OpenClaw instance up and running and keep it running reliably.

Hassan Tahir wrote this article, drawing on his experience to clarify WordPress concepts and enhance developer understanding. Through his work, he aims to help both beginners and professionals refine their skills and tackle WordPress projects with greater confidence.


 Lifetime VPS Europe
 Lifetime VPS Asia
 Lifetime Hosting
 France Lifetime Dedicated Servers
 Germany Lifetime dedicated servers
 Lifetime Game Dedicated Servers
 Chicago, US
 Singapore
 Hong Kong
 Seoul, South Korea
 Amsterdem, Netherlands
 London, UK
 Zurich, Switzerland
 Sydney, Australia
 DDOS Protection
 Submit Ticket
 Full Management
 Videos and Podcasts
 Voxfor Advanced Price Management For WooCommerce
 Voxfor AI Content Summary


