
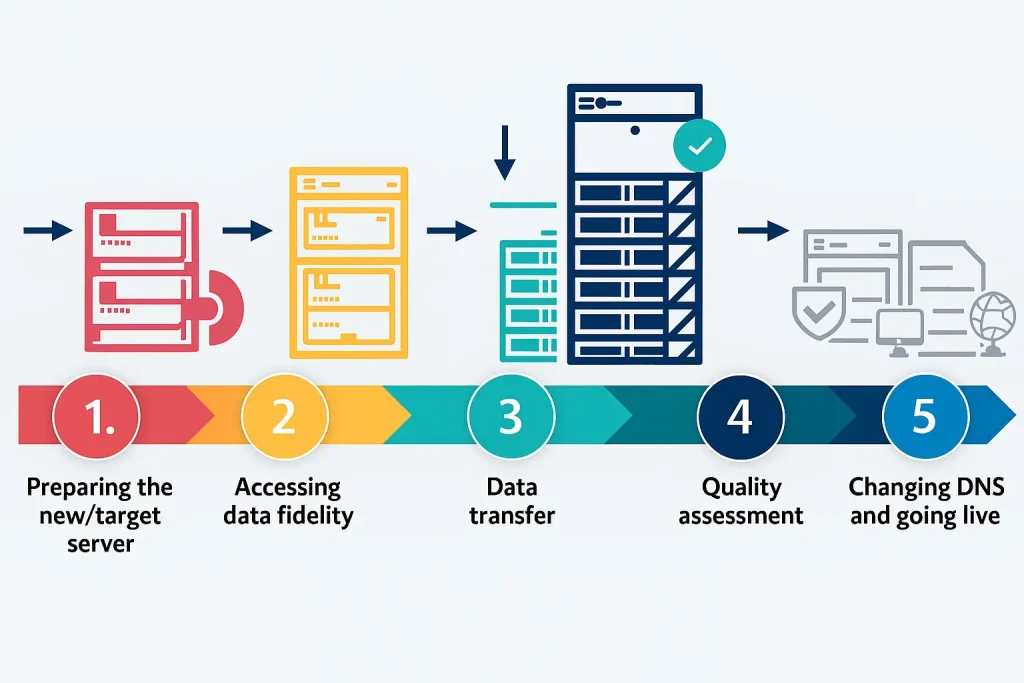
WordPress migration is a critical process that requires careful planning and execution to ensure a smooth transition from one environment to another. Whether you’re moving to a new hosting provider, changing your domain, or upgrading your WordPress installation, following a comprehensive post-migration checklist will help you avoid costly mistakes and maintain your search engine rankings and site performance.
A WordPress post-migration checklist includes all the verification procedures and optimization processes that you should complete after changing your server/domain. This phase is important since it directly influences what your site does, how the site is experienced and whether it can be seen in search engines. Loss of traffic, low SEO performance and poor user experiences are some of the consequences of broken links, missing redirects, problems with the SSL certificate, or incompatible plugins. Post-migration issues are possible.
Post-migration work aims at making sure that every feature of your WordPress site functions perfectly on its new platform without losing the search positions that you have worked so hard to reach, and having your data intact.

Before you proceed with migration, proper preparation is essential. This foundational phase sets the stage for a successful transition.
Record the current metrics of SEO prior to migration. Google Search Console and Google Analytics are examples of tools used to record your existing search engine rankings, organic traffic, and key performance indicators. Using this starting point data, you can gauge the effect of migration and immediately recognize any ranking changes or traffic loss that takes place after migration. Make screenshots of significant measures and keep a detailed document of your existing URL hierarchy and internal connection layout.
This is to be done when you have a complete copy of your original site. This comprises of your WordPress database, your web files, your site plugins, themes and media assets. Make sure you have a full point of restoration by using backup tools or backup migration plugs on your hosting account such as Duplicator or All-in-One WP Migration. To guard against loss of data, make several copies of this backup; one in your hosting account and another on a local computer.
Conduct a comprehensive search engine optimization research on your current site prior to migration. Find out issues with SEO that you can resolve on the new site, and make sure you do not bring the technical problems with you. Visit your site with tools such as Screaming Frog or Ahrefs to crawl and capture all URLs, internal links, metadata, and structured data. It is an audit that will develop a URL inventory, which will be necessary in configuring appropriate redirects.
Develop a comprehensive map of how URLs will change during migration. If you’re changing domain names or URL structure, document exactly how each old URL should map to its new counterpart. This mapping becomes critical for implementing 301 redirects that preserve SEO equity and guide users to the correct pages on your new site.
Proper preparation of your new hosting environment ensures a smooth migration process.
Choose a hosting company that suits your needs in WordPress, such as the support of the required version of PHP, compatibility with databases, and hardware. Make sure that your selected hosting plan offers services such as staging environments, automatic backup, as well as the ability to install WordPress with a single mouse click. Voxfor managed WordPress hosting with an in-built migration facility.
Pre-migration: Before moving to your live server, you can set up a staging or testing environment where you can test everything to ensure it is working properly. Most hosting companies also provide staging, as it replicates the exact copy of your production site in a parallel environment. Alternatively, you may employ the hosts file method to map your new domain to your staging server for local testing. Such a staging environment enables you to test the full migration process without testing your live site.
Prior to the migration, upgrade your WordPress core, all the plugins and themes to the latest version. This will allow your new server not to have compatibility problems, and it will have the most recent security patches. But do not update the major theme or list of plugins just before migration; update in a staging environment first to detect possible conflicts.
Disable security plugins, caching plugins, and redirect plugins on your original website before migration. These can interfere with the migration process and cause data transfer issues. You’ll reactivate and reconfigure them after the migration is complete.
The actual migration process involves transferring your data and files to the new environment.
You have three primary options for WordPress migration: automated migration services provided by your hosting company, migration plugins, or manual migration. Migration plugins like Duplicator, All-in-One WP Migration, and WP Migrate DB automate most of the process and are suitable for most users. Manual migration involves exporting your database via phpMyAdmin, transferring files via SFTP, and reconfiguring your WordPress installation—this method provides more control but requires technical expertise.
In the case of manual migration, go to phpMyAdmin on your current hosting account and export your WordPress database in the form of an SQL file. Eliminate superfluous tables in order to decrease the file size. At the same time, you will have to download all the WordPress files, including your wp-content folder containing themes and plugins, over SFTP or the file manager of your hosting company. Make sure that you are downloading the full WordPress directory structure.
On your new hosting server, create a fresh MySQL database with a unique name and associated user account. Record these credentials as you’ll need them to configure your WordPress installation. Ensure your database user has all necessary privileges for WordPress to function properly.
Import your exported SQL file into the new database using phpMyAdmin on your target server. Upload all your WordPress files, themes, plugins, media, and configuration files—to the public_html or www directory on your new server. Ensure the directory structure remains intact during the transfer process.
Edit the wp-config.php file to include your new database name, username, and password. This critical step ensures WordPress can connect to the migrated database on your new server. Also verify your WordPress URL settings in the wp-config.php file match your new domain.
Before updating your DNS records, use the hosts file technique to map your new domain to your new server. This allows you to access and test your migrated site without publicly pointing your domain to the new server. On Windows, edit C:\Windows\System32\drivers\etc\hosts; on Mac or Linux, edit /etc/hosts. Add an entry like: 123.456.78.90 yourdomain.com www.yourdomain.com (using your new server’s IP address).
After migration, comprehensive testing ensures everything functions correctly before going live.
Test all essential WordPress features, including the dashboard login, post creation and editing, page management, and media uploads. Verify that your theme displays correctly and all layout elements render properly. Test your navigation menus, sidebars, and any custom widgets to ensure they function as expected.
Test your posts and pages by looking at them to make sure that they show up with no formatting problems, no missing images, and no broken pieces of content. Ensure featured pictures, galleries, and embedded media are loaded correctly. Test your contact forms, comment boxes and any other interactive features to verify that data is correctly submitted.
Check whether all the installed plugins are working in the new environment. Test your theme compatibility with your version of WordPress and make sure that all the theme-specific features are functioning as intended. In case of difficulties, apply the debugging technique: change to a default theme of WordPress and turn off all the extensions to determine the source of the problem. Afterward, turn on plugins to identify conflicts.
Make sure the version of PHP on your server is high enough to support your installed theme and the installed plugins. Certain plugins have minimum requirements regarding the version of PHP, and malfunctions may arise due to incompatibility. Make sure your version is correct by examining your plugin documentation or by using the WordPress Plugin Directory.
analyse the whole of your migrated site using tools such as Screaming Frog or Dead Link Checker to find out if there are any broken internal links. Check that every image, PDF, and downloadable file is working and visible. Select any custom post type and custom field to be sure that all information is moved.
In case you are moving to HTTPS, ensure that your certificate of authentication is installed correctly and accepted by browsers. Look for warnings of mixed content, where not all resources are loaded using HTTPS. Find and correct any mixed content problems using browser developer tools. You should also ensure that your site works in more than one browser and that the display of the SSL certificate is correct, and that all browsers trust it.
Test your website on various devices, including smartphones, tablets, and desktops. Use responsive design testing tools like Google Mobile-Friendly Test to ensure your site displays correctly across all screen sizes. Pay attention to touch interactions, button functionality, and layout adjustments on smaller screens.
Test your site with all major browsers: Chrome, Firefox, Safari, and Edge. Ensure that the CSS styling is in place and that JavaScript functionality is up and running as intended, and that everything that interacts with other web browsers works as intended. Take particular note of any custom features or animations that can act in a particular way in certain browsers.

There are certain technical and strategic measures that you need in order to preserve and maintain your SEO performance in the course of migration.
If your URL structure changed or you moved to a new domain, set up 301 (permanent) redirects from every old URL to its corresponding new URL. This is critical for preserving SEO equity and preventing 404 errors. You can implement redirects using your hosting provider’s server configuration, your WordPress site’s .htaccess file, or a WordPress redirect plugin like Redirection. The redirect map you created during pre-migration planning guides this process.
Generate a fresh XML sitemap for your new WordPress installation, your SEO plugin or tools like Yoast SEO or RankMath can do this automatically. Submit this new sitemap to Google Search Console and Bing Webmaster Tools. If you’re using the same domain, update your existing sitemap; if changing domains, submit the new sitemap as a new property.
When you have changed domains, there is a Change of Address tool in Google Search Console, which you can use to remind Google about the migration. This sends a message that your content has been relocated permanently, and it assists Google in transferring your search power to the new site. This is done by choosing the new property in Google Search Console, going to the settings and selecting Change of Address.
In the initial few weeks after migration, keep a close eye on the Google Search Console data. Keep an eye on your coverage reports and verify that crawl statistics show that Googlebot can reach your new site, and use the Performance report to keep track of changes in ranking. When you find coverage or major decreases in ranking, deal with it now.
While redirects handle old URL mapping, update internal links within your content to point directly to new URLs instead of relying on redirects. This improves site efficiency and user experience. Use find-and-replace functionality or plugins like Better Search and Replace to update links en masse.
Ensure that structured data (Schema markup) is transferred correctly and that rich snippets display properly in search results. Use the Rich Results Test in Google Search Console to verify your structured data is valid and recognized by Google. Correct any structured data errors or warnings.
Check for Duplicate Content IssuesIn the initial few weeks after migration, keep a close eye on the Google Search Console data. Keep an eye on your coverage reports and verify that crawl statistics show that Googlebot can reach your new site, and use the Performance report to keep track of changes in ranking. When you find coverage or major decreases in ranking, deal with it now.
After migration, optimize your website’s performance to maintain user engagement and search rankings.
Diagnostics: Utilize such tools as Google PageSpeed Insights, GTmetrix, and WebPageTest to check your site’s loading speed using the new server. Measure these metrics against your pre-migration baseline in order to determine any performance degradation. Site speed is a ranking parameterr; hence any tangible slowing of speed should be rectified at once.
Install and configure a caching plugin like WP Super Cache or W3 Total Cache to improve page load times. Enable server-side caching if your hosting provider offers it. Browser caching directives help repeat visitors experience faster load times.
Look through your pictures and media files to make sure that they are optimized to be delivered to the web. It is also possible to use image optimization extensions, such as Smush or Imagify, to compress files without losing their quality. Use the latest image formats, such as WebP, to reduce loading time.
Enable GZIP compression on your server to reduce the size of transferred files. Most hosting providers offer this with a simple configuration change or through caching plugins.
Secure your newly migrated WordPress site with essential security measures.
Change your database password from the default migration credentials to a strong, unique password. Update wp-config.php with the new credentials and ensure only authorized users have database access.
Reactivate your security plugins and configure them for your new environment. Set up firewalls, intrusion detection, and security scanning. Configure login protection, two-factor authentication, and backup schedules.
If you don’t have it set up already, make sure you have the proper setup of the https. Most hosting providers provide free SSL certificates through Let’s Encrypt. Install your certificate and change the URL of your WordPress site to https, and implement the redirects to https.
Check file and folder permissions are as they should be. WordPress directories should usually have 755 permissions, and files should have 644 permissions. Incorrect permissions can lead to security vulnerabilities.
Before considering your migration complete, perform these final checks.
Check file and folder permissions are as they need to be. WordPress directories should normally have 755 permissions, and files should have 644 permissions. Incorrect permissions may cause security vulnerabilities.
Watch your analytics closely during the first two weeks post-migration. Monitor organic traffic, user behavior, bounce rates, and conversion metrics. If you notice significant changes, investigate and address the underlying causes.
Create a comprehensive backup of your newly migrated site now that it’s configured and tested. This backup represents your successful post-migration state and provides a restoration point if issues arise.
Create documentation of your migration process, including specific tools used, changes made, redirects implemented, and any issues encountered and resolved. This documentation proves invaluable if you need to migrate again in the future.
If users encounter broken links, verify that your 301 redirects are properly configured. Check your .htaccess file or redirect plugin settings. Use crawl tools to identify all broken links and systematically fix them.
If WordPress can’t connect to your database, verify your wp-config.php credentials are correct and match your new database settings. Ensure your database user has proper privileges and that your hosting provider hasn’t blocked database connections.
If plugins don’t function after migration, check for PHP version incompatibilities. Disable and reactivate the problematic plugin. If issues persist, contact the plugin developer or consider using an alternative plugin.
If your browser shows security warnings about mixed content, search for HTTP URLs within your WordPress database and content. Use find-and-replace to update them to HTTPS. Check your theme and plugin settings for hardcoded HTTP URLs.
If rankings drop significantly post-migration, verify your redirects are working properly and monitor Google Search Console for crawl errors. Check that your new site isn’t blocked by robots.txt and that you haven’t accidentally added noindex tags to your pages.
A comprehensive WordPress post-migration checklist ensures that your website transitions smoothly while preserving functionality, performance, and search engine visibility. By systematically addressing pre-migration preparation, technical migration execution, thorough post-migration testing, SEO preservation, performance optimization, and security hardening, you protect your investment in your WordPress website and maintain the organic traffic and user trust you’ve built over time.
Taking time to follow this detailed checklist may seem extensive, but it prevents costly mistakes, maintains your search rankings, and ensures your website performs optimally in its new home. Whether you’re using migration plugins, professional services, or manual migration methods, these principles apply universally to ensure your WordPress migration succeeds.

Hassan Tahir wrote this article, drawing on his experience to clarify WordPress concepts and enhance developer understanding. Through his work, he aims to help both beginners and professionals refine their skills and tackle WordPress projects with greater confidence.


 Lifetime VPS Europe
 Lifetime VPS Asia
 Lifetime Hosting
 France Lifetime Dedicated Servers
 Germany Lifetime dedicated servers
 Lifetime Game Dedicated Servers
 Chicago, US
 Singapore
 Hong Kong
 Seoul, South Korea
 Amsterdem, Netherlands
 London, UK
 Zurich, Switzerland
 Sydney, Australia
 DDOS Protection
 Submit Ticket
 Full Management
 Videos and Podcasts
 Voxfor Advanced Price Management For WooCommerce
 Voxfor AI Content Summary


