
This guide shows you how to install and use Windows Subsystem for Linux (WSL) on Windows 11 to manage and interact with AI tools like Ollama and OpenWebUI. Follow these steps to create an efficient AI-powered workflow.
Windows AI development setup
WSL, Ollama, and OpenWebUI help create flexible local-style AI environments. Voxfor VPS gives developers remote server resources for testing and running modern tools.
WSL is a layer that enables running Linux binary executables natively on Windows for running native Linux commands, tools, and distributions directly on a Windows system. It bridges the gap between the Linux and Windows environments, enabling users to seamlessly utilize the strengths of both platforms without additional hardware or software.

After Opening the PowerShell, Run the command below to install wsl on your Windows Machine.
wsl --install
This simple command will automatically install WSL and the default Linux distribution (Ubuntu). It makes the process simple and has no other settings or installations that you have to perform so that users can easily run Linux on Windows.
After running the installation command, it is essential to confirm that WSL has been installed successfully and is functioning correctly. Open the command prompt and enter:
wsl --list --verbose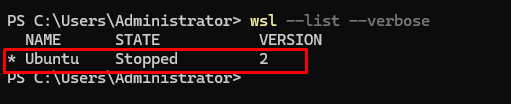
Ollama is a command-line tool for managing advanced AI models like Llama on local machines. It allows users to install, configure, and run AI models with minimum effort. Ollama’s simplicity suits researchers, developers, and AI enthusiasts who want more control over model operations without relying on external servers.
Installing Ollama begins with a simple command you can copy from the official Ollama website. Open your WSL (Windows Subsystem for Linux) and paste the command into the prompt.

curl -fsSL https://ollama.com/install.sh | shThis one-line script automates the download and setup of Ollama, including fetching dependencies and configuring the environment, ensuring minimal manual intervention.

Yet, the script is just so simple that even nontechnical users can get the software installed effortlessly. After installation, the Ollama installation is automatically executed once, and your WSL system is set up to run Ollama by making use of its powerful AI model capabilities.
Method 1:
Once the installation is complete, verify it by running:
ollama -vThis command displays a list of installed models and confirms whether the Ollama CLI is functioning correctly.

If the list is empty, you can install models in the next step, ensuring your installation is successful.
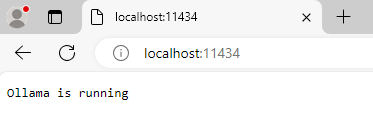
Method 2:
You can also verify if Ollama is Installed and Running by Opening the Browser, Trying to check if the port is accessible, and getting a message telling you Ollama is Running.
127.0.0.1:11434 or localhost:11434
To add a model, such as Llama, use the following command:
ollama pull llama3.2:3b
This downloads and installs the selected mode with 3 billion parameters. Once installed, you can interact with it by running:
ollama run llama3:2.3bThis command invites the model to initiate it and operates with it as a live model. However, once the model is created, then you can directly throw queries to the command prompt terminal. you could ask questions such as, “What is the theory of relativity all about?” or “What are the advantages of deploying local AI models?” After asking a query from the model, your input will be taken, and the model will type an answer just in the command prompt, so the ability of the model to answer several queries profoundly and correctly can also be seen.

This process shows us the power and utility of Ollama for interactive AI tasks.
Docker is a mandatory requirement for running OpenWebUI. Start by adding the Docker GPG key to your system:
This command makes the directory and sets the exact permissions, proving it can hold keyring files for secure APT packages.
sudo install -m 0755 -d /etc/apt/keyrings
The Next command downloads Docker’s GPG key and securely saves it in /etc/apt/keyrings/docker.asc to verify Docker packages’ authenticity.
curl -fsSL https://download.docker.com/linux/ubuntu/gpg | sudo tee /etc/apt/keyrings/docker.asc
Now that we have the GPG Key, we can move on to the following command.
The following command confirms that all users can read the docker.asc file, enabling the system to authenticate Docker packages during installation and updates. The chmod command is used to set read permissions.
sudo chmod a+r /etc/apt/keyrings/docker.asc
This step ensures that your system can trust the Docker repository and prevents installation errors caused by invalid keys.
Next, add a stable repository of Docker to your system package manager:
This command lets you download and install Docker components securely from the official Docker website.
echo \
"deb [arch=$(dpkg --print-architecture) signed-by=/etc/apt/keyrings/docker.asc] \
https://download.docker.com/linux/ubuntu $(lsb_release -cs) stable" | \
sudo tee /etc/apt/sources.list.d/docker.list > /dev/null
Update your package list and install Docker with its necessary components for running OpenWebUI:
sudo apt-get update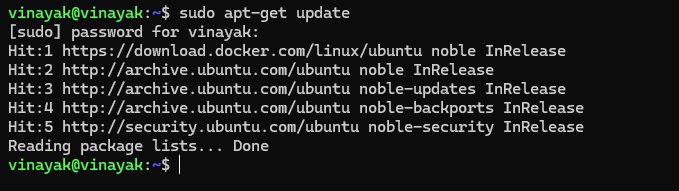
Now, we will install some Docker tools. These tools will allow you to run Docker containers, manage images, and compose multi-container setups, which is essential for OpenWebUI.
sudo apt-get install docker-ce docker-ce-cli containerd.io docker-buildx-plugin docker-compose-plugin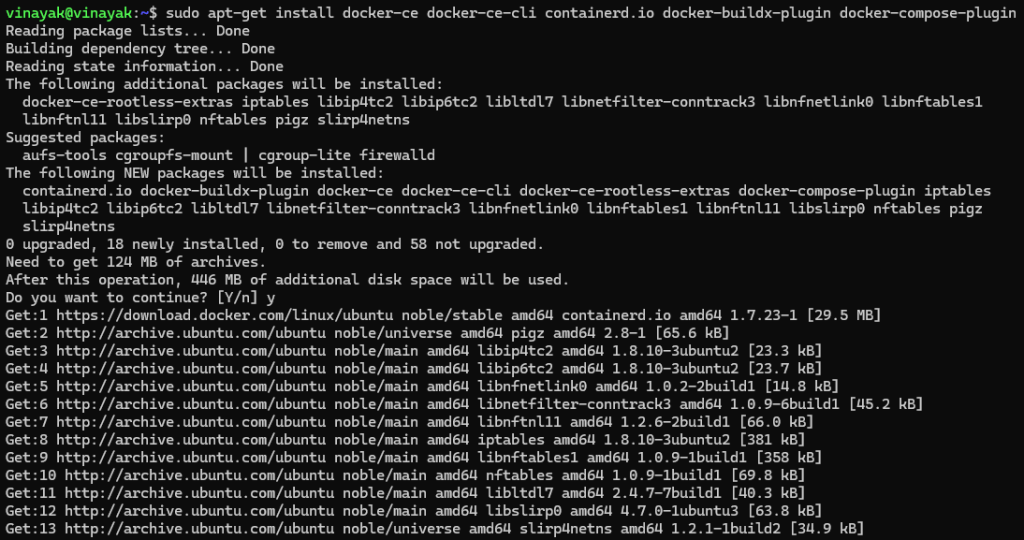
To start OpenWebUI, run the Docker command in your WSL terminal:
This command pulls the necessary Docker image, configures the backend, and starts a local server on your machine. Ensure that the OLLAMA_BASE_URL variable points to the correct location of your Ollama instance.
docker run --d --network host -v openwebui/app:/backend/data \
-e OLLAMA_BASE_URL=http://127.0.0.1:11434 --name open-webui
Once the OpenWebUI service is running, open a browser and go to:
http://127.0.0.1:3000 or http://yourdomain.com:3000Note: The domain will only work if you have mapped it to the IP address of your machine.
The IP 127.0.0.1 is an Internal IP Address and will only be usable on the same Network where the OpenWebUI and Ollama are Installed. To access the website from anywhere, you must ensure that people can route to the website from their IP or domain name.

You will have to sign up for a new admin account using your name, email, and your desired password. This account will allow you to work with the entire feature set of OpenWebUI and its possibilities to manage models, perform and configure queries, etc.

The OpenWebUI dashboard is designed for simplicity and efficiency. Key sections include:
This system gives a convenient interface for working with AI models and defining the resulting procedures.

The Settings tab offers several customization options:


The Models Tab in Admin Panel allows you to:
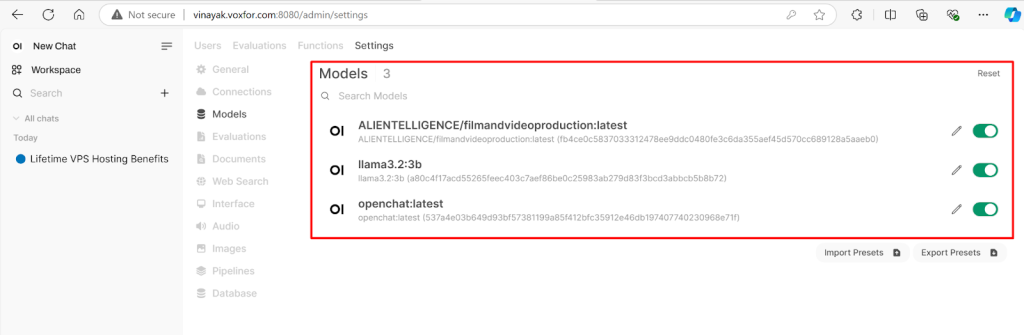
Each model can be individually configured to suit your needs:

The Database Tab provides tools for managing system data:

Advanced settings include:


The Users Tab in the OpenWebUI admin panel allows administrators to manage user roles. Depending on their required access level, users can be set as Admin or remain Pending. To update a user’s role, click the pencil icon next to their name.

Users may see an Account Activation Pending message if they face restricted access. This issue occurs when admin approval is needed. Navigate to the admin panel and activate user accounts to resolve this problem. Contact the administrator if the issue persists.

Administrators can set up API connections in the Settings Tab for OpenAI, Ollama, and other integrations. Use the dropdown menu to toggle between available APIs. These settings confirm seamless integration for dynamic model capabilities.

OpenWebUI allows users to configure advanced features under the admin panel’s Audio and Image Settings sections. Enable Text-to-Speech engines like Whisper or adjust image storage settings for optimized resource use. Make sure you’ve selected the appropriate settings based on your project needs.

The Database tab enables administrators to easily manage system data, import existing configurations via JSON files for quick setup, and export current backup settings. The database can also be reset entirely to troubleshoot persistent issues.
The NVIDIA-SMI command allows users to monitor GPU performance in real-time. It provides detailed information, including the driver version, CUDA version, GPU memory usage, and processes utilizing the GPU. This tool is essential for ensuring the optimal allocation of resources when running large models like Llama 3:2b.

OpenWebUI provides the flexibility to manage multiple AI models such as LLaMA 3.2b, Arena Model, and more. Use the Model Selector feature to switch between models based on project requirements. Each model offers unique capabilities tailored to specific use cases, such as help with natural language or image generation.

OpenWebUI provides a feature to share data between AI models so as to enable a scenario where two AI models can interact with each other. For this advanced use case, this feature can be especially useful, for instance, alongside collaborative problem-solving or for comparing one AI system against another.

OpenWebUI temporary chats are fast and light, temporary chats giving you a quick and brief environment to try out things, see AI outputs, or run non permanent interactions. This feature forces the session history not to be saved, which is best for sensitive or trial-based exchanges.

If Docker doesn’t start, restart the service:
sudo systemctl restart docker
Ensure that Docker is installed correctly, and check that your user has the required permissions to run Docker commands.
Run the following command to check installed models:
ollama list
If the required model is missing, add it using Ollama pull <model_name> and confirm its availability before running queries.
When OpenWebUI is not accessible, look at the status of the Docker container:
docker ps
If necessary, restart the container and make sure your browser is getting hit the right server.
Installing WSL on Windows 11 lets you easily integrate tools like Ollama and OpenWebUI into your AI workflows. WSL enables lightweight Linux environments, while Ollama and OpenWebUI simplify managing and interacting with AI models. Experiment with advanced features and customize the setup to suit your needs.

Vinayak Baranwal wrote this article. Use the provided link to connect with Vinayak on LinkedIn for more insightful content or collaboration opportunities.


 Lifetime VPS Europe
 Lifetime VPS Asia
 Lifetime Hosting
 France Lifetime Dedicated Servers
 Germany Lifetime dedicated servers
 Lifetime Game Dedicated Servers
 Chicago, US
 Singapore
 Hong Kong
 Seoul, South Korea
 Amsterdem, Netherlands
 London, UK
 Zurich, Switzerland
 Sydney, Australia
 DDOS Protection
 Submit Ticket
 Full Management
 Videos and Podcasts
 Voxfor Advanced Price Management For WooCommerce
 Voxfor AI Content Summary


