 Lifetime VPS Europe
 Lifetime VPS Asia
 Lifetime WooCommerce Hosting
 Lifetime Hosting
 Lifetime Game Dedicated Servers
 Chicago, US
 Tokyo, Japan
 Singapore
 Hong Kong
 Seoul, South Korea
 Amsterdem, Netherlands
 London, UK
 Stockholm, Sweden
 Oslo, Norway
 Vienna, Austria
 Zurich, Switzerland
 Sydney, Australia
 Wordpress Hosting
 VPS Hosting
 DDOS Protection
 Submit Ticket
 Full Management
 Guides
 Videos and Podcasts
 Discover Creative Ideas
 Voxfor Autonomous AI Workers
 Voxfor Mega Menu
 Voxfor Advanced Price Management For WooCommerce
 Voxfor Secure Live Chat and AI Support
 Voxfor Multilanguage
 Voxfor AI Content Summary
 Voxfor Autopilot
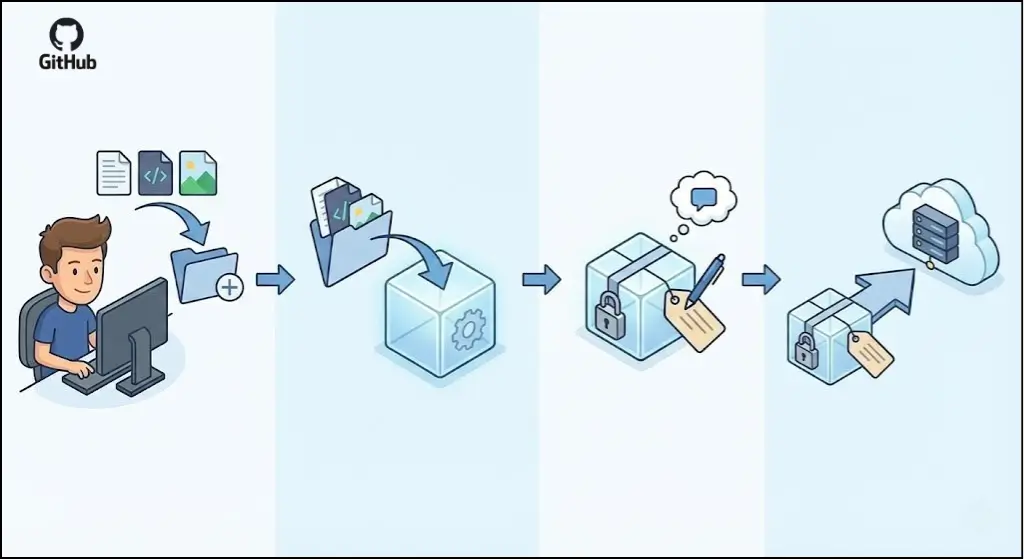
Git and GitHub are the new tools in the world of software development, which are joined together to assist you with the management of your code. Git is a version control system that helps to monitor the changes in your files as time goes by, and it lets you know what, when, and why. GitHub is a web-based tool that manages your Git repositories, so it is simple to work together with other programmers, save your code, and communicate your projects to the world.
Git-to-deploy workflow
Commit your code, then deploy it on VPS hosting you control
GitHub keeps your code organized, but real projects also need a reliable place to run. Voxfor VPS gives developers dedicated resources for staging apps, APIs, CI workflows, and production deployments.
Learning to push and commit files is the basic knowledge of using Git and GitHub. By committing, you are taking a snapshot of your project at a given time with a description of the changes. With a push, you are sending those commits from your local machine to GitHub so that your colleagues can see them, as well as so that your work is safely stored in the cloud. This process is the foundation of group development and does not allow the chaos of working with various versions of files manually.
Requirements to Push Files to GitHub
Before you start committing and pushing files to GitHub, make sure you have the following in place:
- Git is installed on your computer: Download Git from git-scm.com and follow the installation instructions for your operating system (Windows, Mac, or Linux).
- A GitHub account: Sign up for free at github.com.
- Basic command-line knowledge: Familiarity with opening a terminal or command prompt and navigating folders using commands like cd (change directory) and ls or dir (list files).
- A code editor: Any text editor of your choice to write a code Visual Studio Code or Sublime Text or any other tools.
- Git set-up locally: Once you have installed git, you can set-up your name and email with these commands in your terminal:
git config --global user.name "Your Name"
git config --global user.email "[email protected]"
Creating or Cloning a GitHub Repository
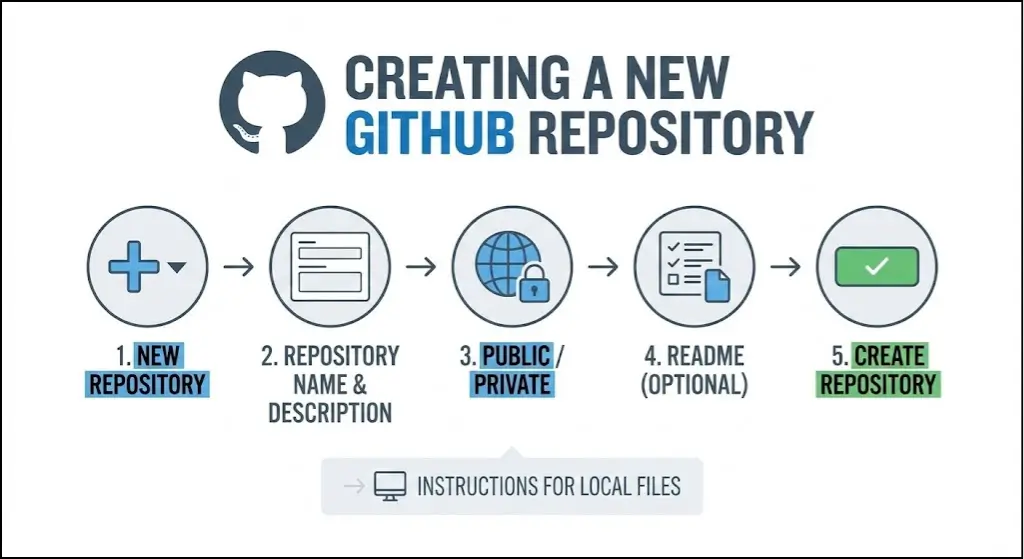
Creating a New Repository on GitHub
To start a new project, create a repository directly on GitHub:
- Log in to your GitHub account and click the + icon in the top-right corner
- Select New repository from the dropdown menu
- Enter a repository name (e.g., “my-first-project“)
- Add an optional description to explain your project
- Choose whether the repository should be Public (visible to everyone) or Private (visible only to you and people you invite)
- Check the box to Initialize this repository with a README (optional but recommended for beginners)
- Click Create repository
Once created, GitHub will show you instructions on how to add files from your local machine.
Cloning an Existing Repository
If you want to work on a repository that already exists on GitHub (either your own or someone else’s), clone it to your local machine:
- Navigate to the repository on GitHub
- Click the green Code button
- Copy the HTTPS URL (easiest for beginners)
- Open your terminal and navigate to where you want to save the project
- Run the clone command:
git clone https://github.com/username/repository-name.git
cd repository-name
This downloads a local copy of the repository on your computer, which contains all the project files and Git history.
Adding Files and Folders to the Repository
Placing Files in Your Project Directory
Once you have a repository set up locally, add your files and folders to the project directory. You can do this by:
- Manually copying files into the folder
- Creating new files using your code editor
- Dragging and dropping files into the project folder
For example, if you have an index.html file, place it in your project directory:
my-first-project/

├── index.html
├── style.css
└── script.js
Verifying Files with Git Status
After adding files, check what Git sees in your repository by running:
git statusThis command will output something like:
On branch main

No commits yet

Untracked files:
  (use "git add <file>..." to include in what will be committed)
        index.html
        style.css
        script.js

nothing added to commit but untracked files present (track files)
Nothing added to commit, but untracked files present (track files)
Untracked files are the files that are there in your project directory, but which Git is not yet tracking. This is the default of new files, and they are followed by staging and commitment.
Committing Files and Folders
Understanding the Staging Area
Before committing, you need to understand Git workflow:
- Working Directory: Where your files actually exist on your computer
- Staging Area: A holding area where you prepare changes to be committed
- Repository: The permanent record of your commits
Imagine it as a process of shipping: you make something (working directory), place it in a box (staging area) and then ship the package (repository).
Staging Files with Git Add
To stage files, use the git add command. You have several options:
Stage a single file:
git add index.htmlStage all changes:
git add .The dot (.) means “add all changes in this directory and subdirectories.“
Stage-specific files:
git add index.html style.cssAfter staging, run git status again to verify:
On branch main

Changes to be committed:
  (use "git rm --cached <file>..." to unstage)
        new file:   index.html
        new file:   style.css
        new file:   script.js
Creating a Commit with Meaningful Messages
Once files are staged, commit them using:
git commit -m "Add initial HTML, CSS, and JavaScript files"The -m flag allows you to include a commit message. Posting this message explains what you changed and why. A great commit message is both brief and informative.
Good commit messages:
- “Add user authentication feature.”
- “Fix bug in calculation function.”
- “Update README with installation instructions.”
- “Refactor database connection code”
Poor commit messages:
- “Update”
- “Fix stuff”
- “asdf”
- “Changes”
Best Practices for Commit Messages
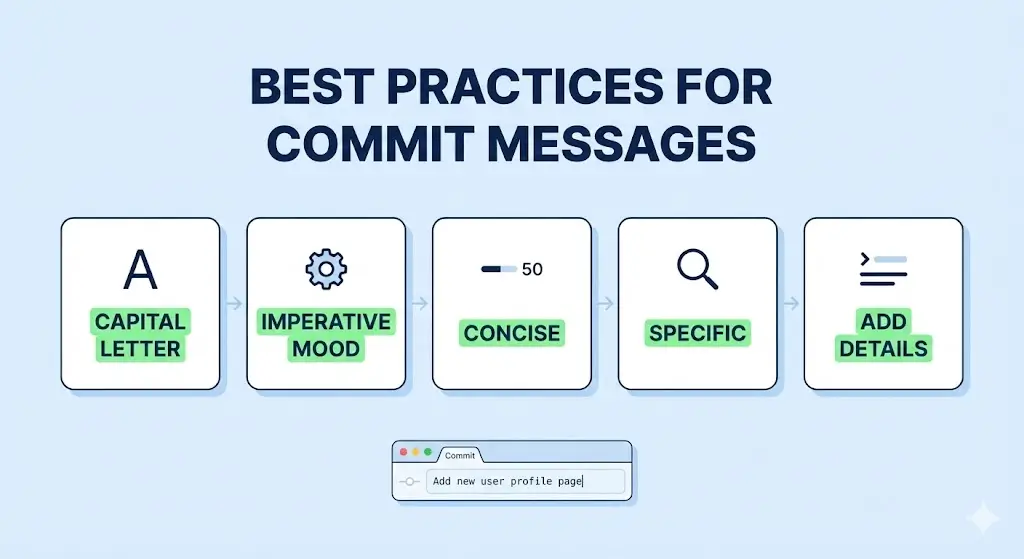
Follow these guidelines when writing commit messages:
- Start with a capital letter: “Add new features” instead of “add new features.“
- Use imperative mood: “Fix bug” instead of “Fixed bug” or “Fixes bug.“
- Keep it concise: First line should be 50 characters or less
- Be specific: Explain what changed, not just that something changed
- Add details if needed: For complex changes, add a blank line after the first line and include more explanation
Example of a detailed commit message:
git commit -m "Add user login page

- Create login form with email and password fields
- Add form validation
- Implement password reset functionality"
Pushing Changes to GitHub
Understanding Branches
It is advisable to learn about branches before pushing. A branch is a line of development in itself. As the default, Git generates a primary branch named main or master (GitHub changed the default name to main in 2020, but older repositories may use master as the default name).
You can check your current branch with:
git branchThis will show something like:
* mainThe asterisk indicates which branch you’re currently on.
Pushing Your Commits
Once you’ve committed your changes, push them to GitHub using:
git push origin mainBreaking this down:
- git push: The command to upload changes
- origin: The name of the remote repository (usually GitHub)
- main: The branch you’re pushing to (use “master” if that’s your default branch)
If this is your first time pushing from a newly created local repository, Git might ask for your GitHub credentials. Enter your username and password (or personal access token if you’ve set up two-factor authentication).
After a successful push, you’ll see output like:
Counting objects: 3, done.
Writing objects: 100% (3/3), 256 bytes | 256.00 KiB/s, done.
Total 3 (delta 0), reused 0 (delta 0), pack-reused 0
To https://github.com/username/repository-name.git
 * [new branch]      main -> main
Verifying Your Push on GitHub
Open your GH-repo in your web browser and reload the page. Your files should now be on GitHub, and the commit message you have created should now show on the list of commit history.
Common Errors and How to Fix Them
Error 1: “Fatal: Not a Git Repository”
Problem: You ran a Git command in a folder that isn’t a Git repository.
Solution: Navigate to your project folder or initialize a new repository:
cd my-project
git init
Error 2: “Error: Permission Denied (Public Key)”
Problem: Git can’t authenticate with GitHub using SSH.
Solution: Use HTTPS instead of SSH. In cloning, one should use the HTTPS URL (not the SSS URL). Change it in case you have already cloned using SSH:
git remote set-url origin https://github.com/username/repository-name.gitError 3: “Error: Failed to Push Some Refs to Origin”
Problem: Your local branch is behind the remote branch (someone else pushed changes, or you’re working on an older version).
Solution: Pull the latest changes first:
git pull origin mainIf there are no conflicts, this will automatically merge changes. Then try pushing again:
git push origin mainError 4: “Merge Conflict”
Problem: Git found conflicting changes in the same lines of a file.
Solution:
- Git will mark the conflicting areas in your file like this:
<<<<<<< HEAD
Your changes
=======
Their changes
>>>>>>> branch-name- Manually edit the file to keep the changes you want.
- Remove the conflict markers (the <<<<<<, =======, >>>>>> lines)
- Save the file and stage it:
git add conflicted-file.js- Commit the merge:
git commit -m "Resolve merge conflict in conflicted-file.js"- Push the resolved commit:
git push origin mainError 5: “Rejected – Non-Fast-Forward”
Problem: Someone else pushed changes to the branch while you were working locally.
Solution: Pull before pushing:
git pull origin main
git push origin main
Best Practices for Git Commits
Commit Small, Logical Changes
Instead of making one massive commit with dozens of changes, break your work into smaller, logical commits. This makes it easier to:
- Understand the history of your project
- Revert specific changes if needed
- Find bugs using tools like git bisect
- Collaborate effectively with team members
Example of good practice:
- Commit 1: “Add database connection logic”
- Commit 2: “Create user table schema”
- Commit 3: “Add input validation to user form”
Example of poor practice:
- Commit 1: “Add database, user form, API endpoints, update documentation”
Write Meaningful Commit Messages
You are documenting to your team and your future. Take the time to compose in a clear, descriptive message that will tell you what and why you are changing.
Keep Your Repository Organized
Maintain a clear folder structure in your repository:
project-name/
├── src/
│   ├── index.js
│   └── components/
├── assets/
│   ├── images/
│   └── styles/
├── tests/
├── README.md
└── .gitignore
Use .gitignore
Create a .gitignore file in your repository root to tell Git which files to ignore. This is useful for files that shouldn’t be tracked, like:
node_modules/
.env
.DS_Store
*.log
dist/
Simply create a file named .gitignore and list files and folders (one per line) that Git should ignore.
Push Regularly
Don’t wait until you’ve made massive changes to push. Push regularly throughout your day to:
- Backup your work to GitHub
- Share progress with team members
- Reduce the risk of losing work
Review Before Committing
Before staging files, review what you’re about to commit:
git diffThis is a demonstration of your changes. Stage only after making everything look right.
Use Meaningful Branch Names
If you’re using multiple branches, name them descriptively:
- Good: feature/user-authentication, bugfix/login-error, docs/api-endpoints
- Poor: test, new, temp123
Conclusion
Any developer needs to learn how to work with the Git commit and push workflow. It is very easy to do, as you know, the simple steps:
- Add files to your project directory
- Stage changes with git add
- Commit changes with meaningful messages using git commit -m
- Push to GitHub with git push origin main
Such practices and a knowledge of the pitfalls you could possibly fall into will provide a strong version control and collaboration base. As you become familiar with Git, you might venture into new functions such as branching, merging and rebasing but these basics will do you well in any development project.
Remember: commit often, write clear messages, and push regularly. This habit will make your development process smoother, protect your work, and make collaboration with other developers seamless. Happy coding!
About the writer

Hassan Tahir wrote this article, drawing on his experience to clarify WordPress concepts and enhance developer understanding. Through his work, he aims to help both beginners and professionals refine their skills and tackle WordPress projects with greater confidence.