
Welcome to the Voxfor guide for installing AlmaLinux! In this tutorial, I’ll walk you through the full installation procedure for AlmaLinux 9.0. If you’re not familiar with AlmaLinux, it’s a fantastic distribution that keeps the spirit of CentOS alive, especially as we used to know it. CentOS, for most of its history, was built directly from the sources of Red Hat Enterprise Linux, offering a no-cost alternative to Red Hat’s subscription fee, which was appreciated by administrators worldwide.
Although CentOS has since taken a different direction, AlmaLinux steps in as a drop-in replacement for Red Hat, built on RedHat sources, making it an excellent choice for CentOS fans to keep their servers running the same way. AlmaLinux 9 provides a robust, free, one-to-one binary-compatible replacement for Red Hat Enterprise Linux. For those looking to set up a reliable and efficient server, AlmaLinux 9 ISO offers an ideal solution, with additional benefits like AlmaLinux 9 firewall configurations to ensure security.
AlmaLinux is a robust distribution that carries on the legacy of CentOS, providing a free, one-to-one binary-compatible replacement for Red Hat Enterprise Linux. It’s an excellent choice for anyone looking to set up a reliable and efficient server.
This guide walks you through the process of installing AlmaLinux 2024, a free, one-to-one binary-compatible replacement for Red Hat Enterprise Linux, via the Voxfor management interface. Key steps include preparing your server, loading the AlmaLinux ISO, configuring network settings, setting the root password, creating a user account, and starting the installation. Post-installation tasks include updating the system, installing essential packages, setting up a firewall, and enabling automatic updates. For detailed instructions and additional resources, visit the Voxfor website.
First you have to go to the voxfor website and then move to the widget by the usa vps price.
To subscribe to a plan, follow these steps:

On the new page, sign up by entering your details.
Complete all steps, and you’ll receive an email from Voxfor confirming your subscription.

After following all these steps, you’ll receive an email from Voxfor confirming your subscription and the server information.

At Voxfor, we offer the purchase of a Lifetime server starting at just $250. Your server, pre-installed with AlmaLinux, will be ready in 2 minutes. You’ll also have access to many other operating systems for installation. This guide will show you how to install AlmaLinux through our management interface, not using a USB stick as traditional methods suggest.
Follow these simple steps to install AlmaLinux:
Access the Voxfor management interface and select and click on your server from the list Under Services

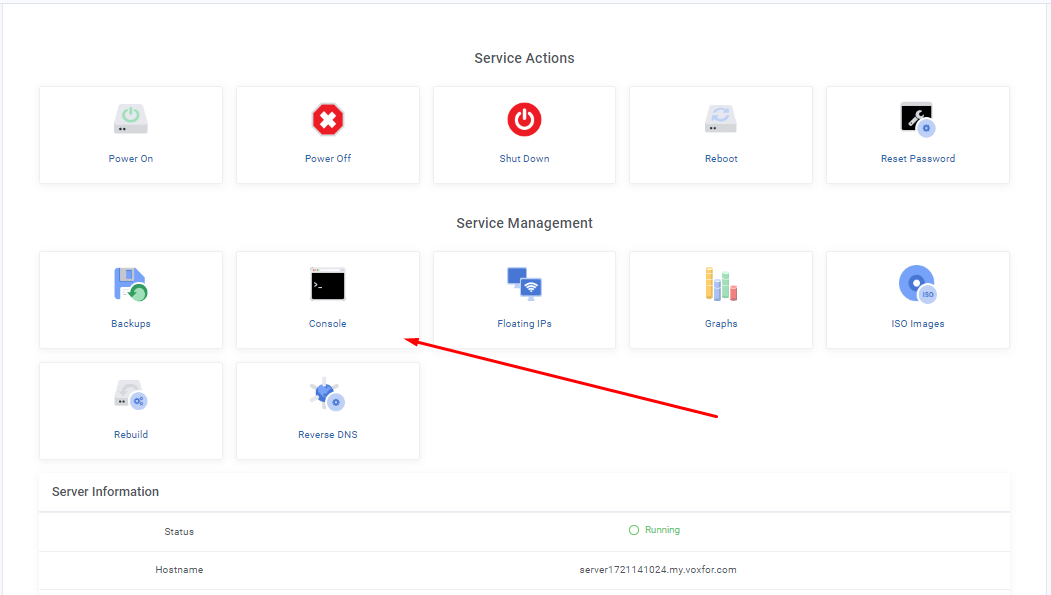
Locate the “Service Management” section on your dashboard. Click on the “ISO Images” option, which is represented by an icon with a disc and the text “ISO Images”.

In the search box, type the text “alma” and press Enter. From the list of available ISO images, locate “AlmaLinux 9.2 (amd64/boot)”. To load the ISO image, click on the refresh icon button next to “AlmaLinux 9.2 (amd64/boot)”

In the “Service Actions” section, click on the “Reboot” option to load the ISO image. A confirmation box will appear asking, “Are you sure that you want to reboot this virtual machine?” Click “Yes” to proceed.

In the “Service Management” section, click on the “Console” option to navigate to the console.
On the console screen, you will see the AlmaLinux boot menu. Select “Install AlmaLinux 9.2” and press Enter to start the installation.

On the welcome screen, select your preferred language from the list on the left. For example, if you want English, click on “English.”
Select Variant: From the options that appear on the right, choose the specific variant, such as “English (United States).”
Click Continue: Once you’ve selected your language, click the “Continue” button at the bottom right of the screen to proceed.

Click on “Network & Host Name” to configure the network settings.

Ensure the toggle switch for your Ethernet connection (e.g., enp1s0) is turned on, indicating it is connected.
If your network is configured via DHCP, you should see an Your Server IP and other network details displayed on the right side.

Enter the desired host name in the “Host Name” field at the bottom of the screen.
Click “Apply” to set the hostname.

If you need to configure the network manually, click on the “Configure…” button on the right side.
In the configuration window, you can set the IP address, subnet mask, gateway, and DNS servers as required.

Open Keyboard Settings: On the “Installation Summary” screen, click on “Keyboard” under “Localization.”

Confirm or Change Layout: Ensure the displayed layout (e.g., English (US)) is correct, or select a different one from the list.
Add Layouts: Click the “+” button to add additional keyboard layouts if needed.
Test Layout: Use the provided text box to test and confirm the layout.
Click Done: After confirming the correct layout, click “Done” to return to the “Installation Summary” screen.
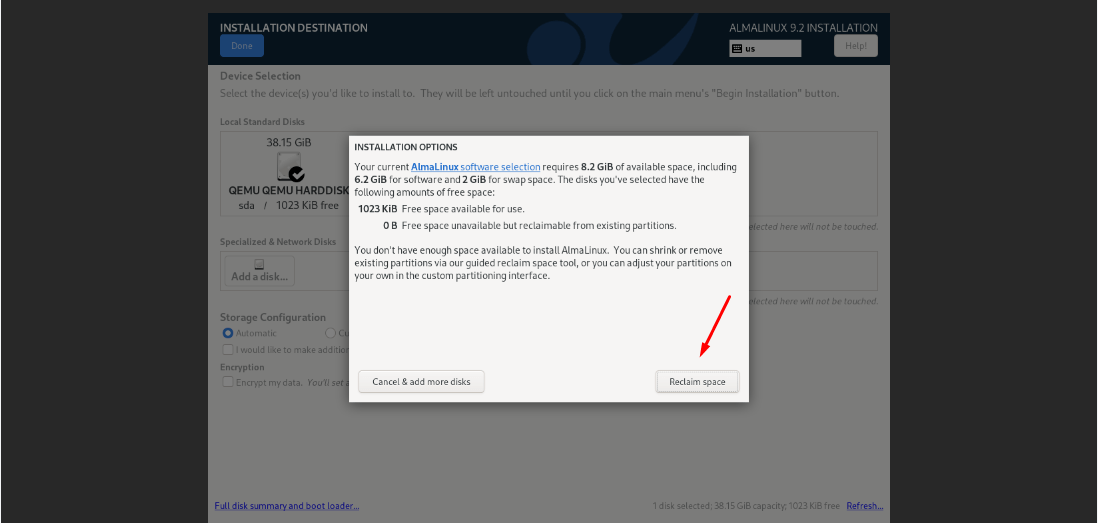
Choose Disk: On the “Installation Summary” screen, click on “Installation Destination” under “System.”

Choose the hard disk where you want to install AlmaLinux, Storage Configuration should be automatic.

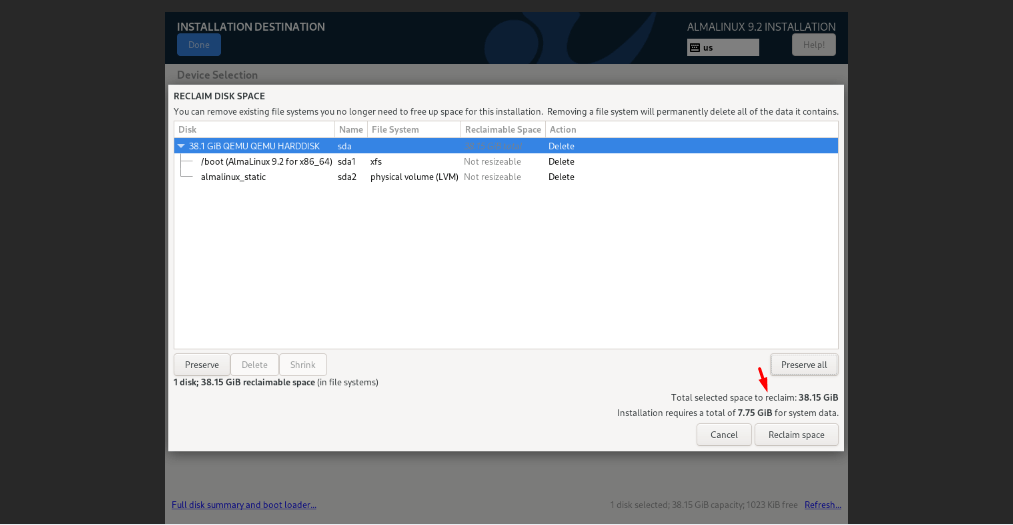
If the disk has existing data, select the option to delete all existing partitions
partition selection screen with the option to delete existing partitions selected.
On the “Installation Summary” screen, click on ” Software Selection, you will be prompted to choose the type of installation. Select “Minimal Installation” or a similar option that installs only essential packages.

Select “Minimal Installation” or a similar option that installs only essential packages.

Look for the “Time & Date” option in the installation summary screen and click on it.
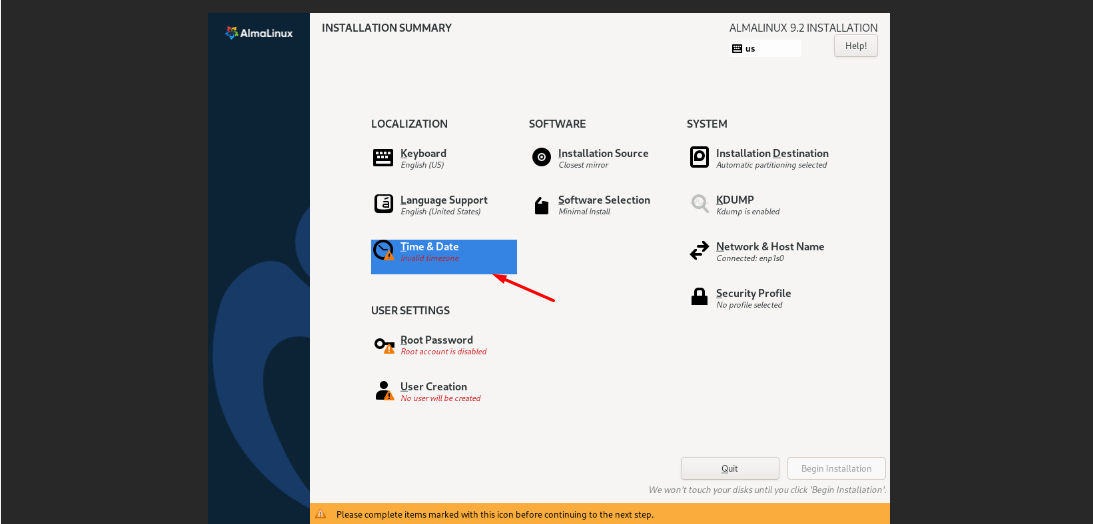
Setting the correct time and date on your server is crucial for various reasons, including accurate logging, scheduled tasks, and system synchronization. Here’s a simple explanation of how to set your timezone during the AlmaLinux installation process.

Creating a strong root password is crucial for the security of your server. Here’s how to do it during the AlmaLinux installation process
Access the Root Password Section:
In the installation summary screen, click on “Root Password.”

Enter Your Password:
Type your desired password in the “Root Password” field.
Re-enter the same password in the “Confirm” field to ensure it is correct.

Default Lock Option:
By default, the “Lock root account” option is enabled. This means the root account will be locked to prevent direct logins. Ensure that you have enable root account or create a new user “normal privilege” guide how create new user next step
Ensure that the “Allow root SSH login with password” option is checked. This prevents the root user from logging in directly via SSH,.
But remember root account, it is not recommended as it poses a security risk. Instead, always use a normal user account with sudo privileges.
Creating a normal user account during the AlmaLinux installation process:
Access the User Creation Section:
In the installation summary screen, click on “User Creation.”

Enter User Information:
Full Name: Enter the full name of the user.
Username: Choose a username for the account.
Set Password:
Type your desired password in the “Password” field.
Re-enter the same password in the “Confirm” field to ensure it is correct.
Ensure that the password is strong, with a mix of uppercase and lowercase letters, numbers, and special characters.
Administrator Privileges:
If you want this user to have administrative privileges, check the “Make this user administrator” option. This will allow the user to perform administrative tasks using sudo.
Confirm and Continue:
Click “Done” to save the user account information and return to the main installation

Once you have configured all the necessary settings, you are ready to begin the installation of AlmaLinux. Here’s how to proceed:
Review Your Configuration:
Ensure that you have set up the language, time and date, root password, user creation, and any other necessary configurations.
Start the Installation:
Click the “Begin Installation” button at the bottom of the installation summary screen.

The installation process will start, and you will see a progress bar indicating the status. This process may take a few minutes.

Once the installation is complete, you will see a message indicating that the installation was successful.
Click the “Reboot” button to restart your system.

After the AlmaLinux installation is complete and you’ve rebooted your server, it’s important to unmount the installation ISO to prevent the server from attempting to boot from it again. Here’s how to do it:
Steps to Unmount the Installation ISO:
Reboot the Server:
After the installation completes, click “Reboot” on the installation screen.
Login to Your Management Interface:
Access your Voxfor management interface where you initially mounted the ISO images.
Unmount the ISO:
Navigate to the section where the ISO images was mounted.
Click on the “Unmount” button next to the ISO.
Final Reboot
After unmounting the ISO, reboot your server again. This ensures that the server boots from the installed AlmaLinux system rather than attempting to start the installation process again.

Access your new AlmaLinux installation by logging in with the user credentials you created during the installation process.
Enter the username and password for the account you created.
Once logged in, you can start configuring your server as needed.

Update System: Run sudo dnf update to ensure your system is up to date.
Install Essential Packages:
Install some common packages that are often required.
dnf install -y wget curl vim gitSet Up a Firewall
Use firewalld to set up a basic firewall:
systemctl start firewalld
systemctl enable firewalld
firewall-cmd –add-service=ssh –permanent
firewall-cmd –add-service=http –permanent
firewall-cmd –add-service=https –permanent
firewall-cmd –reload
Enable Automatic Updates:
Ensure your system receives regular updates.
Install dnf-automatic:
dnf install -y dnf-automatic
systemctl enable –now dnf-automatic.timer
Install and Configure Fail2Ban:
Improve security by installing Fail2Ban to protect against brute-force attacks.
dnf install -y fail2ban
systemctl enable –now fail2ban
Install GUI (Optional): If you need a graphical interface, install GNOME by running sudo dnf groupinstall “Server with GUI”.
Set Default Target: Enable the graphical target by running sudo systemctl set-default graphical.target.
Final Reboot: Reboot your server to apply all changes.
Congratulations! You now have a minimal installation of AlmaLinux up and running. AlmaLinux is a powerful and stable distribution, perfect for servers and workstations alike. Ready for more? Choose Voxfor for your server needs and enjoy the simplicity of a ready-to-use server with AlmaLinux installed, available in just two minutes. Visit Voxfor to get started today! Thank you for following this guide. For more tips and tutorials, stay tuned to our website. If you have any questions or need further assistance, feel free to reach out to our support team.


 Lifetime Hosting
 France Lifetime Dedicated Servers
 Germany Lifetime dedicated servers
 Lifetime Game Dedicated Servers
 Chicago, US
 Singapore
 Hong Kong
 Seoul, South Korea
 Amsterdem, Netherlands
 London, UK
 Zurich, Switzerland
 Sydney, Australia
 DDOS Protection
 Submit Ticket
 Full Management
 Videos and Podcasts
 Voxfor Advanced Price Management For WooCommerce
 Voxfor AI Content Summary


