
Novices must first learn about what Laravel is and why packages are important to the success of the development before plunging into packages. Laravel is a PHP framework, which is actually a toolkit that can enable the developer to create websites and web applications much faster by offering ready-made building blocks instead of depending on the developer to create everything manually. Imagine Laravel as a toolkit of construction: rather than making bricks with clay, digging up ore to form steel and braking down wood to form lumber with trees, a builder uses ready-made materials to build buildings much more quickly. Upon this note, Laravel offers pre-existing solutions to popular web development issues such as user authentication, database management, and routing so that the developer can concentrate on creating distinctive features instead of recreating the underlying infrastructure.
By 2026, Laravel serves around 1.5 million websites around the world, and its market share of PHP frameworks is almost six times higher than that of competitors, such as Symfony, CodeIgniter, and CakePHP. There are 450,000+ Stack Overflow questions with the tag [laravel] (an increase of 18%/year), and it means that there is plenty of learning material available to beginners. Laravel-versed PHP developers command high salaries (40,000-60,000+/year), as the job market is expanding due to the rising number of businesses that are using the framework to create scalable web apps that are robust.
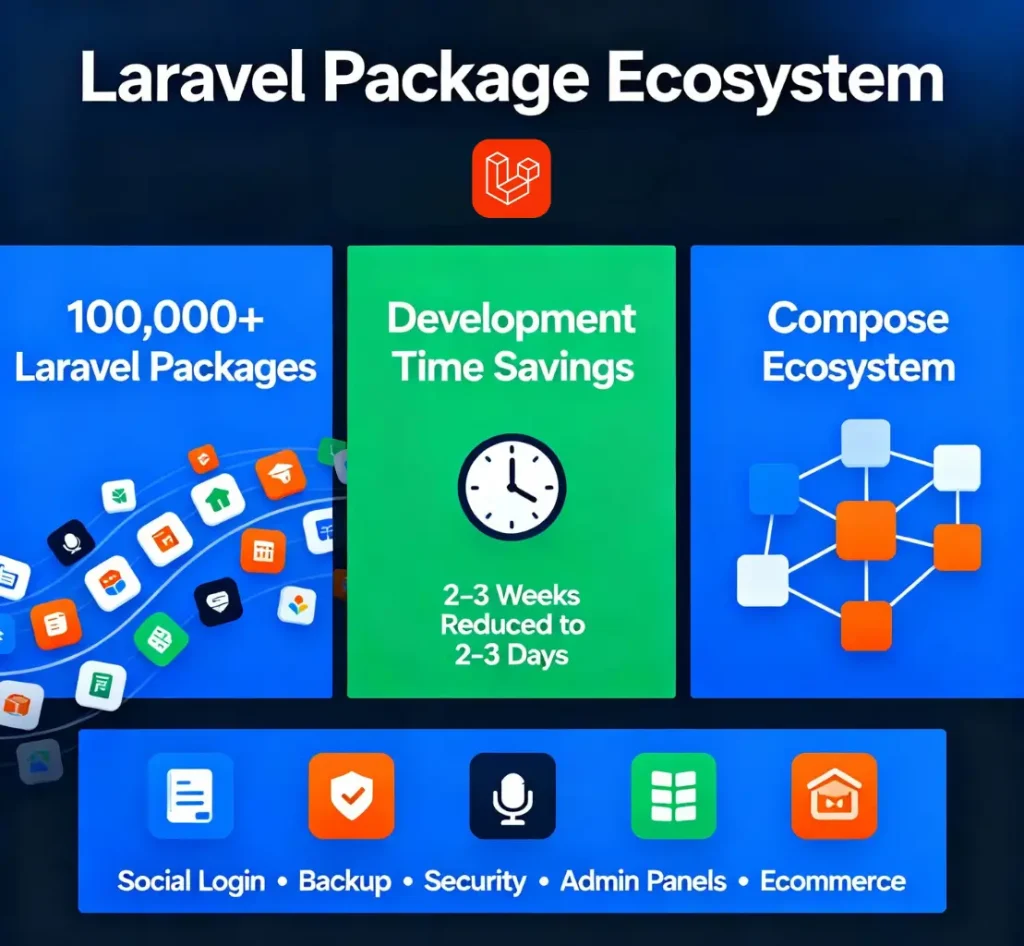
Laravel packages represent pre-written code solutions solving specific problems. Packages function like browser extensions or mobile app plugins, they enhance Laravel’s core functionality without requiring modification to the framework itself. Instead of writing user authentication code from scratch (a task requiring 2-3 weeks for experienced developers), the Laravel Socialite package enables social login (Facebook, Google, GitHub) within 2-3 days by providing pre-built integration. Similarly, instead of manually creating database backup procedures (requiring custom scripting and server configuration), the Laravel Backup package handles comprehensive database and file backups automatically on a schedule.
Laravel market position can be understood in a manner that puts into perspective why studying the framework and its packages will be useful in 2026. The 60% market share of Laravel as a PHP framework has the effect of meanings that the platform is currently being learned within coding bootcamps, is utilized by Fortune 500 companies as a backend infrastructure, and is actively developed, with major versions released every year. More than 90 percent of new Laravel projects are now powered by Laravel 8.3, and adoption of Laravel 11+ is increasing more quickly as enterprises migrate off of older versions.
For career development, Laravel expertise commands premium pricing. Companies hiring Laravel developers report difficulty finding qualified candidates, driving salary premiums of $5,000-15,000 annually above general PHP developers. This market reality validates that learning Laravel and mastering packages positions developers competitively in 2026 job market.
Packages are considered as optional additions to many developers. Nevertheless, the choice of strategic packages is the distinction between the week and the months of shipping applications. Knowing the business case of packages will change the beginner attitudes of seeing extra or necessities when developing professionally.
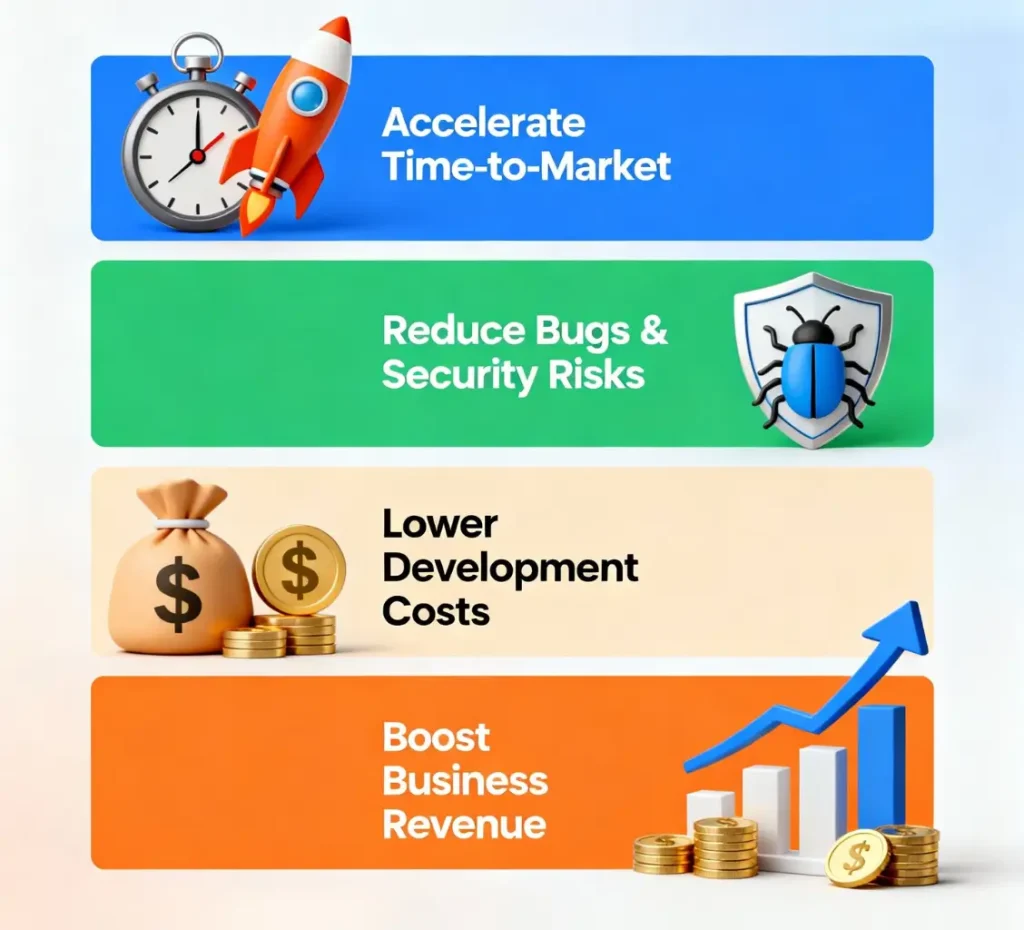
Accelerating Time-to-Market: Building user authentication from scratch requires 3-4 weeks for experienced developers: designing a database schema, implementing password hashing, building email verification, creating password reset functionality, and testing security. Using Laravel Socialite or Laravel Sanctum packages reduces this to 2-3 days—accelerating time-to-market by 85%. For ecommerce projects, using the Bagisto package (a complete ecommerce platform) launches functional online stores in 2-3 weeks versus 8-12 weeks of building custom code. This acceleration directly impacts business revenue: earlier market launch means earlier revenue generation.
Reducing Bugs and Security Vulnerabilities: Packages that have been developed and maintained by sophisticated developers have gone through major tests and security audits. Reduction in bugs 60-70% of a bespoke development would be a reduction in bugs using tested packages. Security risks: especially those that are very risky in applications where payment information or user data are involved, exist 80 times less often in existing packages as compared to custom applications. Firms with sensitive information (financial institutions, medical providers) in particular require the use of packages to perform critical functionality as there is a security validation advantage.
Lower Development Costs: Developer time represents 50-70% of project costs. Reducing development time through strategic package selection directly reduces project budgets. A project taking 16 weeks at $100/hour costs $64,000 in development. The same project, using packages and completing in 8 weeks, costs $32,000, exactly 50% cost reduction. This direct budget impact explains why enterprises prioritize package selection during project planning.
A vast majority of developers are paralyzed when presented with a set of 100 000 and more packages. Knowing what packages are important to focus on helps to avoid being overwhelmed and provides a strong base to the novice projects.
Laravel Debugbar (barryvdh/laravel-debugbar): Every Laravel developer requires debugging tools to understand what code executes and why issues occur. Debugbar displays queries executed, time spent on operations, and execution stack trace, invaluable for identifying performance problems and bugs. Installation: composer require barryvdh/laravel-debugbar –dev (the –dev flag means it runs only during development, not in production).
Laravel IDE Helper (barryvdh/laravel-ide-helper): Improves IDE (code editor) autocomplete functionality, enabling faster, more accurate coding. Modern IDEs like PHPStorm or VS Code recognize Laravel components better with this package installed. Installation: composer require barryvdh/laravel-ide-helper –dev.
Laravel Backup (spatie/laravel-backup): Prevents catastrophic data loss. Database crashes without backups mean complete data destruction—particularly devastating for production applications managing customer data. Spatie’s Laravel Backup automatically creates full database and file backups daily, storing them securely on Amazon S3 or Dropbox. Installation: composer require spatie/laravel-backup.
For Development Learning Projects:
For Ecommerce Projects:
For Admin Dashboard Projects:
For Security-Critical Applications:
For SEO-Important Projects:
1. Laravel Debugbar
Purpose: Extensive debugging of the development process, displaying queries, routes, views, and events that are run on each request. Savings in time: Diagnostic bottlenecks are found immediately rather than hours of troubleshooting. Best suited to: All the Laravel projects in the development stage.
2. Laravel Telescope
Purpose: Advanced monitoring displaying requests, exceptions, database queries, jobs, and logs in a beautiful dashboard interface. Use when: Building complex applications requiring detailed performance analysis. Performance impact: Development-only (zero production impact).
3. Tinker
Purpose: An Interactive shell enabling code execution in a Laravel environment without creating test files. Learning value: Experiment with Laravel code, test database queries, and understand framework concepts interactively. Installation: php artisan tinker.
4. Laravel Socialite
Purpose: Simplified social authentication (Facebook, Google, GitHub, Twitter login). Business value: Users prefer social login over creating new accounts—increases signup completion by 40-60%. Implementation time: 2-3 days versus 2-3 weeks for a custom OAuth implementation.
5. Laravel Sanctum
Purpose: Purpose API authentication of single-page applications and mobile apps. When: Developing contemporary apps based on a distinct frontend (React, Vue) and backend. Advantages: Easy to use compared to Passport, and adequately applicable.
6. Laravel Passport
Purpose: Complete OAuth 2.0 support of complex authentication. Application: Public API development and usage that does need third party developer access. Learning curve: Sharp than Sanctum but stronger.
7. Entrust
Purpose: Granted access control and role management. Use where: Applications need hierarchical permissions (user roles, custom permissions, permission groups). Examples Admin Has the ability to edit any posts, whereas a moderator can only edit certain categories.
8. No Captcha
Purpose: Google reCAPTCHA integration prevents automated spam and bot attacks. Business value: Reduces spam submissions by 95%+ while maintaining a user-friendly experience. Installation: Single composer command, single form line addition.
9. Laravel Voyager
Purpose: Admin panel builder creates professional interfaces of the administration within 15 minutes of installation. Features: CRUD operations, media, menu builder and user management are all built-in. Best in: Quick development of an administer site (not custom code).
10. Orchid
Purpose: Intense administration platform, which is highly customizable. Flexibility: Develop advanced administration interfaces to tricky applications. Learning curve: Medium (steeper than Voyager yet more powerful). Best usability: Enterprise applications that need custom administration capabilities.
11. Laravel Nova
Purpose: Smooth administrative interface (business, 199/year per project). laravel. support.official. Best: Enterprises that have larger budgets and focus on official support.
12. Voyager
Purpose: Content management system built on Laravel, providing complete CMS functionality including pages, posts, categories, media management, and user management. Use when: Building content-focused applications like blogs, news sites, or documentation portals.
13. Bagisto
Purpose: Complete ecommerce platform built on Laravel with products, categories, shopping cart, checkout, payment processing, and admin panel. Time to launch: 2-3 weeks versus 8-12 weeks for building a custom ecommerce. Best for: Entrepreneurs launching online stores quickly without deep technical expertise.
14. AvoRed
Purpose: Lightweight ecommerce platform that focuses on the ability to customize flexibly as opposed to having built-in functionality. Alternative: Developers who are creating custom ecommerce solutions with the highest control needs.
15. SEOTools
Purpose: Comprehensive SEO utilities, meta tag management, robots.txt generation, XML sitemap creation, and structured data (schema markup) generation. Business value: Structured data increases AI Overview citation probability by 3x. Installation time: 5 minutes.
16. Laravel Meta Manager
Purpose: Meta tag control of all pages in a centralized manner with uniform Open Graph tags, Twitter cards, and canonical URLs. Possible advantage: Increases the social media sharing image and clicks by 40%+.
17. Spatie/Sitemap
Purpose: Automated XML sitemap creation to be discovered by search engine. Pro: Makes all pages indexed by Google, Bing, and content crawling AI systems used efficiently.
18. Laravel Response Cache
Purpose: There is automatic response caching which enhances performance significantly. Advantage: Page cache is 10 times faster, decreasing server load by 80 percent or more. Implementation: One addition of middleware.
19. Laravel Package Skeleton
Purpose: Scaffold new Laravel packages following Laravel standards. Best for: Developers building and sharing packages with the Laravel community.
20. Spatie/Honeypot
Purpose: Anti-spam package detecting and preventing bot form submissions without showing users a captcha. Better UX: Forms submit normally for humans; bots are silently rejected without friction. Implementation: Single middleware addition.
Knowing the differences between packages aids beginners to make better choices when they have to make between related solutions.
| Criteria | Voyager | Orchid | Nova | LaraAdmin |
|---|---|---|---|---|
| Setup Time | 15 minutes | 30 minutes | 30 minutes | 15 minutes |
| Learning Curve | Easy | Medium | Medium | Easy |
| Customization | Moderate | High | High | Moderate |
| Cost | Free | Free | $199/year | Free |
| Official Support | Community | Community | Official | Community |
| Best For | Quick Setup | Complex Apps | Enterprise | Legacy Projects |
Decision Guide: Choose Voyager for rapid admin panel needs. Choose Orchid for sophisticated custom requirements. Choose Nova for enterprises with budgets. Choose LaraAdmin for legacy Laravel 7/8 projects.
| Factor | Bagisto | AvoRed |
|---|---|---|
| Setup Time | 1-2 weeks | 2-3 days |
| Feature Completeness | 90%+ (complete store) | 40% (foundation) |
| Customization Required | Minimal | Extensive |
| Time to Revenue | Fastest (weeks) | Longer (months) |
| Best For | Pre-built stores | Custom solutions |
Decision Guide: Choose Bagisto for rapid market entry. Choose AvoRed for maximum customization control.
Most beginners struggle with package installation due to unfamiliarity with Composer. This step-by-step guide removes installation confusion.
Step 1: Open a terminal in your project directory.
Step 2: Execute installation command:
composer require barryvdh/laravel-debugbar --devExplanation: composer require tells Composer to install a package. barryvdh/laravel-debugbar identifies the specific package. –dev indicates development-only installation (not needed in production).
Step 3: Some packages require configuration publishing:
php artisan vendor:publish --provider="Barryvdh\Debugbar\ServiceProvider"Step 4: Restart the Laravel server:
php artisan serveStep 5: Check installation Go to your Laravel site in the browser. In the case of Debugbar, a bottom page toolbar with database query and performance indicators should appear.
In 2026, 50% of development and tech queries trigger Google AI Overviews instead of traditional search results. Understanding how packages impact AI visibility transforms package selection from technical to strategic business decisions.
When developers search “best Laravel authentication package” or “Laravel backup solution,” Google frequently displays AI-synthesized answers pulling from multiple sources rather than showing individual website rankings. Your chosen packages and implementation approaches directly influence whether your Laravel applications and documentation achieve citation within these AI Overviews.
Clear Documentation: Well-documented packages (Laravel Backup, Socialite) with explicit schema markup appear in AI Overviews more frequently than poorly documented alternatives. AI systems extracting information prefer sources with a clear structure.
Performance Optimization: Packages enabling superior Core Web Vitals (PageSpeed 90+) support efficient AI crawling and indexing. Faster-loading sites appear in AI answers more frequently than slow alternatives.
Content Structure: Packages supporting semantic HTML and clear information architecture help AI systems extract and summarize information accurately. Well-structured content increases AI citation probability.
Laravel packages are transformational tools that can be used to create professional applications with drastically reduced timeframes. Understanding the 20 packages in this guide (and the decision frameworks for choosing packages strategically) prepares beginners and experienced developers alike to take advantage of the Laravel ecosystem in effective ways in 2026 and beyond.
The most successful Laravel projects don’t reinvent foundational infrastructure; they are strategic application of battle-tested packages solving common problems; then focus development energy on unique business logic delivering differentiated value. By learning how to choose and install packages, you set yourself on a path of building production-grade applications with efficiency, alongside development teams, and competitiveness in the job market.

Hassan Tahir wrote this article, drawing on his experience to clarify WordPress concepts and enhance developer understanding. Through his work, he aims to help both beginners and professionals refine their skills and tackle WordPress projects with greater confidence.


 Lifetime VPS Europe
 Lifetime VPS Asia
 Lifetime Hosting
 France Lifetime Dedicated Servers
 Germany Lifetime dedicated servers
 Lifetime Game Dedicated Servers
 Chicago, US
 Singapore
 Hong Kong
 Seoul, South Korea
 Amsterdem, Netherlands
 London, UK
 Zurich, Switzerland
 Sydney, Australia
 DDOS Protection
 Submit Ticket
 Full Management
 Videos and Podcasts
 Voxfor Advanced Price Management For WooCommerce
 Voxfor AI Content Summary


