Get 50% Discount Offer 26 Days

Recommended Services
Supported Scripts
WordPress
Hubspot
Joomla
Drupal
Wix
Shopify
Magento
Typeo3
How to Connect MySQL Database to PHP Using MySQLi and PDO?

How to Connect MySQL Database to PHP Using MySQLi and PDO? PHP has gained recognition for its use in web development. It is embedded in HTML and executed on the server, generating dynamic page content. As of 2025, PHP remains extremely widely used, powering approximately 74% of all websites that utilize a server-side language​. Web applications widely use MySQL as one of their preferred relational database choices.

In fact, MySQL is consistently ranked #2, behind Oracle, in terms of popularity on DB-Engines. PHP and MySQL anchor numerous web stacks, commonly referred to as LAMP/WAMP/MAMP stacks. When part of these stacks, PHP scripts extract the necessary information from the database to form HTML pages that display user accounts and stored posts or products.

Even in 2025, PHP and MySQL remain relevant due to their extensive ecosystem and ongoing updates. Most major PHP frameworks and content management system (CMS) platforms, such as WordPress, Drupal, Laravel, and Magento, rely on MySQL/MariaDB for data storage. For example, WordPress documentation explicitly notes that it uses MySQL as its database engine.

The combination of PHP and MySQL is also bundled in development environments like XAMPP, making it easy for beginners to set up a local PHP and MySQL environment. (In fact, the official XAMPP download page describes it as “an easy-to-install Apache distribution containing MariaDB, PHP, and Perl”​.) In short, PHP serves the web pages and scripts, while MySQL provides a robust, relational database backend – a pairing that still powers a huge portion of the web.

Installing XAMPP Connect MySQL Database to PHP

Installing XAMPP Connect MySQL Database to PHP

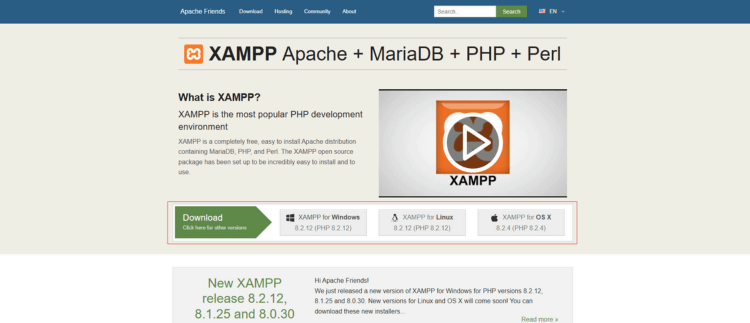
XAMPP is a free, cross-platform package that bundles Apache (web server), PHP, and MySQL/MariaDB together for easy local development. Users can obtain XAMPP through its official Apache Friends website platform. For example, the download page (shown below) allows you to select the installer for Windows, Linux, or macOS.

  • Download XAMPP: Visit the Apache Friends site and download the XAMPP installer according to your operating system. As noted on the site, “XAMPP is an easy-to-install Apache distribution that contains MariaDB, PHP, and Perl.” Select the latest stable version of PHP 8.x (unless you require an older version).

Once downloaded, follow these steps for each platform:

  • On Windows: Run the downloaded xampp-win32-*.exe installer. Click through the setup wizard, accepting the default components (Apache, MySQL/MariaDB, PHP, phpMyAdmin, etc.). Choose an installation directory (the default is C:\xampp). When finished, you can launch the XAMPP Control Panel from the Start menu (Start → XAMPP → Control Panel). The control panel (illustrated below) allows you to start or stop Apache and MySQL with a single click. Using the installer is the easiest method – after installation, you’ll find XAMPP under Start|Programs and use the Control Panel to manage services​.
  • XAMPP Control Panel: After installation on Windows, open the XAMPP Control Panel (shown above). Here, you can start Apache and MySQL by clicking “Start” next to each module. Once running, the module names will be highlighted in green, indicating that your local web server and database server are active. You can also click Admin next to MySQL to open phpMyAdmin (the web database GUI) in your browser. The XAMPP Control Panel is the main interface for managing these services​.
  • On macOS: Open the downloaded xampp-osx-*.dmg file. In the Finder window, drag the XAMPP icon into your Applications folder. Then, launch the XAMPP app (usually named ‘manager-osx’). If macOS warns that it’s from an unidentified developer, you can allow it to open. Once launched, click “Start” next to Apache and MySQL in the XAMPP Manager. XAMPP will be installed under /Applications/XAMPP, and you can manage it via this graphical control panel​.

On Linux: Download XAMPP. Run .run installer for Linux. Open a terminal and navigate to the folder where you downloaded the file. Run chmod +x xampp-linux-*-installer.run to make it executable, then execute it with sudo ./xampp-linux-*-installer.run. Follow the text-based installer prompts and accept the defaults. By default, XAMPP is installed into /opt/lampp. After installation, start the servers by running:

sudo /opt/lampp/lampp start
  •  This command will launch Apache and MySQL/MariaDB, as indicated by messages in the terminal (e.g., “LAMPP started. Apache and MySQL are running.”)​.

After installing XAMPP, you can verify the setup by visiting http://localhost in your browser. You should see the XAMPP welcome page or dashboard, confirming that Apache (PHP) and MySQL are running correctly. Your PHP project files should be placed in the htdocs folder inside the XAMPP directory (for example, C:\xampp\htdocs on Windows, /Applications/XAMPP/xamppfiles/htdocs on Mac, or /opt/lampp/htdocs on Linux). You can then access your projects at http://localhost/your-project-folder. When not in use, stop Apache and MySQL from the control panel or by running sudo /opt/lampp/lampp stop (Linux) to conserve resources.

Step-by-Step Code Tutorial

With XAMPP (or any LAMP/WAMP stack) installed, let’s connect a PHP script to a MySQL database. We’ll use both MySQLi (the “Improved” MySQL extension) and PDO (PHP Data Objects). Follow these steps:

1. Create a Database and Table

create a database on phpmyadmin to Connect MySQL Database to PHP

First, you need a database and a table to connect to. You can use phpMyAdmin (included in XAMPP) or the MySQL command line. For example, open http://localhost/phpmyadmin, and create a new database called testdb. Then, within testdb, create a table named ‘users’ with fields such as ‘id’, ‘name’, and ’email’. Alternatively, run SQL commands via phpMyAdmin or the terminal. An example SQL script to set this up would be:

CREATE DATABASE testdb;

USE testdb;

CREATE TABLE users (

  id INT AUTO_INCREMENT PRIMARY KEY,

  name VARCHAR(100) NOT NULL,

  email VARCHAR(100) NOT NULL UNIQUE

);

This creates a database named testdb and a users table, where the id auto-increments and each email address must be unique. (phpMyAdmin provides a GUI for these operations, but the above SQL will work in any MySQL client.)

2. Connect Using MySQLi (Object-Oriented)

create mysqli_connect php file

Now write a PHP script to connect to the database using MySQLi. For example, create a file mysqli_connect.php in your project folder and add this code:

<?php

$servername = "localhost";   // usually 'localhost' for XAMPP

$username   = "root";        // default XAMPP MySQL user

$password   = "";            // default XAMPP MySQL has no root password&#8203;:contentReference[oaicite:14]{index=14}

$dbname     = "testdb";

// Create a new MySQLi connection

$conn = new mysqli($servername, $username, $password, $dbname);

// Check the connection

if ($conn->connect_error) {

    die("Connection failed: " . $conn->connect_error);

}

echo "Connected successfully to MySQLi";

?>

In this script, we use new mysqli() to connect to MySQL on localhost with the root user and no password (the XAMPP defaults). If the connection fails, $conn->connect_error will be non-empty, and we output the error. On success, it echoes “Connected successfully to MySQLi.”

3. Connect Using PDO

pdo_connect php file

Now, try connecting with PDO, which is a database abstraction layer in PHP. Create another file pdo_connect.php and add:

<?php

$dsn = "mysql:host=localhost;dbname=testdb;charset=utf8mb4";

$username = "root";

$password = "";  // XAMPP default

try {

    // Create a PDO instance (connect to the database)

    $pdo = new PDO($dsn, $username, $password);

    // Set error mode to exception for better error handling

    $pdo->setAttribute(PDO::ATTR_ERRMODE, PDO::ERRMODE_EXCEPTION);

    echo "Connected successfully to PDO";

} catch (PDOException $e) {

    // If there is an error in the connection, we catch it here

    die("Connection failed: " . $e->getMessage());

}

?>

This code uses a DSN (mysql:host=localhost;dbname=testdb) to specify the connection. We then set PDO::ATTR_ERRMODE to PDO::ERRMODE_EXCEPTION so that PDO will throw exceptions on error. If the connection succeeds, it prints “Connected successfully to PDO”; otherwise, it catches the exception and displays the error message.

4. Testing the Connection

database connection successful

Upload these PHP files to your XAMPP htdocs directory (for example, C:\xampp\htdocs\mysqli_connect.php). Start Apache and MySQL from the XAMPP Control Panel, then open http://localhost/mysqli_connect.php in your browser. You should see the success message. Repeat for pdo_connect.php. If you see “Connected successfully,” the connection is working. If an error occurs, the script will display it (e.g., “Connection failed: Access denied…”). Common issues include:

  • Incorrect credentials: Verify that the server name, username, and password are correct (e.g., XAMPP’s default MySQL root user has an empty password).
  • Database does not exist: Ensure that testdb (or the name you used) was created.
  • MySQL is not running: Ensure the MySQL service is started in XAMPP.

5. Error Handling Tips

  • MySQLi: Use if ($conn->connect_error) or mysqli_connect_errno() to detect errors. You can also enable the mysqli exception mode by calling mysqli_report(MYSQLI_REPORT_ERROR | MYSQLI_REPORT_STRICT) at the top of your script to have it throw exceptions.
  • PDO: Always set the error mode to exceptions as shown (PDO::ERRMODE_EXCEPTION). Then handle errors in a try/catch block. This way, instead of silent failures, you get an exception message when something goes wrong.
  • Security: Never output raw error messages on a production site, as they can leak sensitive information. For development, die() with the error is fine, but on a live site, log errors instead. Additionally, use prepared statements (via MySQLi or PDO) to prevent SQL injection when executing queries with user input.

By following these steps, you now have PHP scripts that successfully connect to your MySQL database using both MySQLi and PDO.

3 Best MySQL Management Tools in 2025

Beyond phpMyAdmin (which comes with XAMPP), there are many graphical tools to help manage MySQL databases. Below are three of the most popular as of 2025, along with their features, pros/cons, and use cases:

phpMyAdmin (Web-Based):

phpMyAdmin database management tool
  • Key features: Browser-based interface for managing MySQL and MariaDB databases. Create and modify databases, tables, fields, and indexes, and run SQL queries. Supports the import and export of data (SQL, CSV, etc.), as well as user permissions. Often pre-installed in PHP stacks.
  • Pros: Free and open-source. Very easy to set up, as it is included in XAMPP by default. Great for beginners: its GUI simplifies many tasks. It has grown to become one of the leading tools for managing MySQL databases​, with over 200,000 downloads per month.
  • Cons: Only for MySQL/MariaDB (no support for other databases). As a web app, it can be slower with very large datasets. Requires a running web server and PHP. For production use, you must secure it or disable it (by default, XAMPP’s root MySQL user has no password​, which is insecure).
  • Use cases: Quick local database edits, simple queries and imports. Ideal for learning and small-to-medium projects. Often used in LAMP/WAMP development environments.
  • Pricing: Free.
  • Link: https://www.phpmyadmin.net/

MySQL Workbench (Official GUI):

MySQL Workbench database management tool
  • Key features: Official MySQL graphical tool from Oracle. Includes visual database design (ER modeling), SQL editor, data modeling, performance dashboards, server administration (user management, backup, and restore), and query profiling. It supports designing complex schemas and reverse-engineering databases.
  • Pros: Cross-platform (Windows, macOS, Linux) and completely free (Community Edition). Integrates database design and administration tasks within a single IDE. Useful for both developers and DBAs to manage schema, queries, and optimize performance​. Official support is available as part of the MySQL ecosystem.
  • Cons: Can be resource-intensive or slow with very large databases​. Two major drawbacks of the App Store include its challenging entrance for new users due to its numerous built-in features. Limited support for non-MySQL databases (mostly focused on MySQL/MariaDB)​.
  • Use cases: Ideal for designing and managing enterprise MySQL databases, complex querying, or when you need an all-in-one MySQL tool. Often used in professional environments or when advanced administration tasks (such as backup and data migration) are required.
  • Pricing: Workbench Community Edition is free. (There is a paid MySQL Enterprise edition that includes advanced features, but the community version is fully functional for most use cases.)
  • Link: https://www.mysql.com/products/workbench/

DBeaver (Universal GUI):

DBeaver Database Management Tool
  • Key features: A universal database tool supporting MySQL and many other database engines (PostgreSQL, SQLite, Oracle, SQL Server, etc.). It offers a rich SQL editor (with syntax highlighting and auto-completion), a visual query builder, ER diagrams, data import/export capabilities, and database object management. DBeaver can connect to numerous systems via JDBC.
  • Pros: Multi-platform (Windows/Linux/macOS). Very user-friendly interface designed for developers. The Community Edition is free and open-source software under the GPL​license. It even supports NoSQL and Big Data sources in its Enterprise Edition​. DBeaver’s interface and features make it ideal for users working with multiple database types.
  • Cons: For very large result sets or complex queries, you may occasionally experience slowdowns or need to terminate the query. Advanced features, such as NoSQL support and additional drivers, are only available in the paid Enterprise edition.
  • Use cases: Excellent for developers who work with multiple databases and want a single tool. Useful for browsing visual data and conducting quick queries. Also popular as a free alternative to paid tools.
  • Pricing: Community edition is completely free. The Enterprise edition (with additional features) costs approximately $199 per user per year for a license.
  • Link: https://dbeaver.io/

Each of these tools has its niche: use phpMyAdmin for quick browser-based access (especially on local servers), MySQL Workbench for official, feature-rich MySQL work, and DBeaver if you need a cross-database tool. When choosing, consider whether you need a web interface (such as phpMyAdmin), advanced modeling tools (like Workbench), or multi-database support (like DBeaver).

FAQs

MySQLi and PDO are both PHP extensions for interacting with databases, but they have some differences. MySQLi (“MySQL Improved”) is designed specifically for MySQL and MariaDB databases, offering both procedural and object-oriented interfaces. PDO (PHP Data Objects) is a database abstraction layer that supports various database systems, including MySQL, PostgreSQL, SQLite, and others, with a single, common API. In practice, use MySQLi if you only need MySQL and want to take advantage of its built-in MySQL-specific features (e.g., multi-query). In contrast, PDO is preferred if you might switch databases or want a consistent interface across different databases. Both support prepared statements for security and modern Object-Oriented Programming (OOP) coding, so neither is inherently more feature-rich in basic usage. However, PDO’s cross-database support can be very convenient.

Not by itself – both MySQLi and PDO can be equally secure if used correctly. Security mainly comes from using prepared statements or parameterized queries to avoid SQL injection. PDO and MySQLi both support prepared statements. Some developers prefer PDO because it uses bound parameters and exceptions by default; however, MySQLi can achieve the same functionality with the prepare() and bind_param() methods. In short, neither extension magically protects you; it’s how you write the code (e.g., using $stmt = $pdo->prepare(…) or $conn->prepare(…)) that ensures security. Always validate and bind user inputs, regardless of the extension.

By default, in XAMPP, MySQL (MariaDB) has a user named ‘root’ with no password (a blank password). The PHP examples above use username = “root” and password = “” accordingly. If you changed this default (for example, by running the XAMPP security tool), be sure to update your PHP connection credentials. In a production environment, it is recommended to set a strong password for the root user or use a separate MySQL user with limited privileges

This error indicates that your PHP script was unable to authenticate with MySQL. Common fixes: (a) Ensure MySQL is running in XAMPP. (b) Verify that your connection to the server includes the correct host name and username, along with a valid password entry. (c) Remember that the XAMPP root has no password by default​. Therefore, if you left the password empty in your code, you should remove it or vice versa. (d) If you set a password for the root user, use that. (e) Verify that the host is set to localhost (the default) unless you have specifically configured MySQL for a different address or port. After adjusting credentials, reload the page.

For new projects, either is acceptable, but consider your needs. If you plan to use MySQL/MariaDB exclusively and prefer its specific features, MySQLi is suitable. If you want flexibility (in case you switch databases later) or prefer PDO’s cleaner, exception-based error handling, PDO is a great choice. PDO also tends to be a bit more portable (if you later migrate to PostgreSQL or SQLite, for example). Many developers opt for PDO because of its versatility and the fact that it supports multiple databases with the same code. Ultimately, both MySQLi and PDO are maintained and efficient in PHP 8 and later, so choose the one that best fits your project’s future needs

Conclusion

In this guide, we cover how to set up a local PHP and MySQL environment and connect them using both the MySQLi and PDO extensions. We started by installing XAMPP (Apache, MySQL, PHP) on Windows, macOS, or Linux, and ensured that Apache and MySQL are running. We then demonstrated sample PHP code, using MySQLi (new mysqli(…)) and PDO (new PDO(…)) to establish a database connection, checking for errors, and outputting a success message. We also highlighted good practices, such as handling errors with exceptions (in PDO) and using prepared statements to secure your queries.

Lastly, we looked at popular MySQL database management tools in 2025. Tools like phpMyAdmin, MySQL Workbench, and DBeaver each offer unique features, pros, and cons for different workflows. For beginners on local development, phpMyAdmin (included with XAMPP) is very convenient. As you advance, learning a full IDE like Workbench or a multi-platform client like DBeaver can greatly simplify database design and administration.

As next steps, try creating more tables and writing SQL queries in your PHP code. You can also explore PHP frameworks (like Laravel or CodeIgniter) that use these extensions under the hood. Always practice secure coding – use parameter binding in MySQLi or PDO prepared statements to prevent SQL injection. And remember to secure your database (set strong passwords for MySQL users, restrict network access, etc.) before deploying any PHP-MySQL application to a live server. With this foundation, you’ll be well on your way to building dynamic, data-driven PHP web applications.

About the writer

Hassan Tahir Author

Hassan Tahir wrote this article, drawing on his experience to clarify WordPress concepts and enhance developer understanding. Through his work, he aims to help both beginners and professionals refine their skills and tackle WordPress projects with greater confidence.


1 Comment

Leave a Reply

Your email address will not be published. Required fields are marked *

Lifetime Solutions:

VPS SSD

Lifetime Hosting

Lifetime Dedicated Servers