
Welcome to voxfor’s comprehensive installation guide for CentOS 7.9, In this tutorial, we’ll guide you through the complete installation process for CentOS 7.9, even though it has reached its End of Life (EOL). This fantastic Linux distribution, CentOS 7 2009, keeps the classic CentOS spirit alive. With special repositories, you can continue using it well into 2024 and beyond.
CentOS migration hosting
CentOS environments often need careful updates, repository fixes, or migration planning. Voxfor VPS gives admins dedicated resources for Linux testing, migrations, and reliable production hosting.
CentOS has historically been built from Red Hat Enterprise Linux sources, offering a no-cost alternative to Red Hat’s subscription-based model. This flexibility made it popular among administrators worldwide. Despite CentOS reaching its EOL, it remains an excellent choice for those who prefer a Red Hat-based system. It serves as a drop-in replacement for Red Hat, ensuring your servers continue running smoothly.
To continue using CentOS 7.9 in 2024 despite its End of Life, follow our detailed installation guide to keep your servers stable and efficient. First, prepare your server by accessing the Voxfor management interface, selecting and loading the CentOS 7.9 ISO image, and rebooting the virtual machine. During the installation process, choose your preferred language, time zone, and keyboard layout.
Opt for the “Minimal Install” or predefined server options under Software Selection, and set the installation source URL to archive.kernel.org/centos-vault/7.9.2009/os/x86_64/. Configure your network and hostname, select the installation destination disk, reclaim disk space, and begin the installation. Afterward, create a user account, set the root password, and reboot the system while accepting the license agreement. Follow these steps for a smooth CentOS 7.9 installation via the Voxfor management interface. Visit Voxfor to subscribe to a plan and get started today.
First you have to go to the voxfor website and then move to the widget by the vps pricing.
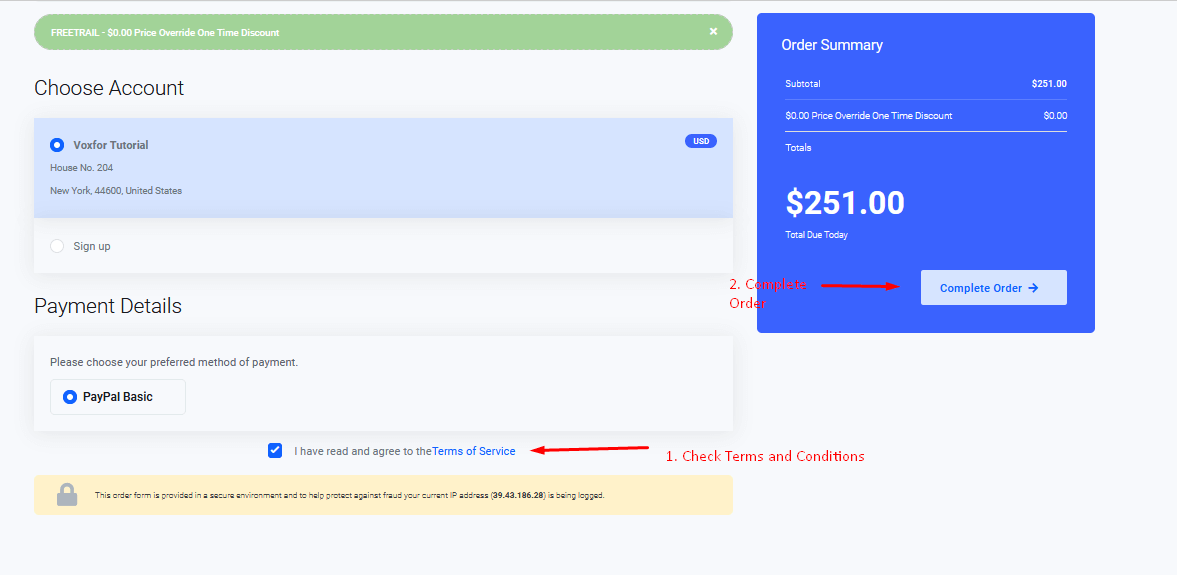
To subscribe to a plan, follow these steps:
On the new page, sign up by entering your details. Complete all steps, and you’ll receive an email from Voxfor confirming your subscription.
After following all these steps, you’ll receive an email from Voxfor confirming your subscription and the server information.

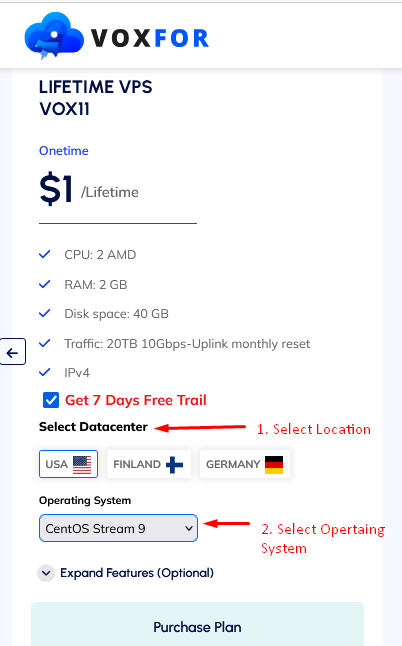
At Voxfor, we offer the purchase of a Lifetime server starting at just $250. Your server, pre-installed with CentOS 7.9, will be ready in 2 minutes. You’ll also have access to many other operating systems for installation. This guide will show you how to install CentOS 7.9 through our management interface, not using a USB stick as traditional methods suggest.
Follow these simple steps to install CentOS 7.9:
Access the Voxfor management interface and select and click on your services from the list Under Services.

Click on services as you can see in the below image:

Locate the “Service Management” section on your dashboard.
Click on the “ISO Images” option, which is represented by an icon with a disc and the text “ISO Images”.

CentOS 7.9 for installation: In the search box, type the text “CentOS” and press Enter.
From the list of available ISO images, locate “CentOS 7.9 (amd64/boot)”.
To load the ISO image, click on the refresh icon button next to “CentOS 7.9 (amd64/boot)”.

Return to the main service management page.
In the “Service Actions” section, click on the “Reboot” option to load the ISO image.

A confirmation box will appear asking, “Are you sure that you want to reboot this virtual machine?” Click “Yes” to proceed.

Click on the console screen, you will see the CentOS 7 boot menu. Select “Install CentOS 7” and press Enter to start the installation.


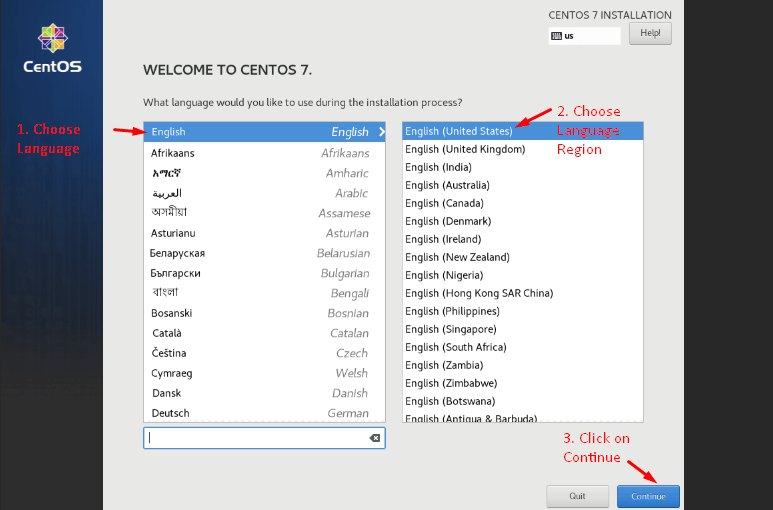
Before starting the installation process itself, select which language you would like to use during installation. The default option is English. Also choose the Language region.
To set a date and time for the system, click the Date & Time icon under the Localization heading.

Select a region/time zone on the map of the world as seen below. Once you have selected your time zone, hit Done to save your changes.

Select the Keyboard option under the Localization heading to set the keyboard layout.

The system default is English (US) and the language you selected in the initial window. Click the plus icon to add more layouts if you want. Move a layout to the top of the list to make it the default option.

Select the Software Selection option under the Software heading.

You will see a list of predefined Base Environment options and optional add-ons. This part entirely depends on your needs.

Click the Installation Source option under the Software heading. Check your machine’s storage under the Local Standard Disks heading. CentOS 7 will be installed on the selected disk.

After selecting the installation source you need to unselect the ISO File and click on “On the network” and paste this link in that option: Link: archive.kernel.org/centos-vault/7.9.2009/os/x86_64/
After putting this URL you need to uncheck the option below which is “This URL refers to a mirror list” and click on “done”.

Click the Network & Host Name option under the System heading.

For the hostname, type in the full host name of your system. In our example, we will set the Hostname as voxfor. After the host name click on apply. Also click the ON button as well.

Click the Installation Destination option under the System heading. Check your machine’s storage under the Local Standard Disks heading. CentOS 7 will be installed on the selected disk.

Select the QEMU QEMU HARDDISK under the Local Standard disk and then click on done.

Choose the disk where the distribution should be installed. After this you need to click on the Reclaim Space.

After selecting the reclaim space another window will be open and then you need to click on Delete All.

After this you need to click on the Reclaim space once again.

After this you just have to click on the Begin Installation.

Our Installation process has been started successfully. Now, you need to select User Creation.

Here you need to enter some details like enter full name, enter user name, enter password, re-enter password and then click on Done.

After this you need to select the root password from the user settings window.

Now, in this window you need to select your root password and re-enter your root password and then click on Done.

After setting the root password and user reaction you need to select the finish configuration.

After this the system will reboot and you will enter a new operating system which is known as CentOS 7.9.
Congratulations! You now have a minimal installation of Rocky Linux 9.2 up and running. Rocky Linux is a powerful and stable distribution, perfect for servers and workstations alike. Ready for more? Choose Voxfor for your server needs and enjoy the simplicity of a ready-to-use server with Rocky Linux installed, available in just two minutes. Visit Voxfor to get started today! Thank you for following this guide. For more tips and tutorials, stay tuned to our website. If you have any questions or need further assistance, feel free to reach out to our support team.
The Voxfor website offers more installation guides, including those for Almalinux, Debian 12, and Ubuntu 22.04.


 Lifetime VPS Europe
 Lifetime VPS Asia
 Lifetime Hosting
 France Lifetime Dedicated Servers
 Germany Lifetime dedicated servers
 Lifetime Game Dedicated Servers
 Chicago, US
 Singapore
 Hong Kong
 Seoul, South Korea
 Amsterdem, Netherlands
 London, UK
 Zurich, Switzerland
 Sydney, Australia
 DDOS Protection
 Submit Ticket
 Full Management
 Videos and Podcasts
 Voxfor Advanced Price Management For WooCommerce
 Voxfor AI Content Summary


