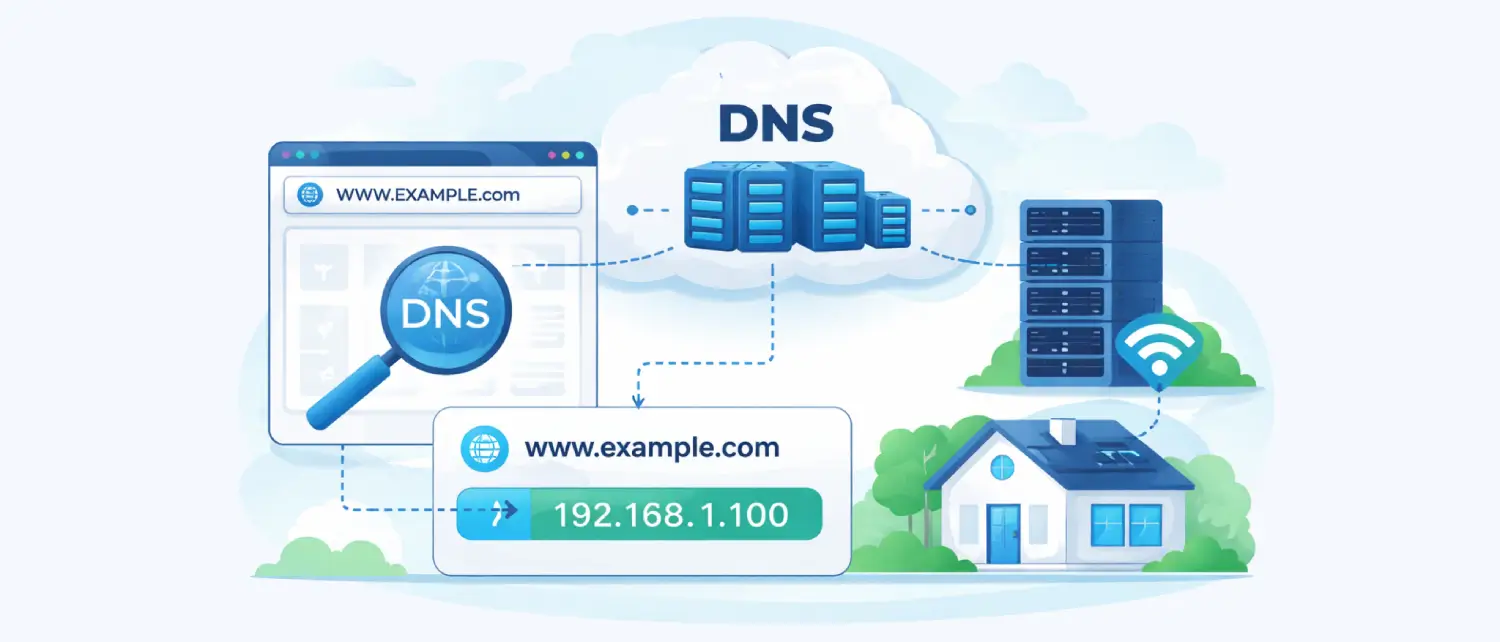
The Domain Name System (DNS) works like the Internet phonebook. It helps convert easy-to-remember website names into the numeric IP addresses that computers use to find each other online.
Inbound Marketing Strategy
Helpful tutorials attract qualified visitors, but reliable hosting keeps those readers engaged. Voxfor VPS gives growing websites the speed, uptime, and control needed to support stronger inbound marketing campaigns.
A simple way to understand this is to compare it to a contact list. A website’s domain name is like a person’s name, while the IP address is like their phone number or home address. DNS connects the name to the correct number so your device knows where to go.
Without DNS, people would have to remember long strings of numbers, such as IPv4 or IPv6 addresses, every time they wanted to visit a website. This would make using the internet extremely difficult for everyday users.
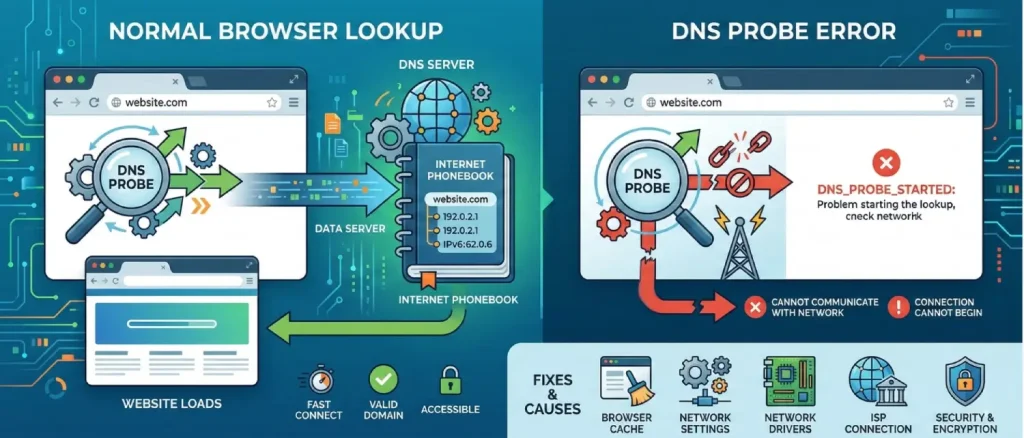
When a user tries to open a website, modern browsers like Google Chrome and other Chromium-based browsers, such as Microsoft Edge, first run a quick internal check called a DNS probe. This check helps the browser confirm that the website’s domain can be found and reached.
During this process, the browser looks up the domain name to get its IP address and briefly tests how quickly the lookup works. It also verifies that the domain is valid and accessible. Once this quick check is successful, the browser continues and starts loading the website normally.
However, if this initial check runs into a problem, the browser may show an error called DNS_PROBE_STARTED. This means the browser tried to start the process of contacting the DNS server, but the connection could not properly begin, or the browser was unable to communicate with the network.
Fixing this issue usually requires checking several possible causes. These can include the browser cache, the computer’s network settings, the network drivers, the internet connection provided by the Internet Service Provider (ISP), and sometimes newer network security or encryption settings. By checking these areas step by step, the problem can usually be identified and resolved.
The manifestation of DNS resolution failures varies significantly depending on the client application utilized. Because the internet relies on a highly distributed, decentralized architecture, DNS errors are inherently common and surface across all operating systems and device form factors. While the underlying failure remains identical, a breakdown in the translation of hostnames to IP addresses, the graphical user interface presents distinct diagnostic messages depending on the software environment.
The table below delineates how the DNS_PROBE_STARTED error and its closely related network breakdown counterparts present across major web browsing applications.
| Web Browser Environment | Primary Diagnostic Message Displayed | Technical Code / Error Flag |
| Google Chrome / Brave | “This site can’t be reached,” or “Server IP address could not be found.” | DNS_PROBE_STARTED or DNS_PROBE_FINISHED_NXDOMAIN |
| Mozilla Firefox | “Hmm. We’re having trouble finding that site.” | N/A (Standard interface failure page) |
| Microsoft Edge | “Hmmm… can’t reach this page.” | DNS_PROBE_STARTED |
| Apple Safari | “Safari Can’t Find the Server” | N/A (Standard interface failure page) |
While the DNS_PROBE_STARTED designation is heavily associated with Chrome and Chromium-based engines, the failure mechanism it describes is universal. The diagnostic process must begin by recognizing that this error does not indicate a permanently defunct website, but rather a localized bottleneck in the query’s outbound journey. This stands in stark contrast to errors representing server-side failures, dictating that the remediation effort must be entirely focused on the client machine, the local router, or the immediately adjacent ISP gateway.
To execute highly effective troubleshooting, it is critical to distinguish DNS_PROBE_STARTED from its closely related error codes, as the differential diagnosis informs the most efficient path to resolution. Network administrators frequently conflate these errors, leading to wasted diagnostic cycles on unrelated system components.
The DNS_PROBE_FINISHED_NXDOMAIN error often appears alongside the DNS_PROBE_STARTED error. While the “started” error means the DNS request could not begin or complete properly, the NXDOMAIN error means the request actually reached the DNS server, but the server responded that the domain does not exist_
This usually happens when the website address is typed incorrectly, the domain name has expired, or the website’s DNS settings are misconfigured. In some cases, clearing your browser or system DNS cache can fix the problem if an outdated record is stored locally. However, most of the time this error is related to an issue on the website’s server or domain configuration rather than the user’s device.
On the other hand, the DNS_PROBE_BAD_CONFIG or DNS_PROBE_FINISHED_BAD_CONFIG errors usually point to a problem with the device’s network settings. In this case, the system may already have valid DNS server addresses, but something in the network configuration is preventing the connection from working properly.
This can happen if there is an IP address conflict, a VPN is interfering with the connection, or a proxy setting is incorrectly configured. To fix this type of error, common solutions include turning off VPN services, resetting the computer’s network settings, and checking or disabling any active proxy configurations.
To understand why a DNS probe fails, it helps to look at how a request moves through different parts of a computer’s networking system. These layers work together to send and receive data across the internet. A failure can happen at several points during this process.
Sometimes the issue is caused by software problems in the browser or operating system. In other cases, it may be related to network settings, drivers, or even hardware issues. By examining each part of the connection step by step, it becomes easier to identify the main reasons behind DNS probe errors in modern network environments.
One of the most common and simplest causes of this problem is an issue with the DNS server itself. Internet Service Providers (ISPs) usually assign DNS servers automatically to your router using a system called DHCP.
If the ISP’s DNS server has problems, such as downtime, maintenance, or even heavy traffic from attacks like DDoS, your device may not receive a response when it sends a DNS request. When this happens, the browser’s DNS check cannot complete, which can leave the probe stuck in a “started” state.
Another possible cause of this error is overly strict security software on the device. Antivirus programs and third-party firewalls often monitor network traffic to protect the system from harmful activity.
Sometimes these security tools can mistakenly treat normal DNS requests as suspicious activity. When this happens, they may block or drop the requests before they even reach the router. As a result, the browser cannot complete its DNS check, which can trigger the DNS probe error.
Another common cause of DNS issues is corrupted or outdated cache data. Both operating systems and web browsers store DNS information locally to help websites load faster. This stored data is called a DNS cache, and it keeps records of recently visited websites and their IP addresses.
However, problems can occur if a website moves to a new server or changes its network settings. In that case, the old IP address stored in the cache becomes outdated. When the browser tries to use this incorrect information, it can lead to connection errors and prevent the website from loading properly.
Finally, network adapter driver degradation and specific operating system power management states can severely impact connectivity. Outdated, fragmented, or corrupted network drivers may fail to properly send data packets for transmission. In Windows operating systems, certain features designed to optimize boot times can accidentally preserve these faulty driver states, keeping the error active across multiple user sessions.
Before initiating complex command-line interventions, modifying registry parameters, or altering hardware configurations, network administrators and end-users are advised to execute a series of isolation tests. These preliminary diagnostics help determine whether the fault lies within the specific browser, the local hardware, or the external internet infrastructure, preventing unnecessary modifications to stable system components.
The initial test involves cross-device and cross-browser verification. Accessing the targeted uniform resource locator (URL) via an alternative browser (such as attempting access on Mozilla Firefox or Microsoft Edge if the failure occurred on Google Chrome), or via a separate mobile device connected to the same local area network (LAN), can rapidly isolate software-specific faults. If the website resolves successfully on a secondary device or alternative browser, the issue is localized to the primary machine’s configuration or the primary browser’s internal cache.
Subsequently, the deployment of the browser’s Incognito or Private Browsing mode serves as a highly effective, rapid diagnostic tool. Incognito mode operates within a sandboxed environment, explicitly without using existing cookies, cached site data, or most third-party extensions. If the domain resolves correctly within a private window, it strongly indicates that a corrupted cache file, a tracking cookie, or an incompatible browser extension (such as an aggressive ad-blocker or a localized VPN plugin) is interfering with the DNS request pathway.
Finally, it is important to check whether the domain is working correctly across the internet. This can be done using online DNS propagation tools that show how a domain is resolving from different locations around the world.
If most of these global checks show errors, timeouts, or NXDOMAIN responses, the problem is likely on the server side rather than on your device. In that case, the issue may be related to the website’s hosting provider, CDN, or domain registrar. When this happens, local troubleshooting on your computer will not fix the problem, and the website owner or hosting provider will need to resolve it.
The foundational step in resolving pervasive DNS anomalies involves purging the local operating system’s resolver cache and forcing the network adapter to negotiate a new IP lease from the local routing hardware. This dual process, technically known as flushing and renewing, systematically removes corrupted local records that misdirect browser traffic.
The table below outlines the specific command-line interface (CLI) inputs required to execute this systemic purge across various operating system architectures and enterprise distributions.
| Operating System Architecture | Command Line Utility | Exact Execution Syntax |
| Windows (10/11) | Command Prompt (Admin) | ipconfig /flushdns followed by ipconfig /renew |
| macOS (Modern) | Terminal | sudo dscacheutil -flushcache; sudo killall -HUP mDNSResponder |
| Ubuntu / Debian Linux | Terminal | sudo systemd-resolve –flush-caches or sudo resolvectl flush-caches |
| Arch Linux | Terminal | sudo systemd-resolve –flush-caches |
| Fedora / CentOS | Terminal | sudo service nscd restart |
In Windows environments, the protocol must be executed sequentially to ensure a complete network stack refresh. After opening the Command Prompt with administrative privileges, the flush command clears incorrect, outdated, or corrupted entries from the local DNS resolver cache. Once the flush is completed, the system displays a confirmation message.
Next, the renew command instructs the local DHCP client to release its current IP address and request a new one from the router, helping avoid local IP conflicts. Finally, administrators should run the ipconfig /registerdns command, which re-registers the machine’s DNS settings with the primary ISP, ensuring the local system stays synchronized with the external network gateway.
On Apple’s macOS, the Unix-based architecture manages DNS caching differently, mainly through the Multicast DNS Responder daemon. Running the combined terminal command will clear the local DNS cache and restart the daemon at the same time. It is important to note that macOS does not display a confirmation message after the process finishes. Instead, the terminal prompt simply returns to its normal state once the administrator password is entered and the command completes.
Linux distributions exhibit a high degree of variance depending on the kernel version and the active package managers. Systems using the modern systemd suite require interaction with the resolvectl or systemd-resolve daemons. In contrast, older or legacy distributions, including older CentOS configurations, often handle DNS caching through the Name Service Cache Daemon (nscd), which requires restarting that specific service to clear the cache.
In advanced Linux environments, especially on Ubuntu development machines, a seemingly routine DNS_PROBE_STARTED error can hide deeper system-level conflicts. If a simple DNS cache flush fails, the problem often lies within the /etc/resolv.conf file, which controls system-wide DNS routing. In some cases, this file may become inaccessible, locked, or accidentally deleted by conflicting environment management tools. Errors such as “Operation not permitted” when trying to modify this file usually indicate a serious configuration lock.
To forcefully resolve persistent DNS probe failures on Linux when a standard cache flush fails, administrators may need to bypass the resolv.conf lock by editing the DHCP client configuration directly. Using a terminal text editor, the administrator should open /etc/dhcp/dhclient.conf and add a supersede directive. Adding the line supersede domain-name-servers 8.8.8.8; forces the network manager to ignore corrupted local DNS settings and route traffic through a reliable public DNS server.
After saving this change, administrators should restart the network manager service using sudo systemctl restart NetworkManager.service. This applies the new configuration immediately and can restore normal browser connectivity.
Google Chrome, along with its Chromium-based derivatives, maintains a proprietary internal DNS cache that works independently of the host operating system. Because of this, an operating system-level DNS flush performed through the Windows Command Prompt or macOS Terminal may not clear the browser’s internal cache, leaving the DNS_PROBE_STARTED error unresolved even if the operating system itself is functioning correctly. To fully resolve the issue, direct intervention inside the browser’s internal networking settings is often required.
The procedure requires accessing Chrome’s hidden internal diagnostics page. The user must enter the internal URL chrome://net-internals/#dns directly into the address bar to open the network internals dashboard. Inside the DNS section, selecting the clear host cache option forces Chrome to remove its stored DNS records and perform fresh DNS lookups the next time a website is loaded.
However, advanced diagnostics show that clearing the host cache alone is not enough. It should be followed by flushing the browser’s socket pools. Web browsers maintain active network connections to improve loading speed for multiple page requests and streaming data. If an active socket connection is linked to an outdated DNS record, the DNS probe error may continue even after clearing the cache.
To fix this, users should open the socket section of Chrome’s internal diagnostics page or go directly to chrome://net-internals/#sockets and flush the socket pools. This terminates all active network connections, forcing the browser to create new TCP connections and DNS requests from a clean state.
Furthermore, standard browser hygiene plays an important role in maintaining network stability. Cookies, session tokens, and cached web assets can sometimes cause redirect loops or protocol conflicts that appear similar to DNS errors. Accessing the browser’s privacy settings and clearing browsing data, especially cached images, stored files, and site cookies for the maximum time range (“All time”), helps remove these potential issues.
For maximum effectiveness, experimental browser flags should also be reset to their default settings. Modified Chromium flags, which allow users to test unreleased or experimental features, can sometimes interfere with network protocols. By visiting chrome://flags/ and resetting all settings to their default values, users can remove potential conflicts that may disrupt the DNS probing process.
It is important to note that browser performance optimizations can sometimes appear similar to network latency issues. Features like Memory Saver, which pauses inactive tabs to free RAM, or Preload Pages, which preloads DNS records for links a user might open, can temporarily strain a weak network connection.
While these features usually improve browser speed and responsiveness, a heavily overloaded network adapter may struggle to complete the initial DNS probe if the browser is loading many background resources at the same time. Keeping the browser updated to the latest stable version, especially with Chrome’s frequent update cycle, helps ensure these performance features run with the latest fixes and improvements.
If flushing both the operating system and browser caches fails to resolve the DNS_PROBE_STARTED error, the underlying issue may lie with the ISP’s default DNS servers. Internet Service Providers (ISPs) often prioritize cost and regional proximity rather than query performance, load balancing, or high availability. Switching the network adapter’s DNS settings from the ISP’s default servers to reliable public DNS providers can serve as a more stable and long-term solution.
Two of the most reliable and widely trusted public DNS providers are Google Public DNS and Cloudflare. Both organizations operate large global Anycast networks. Anycast routing allows a single IP address to be distributed across many servers worldwide. When a browser sends a DNS request, the network automatically routes it to the closest and fastest data center.
This approach reduces latency, improves reliability during regional outages, and helps protect users from certain DNS-based attacks, such as localized DNS poisoning.
The table below provides the precise Internet Protocol Version 4 (IPv4) and Internet Protocol Version 6 (IPv6) addresses required for manual configuration across network adapters and routing hardware.
| Public DNS Provider | Primary Server (IPv4) | Alternate Server (IPv4) | IPv6 Primary & Alternate (Optional) |
| Google Public DNS | 8.8.8.8 | 8.8.4.4 | 2001:4860:4860::8888 / ::8844 |
| Cloudflare | 1.1.1.1 | 1.0.0.1 | 2606:4700:4700::1111 / ::1001 |
In a Windows environment, modifying these DNS settings requires opening the Network and Sharing Center through the Control Panel. From there, the administrator must access the adapter settings and open the properties of the active network connection, whether it is Wi-Fi or Ethernet. Selecting Internet Protocol Version 4 (TCP/IPv4) and opening its properties displays the DNS server configuration fields.
By switching the selection from automatic DHCP assignment to manual entry using “Use the following DNS server addresses”, users can enter the preferred and alternate DNS server addresses directly into the system’s network configuration. Although IPv6 is the newer standard for internet addressing, IPv4 is still widely supported by most routers and network devices, making it simpler and less prone to errors during manual troubleshooting.
For macOS architectures, the reconfiguration is facilitated through the System Settings panel. Navigating to the active network interface details allows access to the DNS tab. Here, legacy ISP servers can be removed, and new public DNS servers can be added. Administrator credentials are required to commit these changes to the macOS network configuration.
To apply this fix network-wide, rather than on a per-device basis, administrators can add public DNS servers directly into the local router’s configuration panel (usually found under WAN or Network settings, depending on the router manufacturer, such as TP-Link or Asus). Once configured at the router level, all connected devices will automatically use the new DNS settings, helping prevent DNS probe errors on mobile devices and smart home appliances connected to the same network.
While the majority of troubleshooting protocols focus on desktop systems, mobile devices running Android and iOS can also experience DNS probe errors. The network systems inside these devices still depend heavily on DNS caching and specific DNS settings, which means DNS-related issues can occur on mobile devices as well.
On the Android operating system, resolving the DNS probe error requires accessing the advanced network settings. By opening the Wi-Fi settings and editing the active network, users can switch from a dynamic DHCP configuration to a Static IP setup. This manual configuration provides fields to enter custom DNS servers (such as 8.8.8.8), which overrides the ISP’s default DNS servers.
Critically, Android 9 and later incorporate a system-wide “Private DNS” feature, which utilizes DNS over TLS (DoT) to encrypt all DNS queries across all apps, not just the browser. If a custom Private DNS provider hostname is entered incorrectly, or if an enterprise network actively blocks DoT traffic (which operates on a specific network port), complete DNS failure occurs across the entire device.
Setting the Private DNS feature to “Automatic” or toggling it entirely “Off” within the Network & Internet settings rapidly resolves these encrypted routing conflicts. Finally, clearing the application cache specifically for the Chrome mobile browser application removes localized software bloat that contributes to request latency.
For Apple iOS environments, the methodology is largely parallel. Navigating to the detailed information screen (the “i” icon) of the connected Wi-Fi network allows users to access the “Configure DNS” parameter. Changing this from Automatic to Manual enables the deletion of existing, problematic servers and the introduction of resilient public servers, such as those provided by Google or Cloudflare.
In scenarios where manual configuration fails to restore connectivity, executing a complete reset of the device’s network settings is required. Accessing Settings > General > Reset > Reset Network Settings clears all saved Wi-Fi networks, Bluetooth pairings, and cellular routing data. This forces the iOS device to rebuild its network stack from a completely pristine state upon reboot, eliminating deep-seated configuration errors without deleting user data or applications.
Additionally, performing a hard restart of the mobile device clears transient memory artifacts and terminates hung background processes that may be silently interfering with the device’s networking daemon.
The table below summarizes the mobile configuration pathways for rapid remediation:
| Mobile Operating System | Setting Pathway for DNS Modification | Encrypted DNS Toggle Pathway |
| Android (Modern) | Settings > Wi-Fi > Modify Network > Advanced > IP Settings (Static) | Settings > Network & Internet > Private DNS |
| Apple iOS | Settings > Wi-Fi > (i) Icon > Configure DNS > Manual | Managed primarily via iCloud Private Relay toggles |
Troubleshooting the DNS_PROBE_STARTED error must also account for rapidly evolving infrastructure technologies and non-traditional internet service delivery methods.
For instance, the proliferation of direct-to-satellite internet services, such as Starlink, introduces unique DNS routing complexities. Users relying on satellite constellations frequently experience micro-dropouts as the terrestrial dish transitions its connection between rapidly moving low-earth orbit satellites. While the primary connection generally recovers swiftly, the browser’s DNS probe may initiate exactly during a micro-dropout.
The operating system may report that the network adapter is fully connected to the local router. Still, the router lacks upstream connectivity, resulting in a confusing probe error where the internet appears active but specific programs fail. In these specialized environments, utilizing highly resilient public DNS servers and ensuring the router’s firmware is optimized for satellite handover is critical.
Furthermore, the integration of advanced Artificial Intelligence (AI) features directly into browser environments introduces new security vulnerabilities that impact network handling. Security researchers have uncovered vulnerabilities (such as CVE-2026-0628) within early implementations of integrated AI panels (like Gemini Live in Chrome). These vulnerabilities theoretically allow malicious extensions to tap into the browser environment, hijack panels, and potentially access local operating system files.
To combat these emerging threats, browser engineers are implementing ever-stricter sandboxing protocols and network access restrictions. For example, Chrome updates have split single network permissions into highly granular local-network and loopback-network permissions to prevent malicious cross-site scripting attacks from scanning internal routers.
As browsers become more locked down to protect against these advanced threats, the likelihood of legitimate DNS queries being inadvertently blocked by internal security protocols increases, emphasizing the necessity of testing environments in extension-free Incognito modes.
The DNS_PROBE_STARTED error represents a critical, localized interruption in the internet’s foundational addressing system, effectively paralyzing a web application’s ability to locate remote servers. Exhaustive technical analysis reveals that this failure is rarely indicative of a catastrophic hardware failure or a permanent, global website outage. Instead, it overwhelmingly points to transient data corruption within local caches, conflicting security and encryption protocols, or weaknesses within the ISP default routing infrastructure.
If the issue continues, you may need to look at deeper system settings. This can include changing your DNS servers to reliable public ones, adjusting network settings, or disabling certain system features that may affect network drivers. Some privacy features, such as encrypted DNS or proxy services, can also sometimes interfere with normal DNS routing.

Hassan Tahir wrote this article, drawing on his experience to clarify WordPress concepts and enhance developer understanding. Through his work, he aims to help both beginners and professionals refine their skills and tackle WordPress projects with greater confidence.


 Lifetime VPS Europe
 Lifetime VPS Asia
 Lifetime Hosting
 France Lifetime Dedicated Servers
 Germany Lifetime dedicated servers
 Lifetime Game Dedicated Servers
 Chicago, US
 Singapore
 Hong Kong
 Seoul, South Korea
 Amsterdem, Netherlands
 London, UK
 Zurich, Switzerland
 Sydney, Australia
 DDOS Protection
 Submit Ticket
 Full Management
 Videos and Podcasts
 Voxfor Advanced Price Management For WooCommerce
 Voxfor AI Content Summary


