- Lifetime Solutions
VPS SSD:
Lifetime Hosting:
DEDICATED SERVERS:
- VPS Locations
- Managed Services
- Support
- WP Plugins

Open WebUI is a strong fit for VPS hosting when you want a private AI chat dashboard that stays online and can connect to Ollama, APIs or internal tools. Docker Compose makes the setup easier to maintain, while a VPS gives the interface a stable home for users, backups, SSL, updates and access control.
This guide assumes Ubuntu 22.04 or 24.04, Docker Compose, Open WebUI in a named Docker volume, optional Ollama for local models, and NGINX with Certbot for public HTTPS access. Open WebUI itself is comparatively light; local model inference is the part that changes CPU, RAM and storage requirements.
| Use case | Recommended starting point | Why it matters |
|---|---|---|
| Personal AI dashboard | 2-4 vCPU, 4-8 GB RAM | Good for API-backed chat and light experimentation. |
| Open WebUI + Ollama | 4-8 vCPU, 8-16 GB RAM | Better for small local models and private team use. |
| Team AI workspace | 8+ GB RAM, backups, monitoring | Use authentication, HTTPS, update routines and usage controls. |
Open WebUI is a self-hosted web interface for interacting with AI models. It gives users a familiar chat-style dashboard where they can send prompts, manage conversations, connect model providers, use local models, and build a more private AI workspace.
A normal AI chatbot runs on someone else platform. Open WebUI is different because you host the interface yourself. That means you control where it runs, who can access it, and how it connects to your models.
Open WebUI is especially useful for:
Developers who want a private AI interface for coding help.
Agencies that want an internal AI dashboard for team members.
Website owners who want to test self-hosted AI tools.
Students and researchers who want to experiment with local models.
Businesses that want more control over AI access and user accounts.
Server admins who prefer Docker-based deployments.
Open WebUI can work with Ollama for local model hosting, and it can also connect to OpenAI-compatible API endpoints. If you want a fully local setup, you can run Ollama on the same VPS. If you want lighter server usage, you can run only the Open WebUI interface and connect it to external model APIs.
Running Open WebUI with Docker Compose requires a server that stays online, responds quickly, and gives you full control over your AI environment. Voxfor VPS provides server control, persistent access and flexibility for hosting a private Open WebUI dashboard, connecting it with Ollama, securing it with SSL and managing AI tools from one remote environment.
Many users first test Open WebUI on their local laptop. That is fine for learning, but it becomes limited very quickly. A laptop is not designed to keep services online all day. If the system sleeps, restarts, loses internet, or runs out of resources, your AI interface goes offline.
A VPS solves this problem by giving Open WebUI a dedicated remote environment. It stays online 24/7, can be accessed from different devices, and is easier to secure behind a domain and SSL certificate.
Running Open WebUI on a VPS gives you:
More reliable availability than a local machine.
Remote browser access from desktop or mobile.
A clean Linux environment for Docker Compose.
Easy updates and backups.
Better control over firewall rules and domain setup.
A scalable path if your usage grows.
For example, a solo developer may only need a small VPS to run the Open WebUI interface. A team using Ollama with local models will need more CPU, RAM, and disk space. The right VPS depends on whether you only want the dashboard or you also want to run AI models directly on the server.
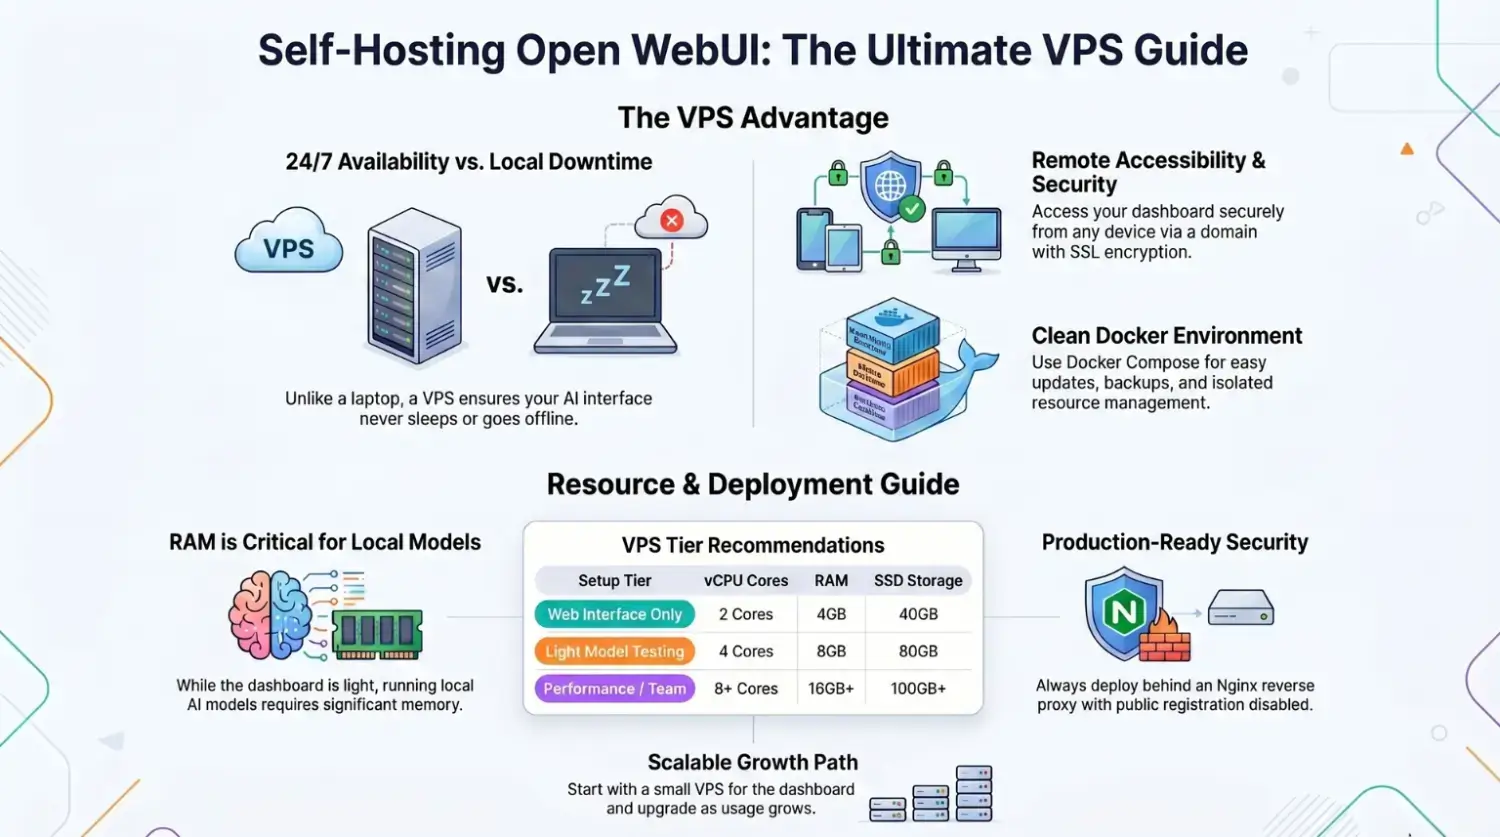
Before installing anything, choose a VPS that matches your use case. Open WebUI itself is not extremely heavy, but AI model inference can use a lot of memory and CPU.
Here is a practical recommendation for Voxfor VPS users:
For Open WebUI only: Choose a Voxfor VPS with at least 2 vCPU cores, 4GB RAM, and 40GB SSD storage. This is enough if Open WebUI is mainly acting as a web dashboard that connects to external AI APIs.
For Open WebUI plus light Ollama testing: Choose at least 4 vCPU cores, 8GB RAM, and 80GB SSD storage. This can handle smaller local models, but performance will depend heavily on the model size.
For better local model usage: Choose 8 vCPU cores, 16GB RAM or more, and 100GB+ SSD storage. If you plan to run local models regularly, RAM becomes very important. Larger models need more memory, and the server may slow down if resources are too limited.
For team usage or heavier AI workloads: Choose a higher-performance Voxfor VPS with more CPU, more RAM, and fast SSD storage. This is recommended if multiple users will access Open WebUI, upload documents, use RAG features, or test several models.
If your goal is only to install Open WebUI as a private interface, you can start small. If your goal is to run local AI models on the same VPS, start with more RAM. A 16GB RAM VPS is a much safer starting point for serious local model testing.
Reference points for this setup: verify current behavior against the Open WebUI documentation, Docker Compose documentation, Ollama project documentation, and Certbot documentation before using the commands on a production system.
For this tutorial, you need:
A Voxfor VPS running Ubuntu 22.04 or Ubuntu 24.04.
Root or sudo access.
A domain or subdomain, such as ai.example.com.
Basic SSH access to your server.
A few minutes to install Docker and configure the stack.
This guide uses Ubuntu commands. If you are using another Linux distribution, the Docker installation steps may be slightly different.
First, connect to your server using SSH.
ssh root@your_server_ipReplace your_server_ip with your real VPS IP address.
Once you are logged in, update the server packages:
sudo apt update && sudo apt upgrade -yIt is better to start from an updated server. This reduces package conflicts and makes sure your system has the latest security patches.
Running everything as root is not a good habit. Create a separate user for server management.
adduser deploy
usermod -aG sudo deploy
Now switch to the new user:
su - deployFrom this point, you can use sudo when administrative access is needed.
Docker allows you to run Open WebUI in a container. Docker Compose makes the setup easier because you can define your services in a single YAML file.
Install the required packages first:
sudo apt update
sudo apt install ca-certificates curl -y
Add Docker official GPG key:
sudo install -m 0755 -d /etc/apt/keyrings
sudo curl -fsSL https://download.docker.com/linux/ubuntu/gpg -o /etc/apt/keyrings/docker.asc
sudo chmod a+r /etc/apt/keyrings/docker.asc
Add the Docker repository:
sudo tee /etc/apt/sources.list.d/docker.sources <<EOF
Types: deb
URIs: https://download.docker.com/linux/ubuntu
Suites: $(. /etc/os-release && echo "${UBUNTU_CODENAME:-$VERSION_CODENAME}")
Components: stable
Architectures: $(dpkg --print-architecture)
Signed-By: /etc/apt/keyrings/docker.asc
EOF
Update the package index again:
sudo apt updateNow install Docker Engine and the Compose plugin:
sudo apt install docker-ce docker-ce-cli containerd.io docker-buildx-plugin docker-compose-plugin -yCheck if Docker is running:
sudo systemctl status dockerTest Docker with:
sudo docker run hello-worldIf the test container runs successfully, Docker is installed correctly.
To run Docker commands without typing sudo every time, add your user to the Docker group:
sudo usermod -aG docker $USERLog out and log back in for the group change to apply.
Then check Docker Compose:
docker compose version
You should see the Docker Compose version in your terminal.
Create a clean folder for the Open WebUI stack:
mkdir -p ~/openwebui
cd ~/openwebui
This folder will store your Docker Compose file, environment file, and future backup scripts.
Open WebUI uses a secret key for secure sessions. If you do not keep this key persistent, users may get logged out after container recreation.
Generate a secure key:
openssl rand -hex 32Copy the output. You will use it in the .env file.
Create a .env file:
nano .envAdd the following values:
WEBUI_SECRET_KEY=replace_with_your_generated_secret_key
WEBUI_URL=https://ai.example.com
[email protected]
WEBUI_ADMIN_PASSWORD=ChangeThisStrongPassword
Replace:
Replace with the key you generated.
https://ai.example.com with your real domain.
[email protected] with your admin email.
ChangeThisStrongPassword with a strong password.
Save and close the file.
This file keeps important settings outside the main Compose file. It also makes future edits easier.
If you only want to run Open WebUI as a web interface, create this file:
nano docker-compose.ymlAdd:
services:
  openwebui:
    image: ghcr.io/open-webui/open-webui:main
    container_name: open-webui
    restart: unless-stopped
    ports:
      - "3000:8080"
    env_file:
      - .env
    volumes:
      - open-webui-data:/app/backend/data

volumes:
  open-webui-data:
    name: open-webui-data
Start Open WebUI:
docker compose up -dCheck running containers:
docker compose psYou can also check logs:
docker compose logs -f openwebuiNow open your browser and visit:
http://your_server_ip:3000If the page loads, Open WebUI is running.
This is good for testing, but for production, you should use a domain with HTTPS and avoid exposing port 3000 directly to the public.
If you want to run local models on the same VPS, you can add Ollama as a second service.
Edit your Compose file:
nano docker-compose.ymlUse this setup:
services:
  ollama:
    image: ollama/ollama:latest
    container_name: ollama
    restart: unless-stopped
    volumes:
      - ollama-data:/root/.ollama
    ports:
      - "127.0.0.1:11434:11434"

  openwebui:
    image: ghcr.io/open-webui/open-webui:main
    container_name: open-webui
    restart: unless-stopped
    depends_on:
      - ollama
    ports:
      - "3000:8080"
    env_file:
      - .env
    environment:
      - OLLAMA_BASE_URL=http://ollama:11434
    volumes:
      - open-webui-data:/app/backend/data

volumes:
  open-webui-data:
    name: open-webui-data
  ollama-data:
    name: ollama-data

Restart the stack:

docker compose down
docker compose up -d

Check logs:

docker compose logs -f
In this setup, Open WebUI talks to Ollama using the internal Docker service name ollama. The Ollama API is not publicly exposed because it is bound to 127.0.0.1.
That is important. You should not expose Ollama directly to the internet unless you fully understand the security risks and have proper access control in place.
To pull a local model, run:
docker exec -it ollama ollama pull llama3.2You can replace llama3.2 with another model supported by Ollama.
After the model is downloaded, open Open WebUI in your browser. The model should appear inside the interface. If it does not appear immediately, refresh the page or check the Open WebUI admin settings.
Model downloads can be large. Make sure your VPS has enough disk space before pulling multiple models.
A basic firewall setup should allow SSH, HTTP, and HTTPS. If you are testing with direct port access, you may temporarily allow port 3000, but for production, it is better to close it and use Nginx as a reverse proxy.
Enable UFW:
sudo ufw allow OpenSSH
sudo ufw allow 80
sudo ufw allow 443
sudo ufw enable
sudo ufw status
If you need temporary testing access to port 3000, run:
sudo ufw allow 3000After you set up Nginx and SSL, remove public access to port 3000:
sudo ufw delete allow 3000A reverse proxy allows users to access Open WebUI through a proper domain, such as:
https://ai.example.comInstall Nginx:
sudo apt install nginx -yBefore configuring Nginx, update your Docker Compose file so Open WebUI only listens on localhost:
ports:
  - "127.0.0.1:3000:8080"
Then restart:
docker compose up -dCreate an Nginx config file:
sudo nano /etc/nginx/sites-available/openwebuiAdd:
server {
    listen 80;
    server_name ai.example.com;

    location / {
        proxy_pass http://127.0.0.1:3000;
        proxy_http_version 1.1;

        proxy_set_header Upgrade $http_upgrade;
        proxy_set_header Connection "upgrade";

        proxy_set_header Host $host;
        proxy_set_header X-Real-IP $remote_addr;
        proxy_set_header X-Forwarded-For $proxy_add_x_forwarded_for;
        proxy_set_header X-Forwarded-Proto $scheme;

        proxy_read_timeout 3600;
        proxy_send_timeout 3600;
    }
}
Replace ai.example.com with your real domain.
Enable the site:
sudo ln -s /etc/nginx/sites-available/openwebui /etc/nginx/sites-enabled/openwebui
sudo nginx -t
sudo systemctl reload nginx
Now, point your domain or subdomain DNS record to your Voxfor VPS IP address. Once DNS is active, visiting your domain should show Open WebUI through Nginx.
Install Certbot:
sudo apt install certbot python3-certbot-nginx -yGenerate SSL:
sudo certbot --nginx -d ai.example.comFollow the prompts. After completion, your Open WebUI instance should be available at:
https://ai.example.comTest automatic renewal:
sudo certbot renew --dry-runHTTPS is important because users may enter prompts, upload documents, or manage account sessions through the browser. Do not run a production AI interface over plain HTTP.
When Open WebUI starts for the first time, create or log in to the admin account. If you used WEBUI_ADMIN_EMAIL and WEBUI_ADMIN_PASSWORD, the admin user should be created automatically on first startup.
After logging in, review these settings:
User registration: Disable public signup unless you want to open registration.
Model connections: Confirm Ollama or API endpoints are configured.
User roles: Limit admin permissions to trusted users only.
Uploads and files: Decide whether users should be allowed to upload documents.
Web search and tools: Enable only the features your use case requires.
For a private VPS setup, the safest approach is simple: keep signup disabled, create only the users you need, and avoid exposing extra services publicly.
Open WebUI receives updates, so you should keep the container image current. With Docker Compose, updating is simple.
Go to your project folder:
cd ~/openwebuiPull the latest images:
docker compose pullRestart containers:
docker compose up -dRemove unused images:
docker image prune -fCheck logs after updating:
docker compose logs -f openwebuiDo not blindly update a production instance during busy hours. If your team depends on Open WebUI daily, take a backup first and update during a quiet time.
Your Open WebUI data is stored inside the Docker volume. This may include user accounts, settings, chat history, and configuration data.
Create a backup folder:
mkdir -p ~/openwebui/backupsBack up the Open WebUI volume:
docker run --rm
  -v open-webui-data:/data
  -v ~/openwebui/backups:/backup
  alpine
  tar czf /backup/open-webui-data-$(date +%F).tar.gz -C /data .
If you also use Ollama, back up the Ollama volume:
docker run --rm
  -v ollama-data:/data
  -v ~/openwebui/backups:/backup
  alpine
  tar czf /backup/ollama-data-$(date +%F).tar.gz -C /data .
Model files can be large, so that Ollama backups may consume a lot of storage. If disk space is limited, you can choose to back up only Open WebUI data and pull the models again later.
To restore Open WebUI data, first stop the stack:
cd ~/openwebui
docker compose down
Restore the backup file:
docker run --rm
  -v open-webui-data:/data
  -v ~/openwebui/backups:/backup
  alpine
  sh -c "cd /data && tar xzf /backup/open-webui-data-YYYY-MM-DD.tar.gz"
Replace open-webui-data-YYYY-MM-DD.tar.gz with your real backup file name.
Then start the stack again:
docker compose up -dOpen WebUI is powerful, but any web dashboard exposed to the internet should be treated carefully.
Follow these baseline practices:
Use HTTPS: Run Open WebUI behind SSL.
Disable public signup: Only allow trusted users.
Use strong passwords: Admin accounts should not use weak passwords.
Do not expose Ollama publicly: Keep it inside Docker networking or bound to localhost.
Keep Docker updated: Security patches matter.
Use a firewall: Only allow SSH, HTTP, and HTTPS.
Use SSH keys: Password-based SSH login is less secure.
Back up regularly: Before updates and major changes.
Monitor disk usage: AI models and uploaded files can fill storage quickly.
Limit users: More users mean more resource usage and more security responsibility.
If Open WebUI is for internal team use only, you can also restrict access by IP address at the Nginx level. That adds another layer of protection.
Check if containers are running:
docker compose psCheck logs:
docker compose logs -f openwebuiCheck if port 3000 is listening:
ss -tulpn | grep 3000If you are using Nginx, make sure Open WebUI is bound to 127.0.0.1:3000 and Nginx is proxying to the same address.
Use:
docker compose versionIf you typed docker-compose, that is the older syntax. Modern Docker Compose uses:
docker composeIf Compose is missing, install the Docker Compose plugin:
sudo apt install docker-compose-plugin -yCheck if the Ollama container is running:
docker compose psCheck Ollama logs:
docker compose logs -f ollamaMake sure your Open WebUI service has:
environment:
  - OLLAMA_BASE_URL=http://ollama:11434
Restart the stack:
docker compose restartThen refresh the Open WebUI dashboard.
This usually means the model is too large for your VPS resources. Local AI models can require a lot of RAM. Try a smaller model, remove unused models, or upgrade to a higher RAM Voxfor VPS.
Check memory usage:
free -hCheck disk space:
df -hCheck container usage:
docker statsIf you still have access to the server, you may be able to update settings from the database or restore from backup. For a fresh test deployment, the fastest option is often to recreate the volume, but this deletes existing users and chats.
Do not remove the Open WebUI volume on a production setup unless you have a confirmed backup.
Open WebUI on a VPS is a good choice when you want a private AI dashboard that stays available without depending on your laptop. It is useful for developers, technical writers, server admins, business teams, and agencies that want more control over AI workflows.
You should use this setup if:
You should avoid running large local models on a small VPS. The Open WebUI interface may run fine, but model inference is the heavy part. If you want local AI models to perform well, choose a Voxfor VPS with enough RAM and CPU for your workload.
A practical starting point for many users is:
Regular backups of the Open WebUI data volume.
For a lightweight dashboard, a smaller Voxfor VPS can be enough. For Open WebUI with Ollama, choose more RAM. For serious AI model testing, start with at least 16GB RAM and scale upward when needed.
The main advantage of using a Voxfor VPS is that your AI dashboard gets a dedicated online environment. You can keep Open WebUI running day and night, manage it through SSH, connect it to your domain, and upgrade resources as your AI usage grows.
Open WebUI gives you a practical way to build your own self-hosted AI dashboard. With Docker Compose, the setup becomes clean and manageable because your services, volumes, ports, and environment variables are defined in one file.
In this guide, you installed Docker on a VPS, created an Open WebUI Docker Compose stack, added optional Ollama support, configured a firewall, placed the dashboard behind Nginx, enabled HTTPS, and learned how to update, back up, and troubleshoot the deployment.
If you only need a private AI web interface, Open WebUI can run on a modest VPS. If you want to run local models with Ollama, choose a stronger Voxfor VPS with more RAM and storage. The more serious your AI workload becomes, the more important server resources become.
A properly configured Open WebUI VPS gives you control, privacy, availability planning and flexibility. Instead of running AI tools only on your laptop, you can create a reliable remote AI workspace that is available when you need it.

Hassan Tahir prepared this guide for readers deploying Open WebUI on VPS infrastructure, with attention to Docker Compose, SSL, backups, access control and practical AI hosting limits.
Yes. It works well on a VPS, especially when deployed with Docker Compose and protected with HTTPS and authentication.
No. Open WebUI can connect to different model providers, but Ollama is a popular option for self-hosted local models.
For API-backed use, 4-8 GB RAM can be enough. For local models with Ollama, 8-16 GB or more is safer depending on model size.
Back up the Open WebUI volume first, pull the new image during a quiet period, restart the stack, and check logs before sending regular users back to the service.
Do not expose it without authentication, HTTPS and firewall rules. Treat it like a private control panel.


 Lifetime Hosting
 Lifetime Game Dedicated Servers
 Chicago, US
 Singapore
 Hong Kong
 Seoul, South Korea
 Amsterdem, Netherlands
 London, UK
 Zurich, Switzerland
 Sydney, Australia
 DDOS Protection
 Submit Ticket
 Full Management
 Videos and Podcasts
 Voxfor Advanced Price Management For WooCommerce
 Voxfor AI Content Summary
 Voxfor Autopilot


