
 Lifetime VPS Europe
 Lifetime VPS Asia
 Lifetime WooCommerce Hosting
 Lifetime Hosting
 Lifetime Game Dedicated Servers
 Chicago, US
 Tokyo, Japan
 Singapore
 Hong Kong
 Seoul, South Korea
 Amsterdem, Netherlands
 London, UK
 Stockholm, Sweden
 Oslo, Norway
 Vienna, Austria
 Zurich, Switzerland
 Sydney, Australia
 Wordpress Hosting
 VPS Hosting
 DDOS Protection
 Submit Ticket
 Full Management
 Guides
 Videos and Podcasts
 Discover Creative Ideas
 Cybersecurity Services
 Voxfor Mega Menu
 Voxfor Advanced Price Management For WooCommerce
 Voxfor Secure Live Chat and AI Support
 Voxfor Multilanguage
 Voxfor AI Content Summary
 Voxfor Autopilot

Quick Answer
An MCP server belongs on a VPS when AI tools need reliable access to private APIs, files, databases or automations. Hosting MCP on a Voxfor VPS gives the server a stable address and lets you control firewall rules, authentication, logs and deployment instead of running the tool bridge on a personal machine.
This guide assumes a small Python MCP server, a dedicated Linux service user, NGINX as a reverse proxy, HTTPS, UFW firewall rules and explicit authentication planning before exposing tools to remote clients.
VPS Fit by MCP Workload
| Use case | Recommended starting point | Why it matters |
|---|---|---|
| Private tool bridge | 2-4 vCPU, 4-8 GB RAM | Good for internal tools, files, APIs and lightweight command execution. |
| Team automation server | 4-8 vCPU, 8-16 GB RAM | Better for multiple clients, queues, logs and workflow reliability. |
| MCP + local AI stack | 8+ GB RAM, NVMe | Pair with Ollama, Open WebUI or vector database workflows. |
Where This Fits in the Voxfor AI VPS Stack
The Model Context Protocol (MCP) is an open standard for integrating AI models with external tools, data sources and workflows. Put simply, it provides an AI client with a straightforward method to find out what your server has to offer, to initiate tools on your server, and to receive helpful background information as needed. As per official docs of MCP, it is a regular bridge between AI apps and outside entities, and per the architecture docs, it is done under a host-client-server pattern where one or more MCP servers are connected to an AI app.
If you need an MCP server that can be reached remotely and managed more cleanly than a local machine, a VPS is often the practical place to host it. Official MCP advice separates the local stdio servers from remote HTTP-based servers, and if you wish to access the internet, use re-usable connectors, and central authentication/Api access, remote servers are the obvious choice. The official Python SDK also recommends Streamable HTTP for production deployments, and recommends using a stateless JSON-response configuration for increased scalability.
This guide is kept to the breezy side on purpose. It is implemented in Python and FastMCP since the official MCP docs have a clear python path, the Python SDK is compatible with regular transports (such as Streamable HTTP) and the quick examples are short enough to follow without getting lost in the framework details.
Build Your Private App Stack on Voxfor VPS
Run your essential self-hosted tools from one secure VPS. Start with Vaultwarden for password management, then expand with n8n for automation, Grafana for monitoring, Nextcloud for private cloud storage, and Gitea for Git hosting. Voxfor VPS gives you full control over your apps, data, backups, and server environment, without relying on multiple monthly SaaS subscriptions.
What hosting MCP on a VPS really means
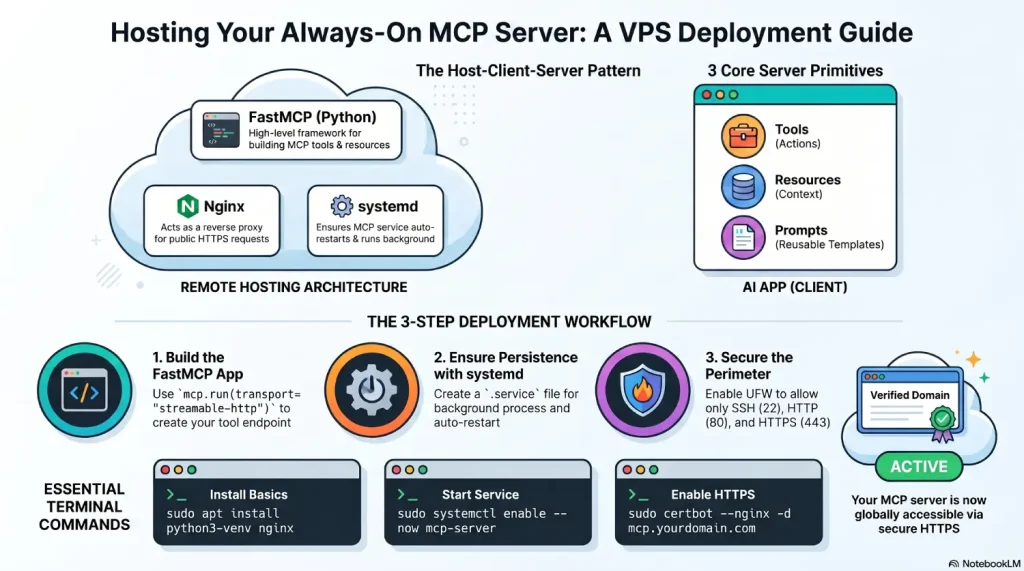
By running MCP on a VPS, you’re essentially creating a remote endpoint that can be accessed by clients with support for MCP running on the internet. The MCP architecture is based on the concept that the client is within the AI app, and your MCP server presents tools, resources and prompts. Local servers are usually stdio on the same machine, but remote servers are usually Streamable HTTP, in order to serve many clients over the network.
This means your VPS setup is generally quite simple on a high level. Your AI client communicates with a public HTTPS URL, Nginx receives it, your Python MCP app processes it, and the app communicates with whatever systems you want under it – API, documents, Git repos, databases, etc. As demonstrated by MCP examples, servers can present tools, resources, and prompts; the official example server list provides practical examples such as handling file systems, Git operations, memory, fetching from a web, and time utilities, to name a few.
Here is the simplest way to picture the setup:
Your AI client
      ↓
https://mcp.yourdomain.com/mcp
      ↓
Nginx on your VPS
      ↓
FastMCP app on 127.0.0.1:8000
      ↓
Your tools, APIs, files, or database
That flow matches the way MCP separates the transport layer from the data layer, and it also matches the standard reverse-proxy pattern Nginx documents for forwarding requests to a local application server.
Why this setup makes sense
The most important is access. Unlike the local servers, which must be installed and configured on each device, the official remote-server docs explain that the remote servers can be accessed from any MCP client which has an internet connection. If you need to run multiple workflows with one server, then a VPS will save you time right off the bat.
A VPS will also clean up operations. Secrets, environment variables, logs, background services, and reverse-proxy settings can all be stored at a single location, rather than spread throughout the laptop. The notes on deployment of FastAPI say that the remote ASGI apps typically rely on a server process that is run automatically and remains available without manual intervention, which fits a persistent MCP endpoint.
Equally as crucial, a VPS provides you improved security barrier. MCP security and authorization documents suggest that more stringent security measures should be applied when a server stores sensitive resources and/or implements user-specific actions, and that remote HTTP transports are more suitable when common authentication patterns like OAuth are required. A good server-based deployment beats a half-baked local script for an internal tool, but if it’s a simple tool, you can get by with a small start-up.
What you need before you start
You do not need a huge machine for your first MCP server. In most beginner-friendly cases, a basic Linux VPS is enough, especially if your server only wraps a few API calls or small internal tools. The official MCP Python SDK requires Python 3.10 or higher, and the FastMCP examples run as an ASGI-style service for HTTP use.
A practical checklist looks like this: an Ubuntu VPS with sudo access, Python 3.10+, domain or subdomain if you want a clean public endpoint, Nginx as the reverse proxy, and Certbot for HTTPS. This aligns with common Linux deployment practice and with the official MCP remote-server guidance, which tells users to enter the full server URL including https:// and any needed path components.
It also helps to decide early what kind of server you are building. MCP supports three core server primitives: tools for actions, resources for context, and prompts for reusable interaction templates. For most first deployments, tools are the easiest starting point because they are the most immediately visible inside an AI workflow.
The easiest step by step deployment
The cleanest beginner path is to build a very small Python MCP server, confirm that it works locally on the VPS, then make it persistent with systemd, put Nginx in front, and finally add HTTPS. That approach matches official Python SDK guidance, FastAPI general deployment model, and standard Linux service management.
Start by installing the basics on Ubuntu:
sudo apt update
sudo apt install -y python3 python3-venv curl nginx
curl -LsSf https://astral.sh/uv/install.sh | sh
The official MCP “build a server” tutorial uses uv to set up the Python project and install mcp[cli], so following that same pattern keeps you close to the upstream docs.
Now create your app folder and install the MCP package:
mkdir -p ~/mcp-server
cd ~/mcp-server
uv venv
source .venv/bin/activate
uv add "mcp[cli]"
That dependency flow comes directly from the official Python quickstart for building an MCP server.
Next, create a minimal server.py file:
from mcp.server.fastmcp import FastMCP

mcp = FastMCP("My VPS MCP Server", stateless_http=True, json_response=True)

@mcp.tool()
def ping() -> str:
    """Simple health check."""
    return "Your MCP server is live."

@mcp.tool()
def add(a: int, b: int) -> int:
    """Add two numbers."""
    return a + b

if __name__ == "__main__":
    mcp.run(transport="streamable-http")
This example follows the official FastMCP pattern: define a server, register tools with decorators, and run with Streamable HTTP. The Python SDK docs specifically recommend Streamable HTTP for production and recommend stateless_http=True with json_response=True for optimal scalability, which makes this a very good VPS-friendly starting point.
Run it once to make sure it starts:
source ~/mcp-server/.venv/bin/activate
python server.py

By default, the official Python SDK examples expose the MCP endpoint at /mcp, and the docs show connecting to http://localhost:8000/mcp during testing.

At this point, your progress looks like this:

Write the server
      ↓
Run it on port 8000
      ↓
Confirm /mcp works
      ↓
Make it persistent with systemd
      ↓
Put Nginx in front
      ↓
Add HTTPS
      ↓
Connect your MCP client
That order keeps the setup easy to debug because you verify one layer at a time instead of changing everything at once. This is a practical deployment recommendation based on the official MCP testing tools, FastAPI deployment guidance, and standard reverse-proxy patterns.
Create a dedicated service user before enabling systemd. This keeps the MCP server away from root-owned home directories and makes permissions easier to audit.
sudo useradd --system --create-home --home-dir /opt/mcp-server --shell /usr/sbin/nologin mcpuser
sudo mkdir -p /opt/mcp-server
sudo cp -a ~/mcp-server/. /opt/mcp-server/
sudo chown -R mcpuser:mcpuser /opt/mcp-server
sudo install -m 600 -o root -g root /dev/null /etc/mcp-server.env
Now make the app persistent with systemd. Create /etc/systemd/system/mcp-server.service:
[Unit]
Description=MCP Server
After=network.target

[Service]
User=mcpuser
WorkingDirectory=/opt/mcp-server
EnvironmentFile=/etc/mcp-server.env
Environment=PYTHONUNBUFFERED=1
ExecStart=/opt/mcp-server/.venv/bin/python /opt/mcp-server/server.py
Restart=on-failure
RestartSec=5

[Install]
WantedBy=multi-user.target
Then enable and start it:
sudo systemctl daemon-reload
sudo systemctl enable --now mcp-server
sudo systemctl status mcp-server
systemd is the standard Linux service manager, .service files define supervised processes, and systemctl is the command used to control and inspect them. FastAPI’s deployment guidance also supports supervised production processes, while systemd gives you logs, restart behavior and service control.
Next, put Nginx in front of the app. Create a server block like this:
server {
    listen 80;
    server_name mcp.example.com;

    location / {
        proxy_pass http://127.0.0.1:8000;
        proxy_set_header Host $host;
        proxy_set_header X-Forwarded-For $proxy_add_x_forwarded_for;
        proxy_set_header X-Forwarded-Proto $scheme;
    }
}
Enable the site and reload Nginx:
sudo ln -s /etc/nginx/sites-available/mcp /etc/nginx/sites-enabled/
sudo nginx -t
sudo nginx -s reload
Nginx documents reverse proxying with proxy_pass, and its beginner guide shows the standard pattern of receiving requests and forwarding them to a local upstream server. If you keep the official FastMCP default path, your public MCP URL will usually be https://mcp.example.com/mcp.
Finally, add HTTPS with Certbot:
sudo snap install --classic certbot
sudo ln -s /snap/bin/certbot /usr/local/bin/certbot
sudo certbot --nginx -d mcp.example.com
sudo certbot renew --dry-run
The official Certbot instructions for Nginx document this exact flow, including automatic Nginx configuration and renewal testing. For real remote MCP connectors, using a proper HTTPS URL is the right default, and MCP own remote connection docs tell users to enter a full URL with the correct protocol and path.
Do Not Expose MCP Tools Until This Is True
| Control | Minimum standard | Reason |
|---|---|---|
| Authentication | Use API keys, OAuth, or another explicit auth layer before remote access. | MCP tools can trigger actions, not just return text. |
| Tool scope | Give each tool only the files, APIs or database actions it truly needs. | Broad tool permissions turn model mistakes into real system risk. |
| Logging | Log tool calls, failures, source IPs and unusual request volume. | You need evidence when a workflow behaves unexpectedly. |
| Network exposure | Keep private tools behind VPN, IP allowlists or internal networks where possible. | Public endpoints need more review than private automation bridges. |
How to keep it secure without making it complicated
The easiest security mistake is to treat an MCP server like a toy script. It is not. MCP tool calls can reach external systems, so the rules need to be boring and strict. The official tools specification says servers must validate tool inputs, implement proper access controls, rate limit tool invocations, and sanitize outputs. That alone tells you how production-minded your server should be once it is live on a VPS.
The next simple win is narrowing exposure. Use the firewall, expose only what you need publicly, and let Nginx be the public face of the service. Ubuntu UFW docs show the usual commands for allowing SSH, opening only the required ports, checking status, and enabling the firewall. A safe beginner setup is to allow OpenSSH, 80/tcp, and 443/tcp, while keeping your Python app listening only on localhost behind Nginx.
Use these commands:
sudo ufw allow OpenSSH
sudo ufw allow 80/tcp
sudo ufw allow 443/tcp
sudo ufw enable
sudo ufw status
Ubuntu documentation explicitly recommends allowing OpenSSH before enabling UFW so you do not lock yourself out of the server.
If your MCP server touches user data, admin actions, or anything that needs an audit trail, add proper authorization early. The official MCP authorization guidance says authorization is optional in theory but strongly recommended when your server accesses user-specific data, needs per-user auditing, or grants access to sensitive APIs. MCP architecture docs also note that HTTP transports support standard auth methods such as bearer tokens, API keys, and custom headers, with OAuth recommended for obtaining authentication tokens.
There are two more security ideas worth keeping in mind even if you are still building a simple server. First, MCP security guidance explicitly warns against “token passthrough,” where a server forwards client tokens downstream without validating they were actually issued for that server. Second, the security docs warn against overly broad scopes because broad permissions increase the damage if a token leaks. In practice, that means your first public MCP server should have narrow permissions, minimal tools, and simple per-tool boundaries.
How to test it and fix the most common problems
The first useful test tool is the MCP Inspector. The official MCP debugging docs call it the first stop for testing and debugging because it can connect to stdio or Streamable HTTP servers, invoke tools, and inspect what the server is returning. The Python SDK quick example also uses Inspector as the basic way to test a server after launch.
You can start it with:
npx -y @modelcontextprotocol/inspectorThen point it at your endpoint. For local testing on the VPS, use http://127.0.0.1:8000/mcp. For live testing after Nginx and TLS are in place, use your public URL such as https://mcp.example.com/mcp. The official Python docs show the default local path, and the remote-server docs remind users that the complete URL must include the proper protocol and path.
If something breaks, keep the troubleshooting path simple. Check the app service with systemctl status mcp-server, read logs with journalctl -u mcp-server -f, and check Nginx logs if the request is not reaching the app. systemctl controls and inspects services, journalctl reads the systemd journal, and Nginx beginner guide points to standard access and error logs as the first place to look when a reverse-proxy setup misbehaves.
One small thing catches many people: if you are testing from a browser-based client and the connection looks half-broken, check CORS. The official Python SDK docs say browser-based clients may need CORS configured and may need the Mcp-Session-Id header exposed so the browser can read it properly. If you are just starting out, the easiest way to avoid that complexity is the stateless JSON-response mode recommended by the SDK for production.
The simplest way to think about the whole setup
If you want the short version, it is this: build a small FastMCP server, run it over Streamable HTTP, keep it behind Nginx, lock the VPS down with a basic firewall, add HTTPS, and only then connect it to your AI client. That matches the official MCP transport model, the Python SDK production guidance, Ubuntu’s firewall recommendations, Nginx reverse-proxy pattern, and Certbot HTTPS workflow.
From there, you can grow in a controlled way. Start with one or two safe tools. Add auth before you add sensitive data. Keep scopes narrow. Test with Inspector. Watch logs. Once that is stable, your VPS-hosted MCP server stops feeling experimental and starts feeling like a real piece of infrastructure for AI agents, tools, and automation. That is exactly the direction MCP is designed for: a standard, reusable, interoperable way to connect AI applications with real systems.
Conclusion
Hosting an MCP server on a VPS is one of the most practical ways to build a reliable foundation for AI agents, tools, and automation. It gives you a server that stays available, is easier to manage, and can connect with different AI clients when you need it.
The simple advantage is that you do not have to make the setup complicated from day one. Start with a small MCP server, test one or two simple tools, secure your VPS properly, and then expand step by step. This way, you avoid confusion and build something that is easier to maintain in the long run.
For developers, MCP opens the door to more useful AI workflows. For businesses, it creates a way to connect AI with real systems instead of treating it like a basic chatbot. And with a VPS, your MCP server has the stable hosting environment it needs to run smoothly.
If you are planning to experiment with AI agents, private automation, or custom tool connections, setting up an MCP server on a VPS is a smart place to start.
About the writer

Hassan Tahir prepared this guide for readers deploying MCP servers on VPS infrastructure, with attention to Python services, reverse proxies, authentication, tool permissions, logs and practical AI automation limits.
Frequently Asked Questions
Why host MCP on a VPS?
A VPS gives MCP servers a stable network location, easier logging and a safer boundary for tools that should not run on a personal laptop.
Should an MCP server be public?
Only if it is protected. Use authentication, firewall rules, HTTPS, least-privilege tool permissions and logging before allowing remote access.
Can MCP connect to private business tools?
Yes, but credentials should be scoped carefully and stored securely. Give each tool only the access it needs.
What transport should production MCP use?
Use the transport recommended by the current MCP SDK and client you are integrating with. For remote production use, plan around HTTP transport, TLS, authentication, logs and clear tool permissions instead of exposing a local-only development setup.
What VPS specs are enough for an MCP server?
A small API-style MCP server can often start with 2-4 vCPU and 4-8 GB RAM. Add more resources when the server runs queues, browser automation, local models, vector search or multiple teams.
What should I monitor?
Monitor service health, failed requests, tool errors, CPU, memory, disk usage and unusual access patterns.