
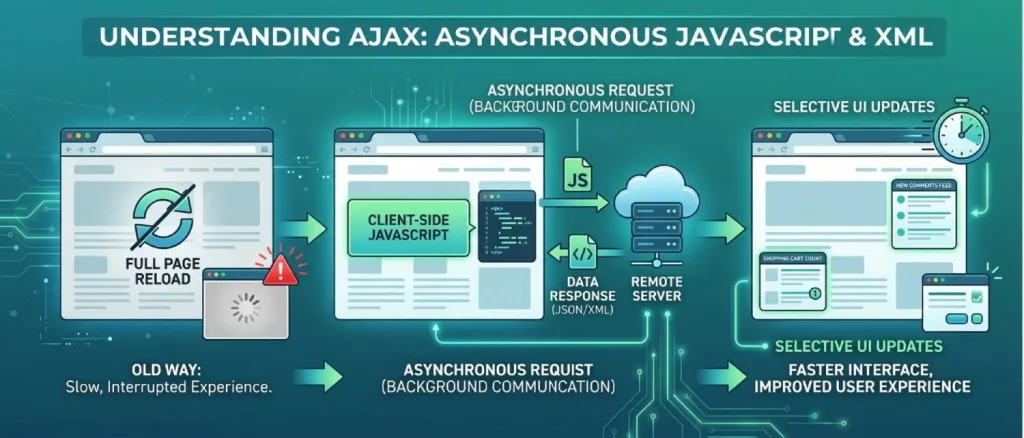
AJAX stands for Asynchronous JavaScript And XML. It is a web-development technique that lets a web page communicate with a server in the background and update only a specific portion of the UI, all without triggering a full page reload. The result? Faster interfaces, fewer interruptions, and a dramatically better user experience.
Despite the “XML” in the name, modern AJAX implementations almost always exchange data as JSON, which is lighter and easier to work with. The underlying mechanics use the browser’s XMLHttpRequest API or the newer fetch() API to send an HTTP request to the server asynchronously while the page continues responding to the user.
Common real-world examples of AJAX you interact with every day include:
WordPress ships with a centralized AJAX processor built into the core. Every AJAX request — whether from the front end or the admin dashboard, is routed through a single PHP file: admin-ajax.php, located in the wp-admin/ directory.
The request lifecycle looks like this:
wp-admin/admin-ajax.php with an action parameter that identifies what should happen.Good to KnowIn the WordPress admin area, a global JavaScript variable ajaxurl is already defined and points to admin-ajax.php. On the front end, this variable does not exist by default — you must pass the URL yourself using wp_localize_script().
AJAX requests use standard HTTP methods. The two you’ll encounter most often are:
Always choose the correct method. Sending sensitive or large payloads via GET (in the URL) is a security and usability anti-pattern.
After processing a request, your PHP handler can return data in several formats:
wp_send_json_success() and wp_send_json_error() automatically encode PHP arrays as JSON.Best PracticeDefault to JSON for all your AJAX responses. It is the most flexible format, you can embed rendered HTML inside a JSON field when needed, and it integrates naturally with JavaScript’s response.json() or jQuery’s automatic parsing.
WordPress bundles jQuery by default, making it the traditional choice for AJAX in themes and plugins. jQuery provides high-level methods, $.ajax(), $.post(), and $.get() — that handle request headers, serialization, and callback wiring for you with minimal code.
WordPress also ships with the jQuery Form Plugin (registered as jquery-form), which wraps any <form> element to submit via AJAX automatically, inferring the method, URL, and data from the form’s own HTML attributes. This makes it especially convenient for AJAX form handling.
Here a plain JavaScript AJAX request for comparison:
// Plain JavaScript — XMLHttpRequest
const xhr = new XMLHttpRequest();
xhr.onreadystatechange = function () {
  if (this.readyState === 4 && this.status === 200) {
    console.log(this.responseText);
  }
};
xhr.open('GET', 'https://example.com/data', true);
xhr.send();
And the same request using jQuery:
// jQuery — cleaner, less boilerplate
$.ajax({
  url:  'https://example.com/data',
  type: 'GET',
  success: function (response) {
    console.log(response);
  }
});
And the ultra-concise jQuery Form Plugin approach for a <form>:
// jQuery Form Plugin — form attributes drive the request
$('form.my-ajax-form').ajaxForm({
  success: function (response) {
    console.log(response);
  }
});wp_ajax_{action} and wp_ajax_nopriv_{action}When a request reaches admin-ajax.php, WordPress checks the user’s authentication status and fires one of two action hooks:
wp_ajax_{action} — Triggered for logged-in (authenticated) users.wp_ajax_nopriv_{action} — Triggered for logged-out (non-authenticated, “no privilege”) visitors.The {action} placeholder is a custom string you define — it acts as a unique identifier that connects the front-end JavaScript request to the correct PHP callback.
// functions.php

// Handle AJAX for logged-in users
add_action( 'wp_ajax_my_custom_action', 'my_custom_ajax_handler' );

// Handle AJAX for logged-out visitors
add_action( 'wp_ajax_nopriv_my_custom_action', 'my_custom_ajax_handler' );

function my_custom_ajax_handler() {
    // Process the request and return a response
    wp_send_json_success( 'Request received!' );
}
What Does “nopriv” Mean?nopriv is short for “no privilege” — it refers to a user who is not authenticated and therefore has no elevated capabilities. If you only register the wp_ajax_{action} hook and a logged-out user makes the same request, WordPress will return a 0 or a -1 error response. Always register both hooks unless the action is exclusively for authenticated users.
Knowing when to reach for AJAX, and when a traditional form submission is the better choice, is a key part of building quality WordPress sites.
| Scenario | Recommended Approach | Why |
|---|---|---|
| Form field validation as the user types | AJAX | Immediate feedback without interrupting the user |
| Like / upvote action on a post | AJAX | Instantaneous UI update; reload would be jarring |
| Loading additional posts (“Load More”) | AJAX | Preserves scroll position; no full-page cost |
| Submitting a new WordPress post | Regular POST | Naturally results in a new page (the edit screen) |
| User registration / login | Either (AJAX for UX polish) | Traditional forms work; AJAX adds inline error feedback |
| Filtering/sorting a product list | AJAX | Updates the list without reloading the entire catalog page |
As a rule of thumb: use AJAX whenever the expected outcome is a partial update of the current page. Use a standard HTTP request whenever the expected outcome is loading an entirely new page or a full page refresh.
Building an AJAX-powered feature in WordPress involves three distinct pieces of work. Let’s walk through each one.
Start with a standard HTML <form> element. Set its action attribute to the admin-ajax.php URL (use admin_url('admin-ajax.php') in PHP to generate it dynamically), and its method to post.
Inside the form, add a hidden input named action whose value matches the custom action name you will register in PHP. This tells WordPress which hook to fire. Always include a nonce field using wp_nonce_field() to protect the request.
<form
  class="my-ajax-form"
  action="<?php echo esc_url( admin_url( 'admin-ajax.php' ) ); ?>"
  method="post"
>
  <!-- Required: tells WordPress which PHP hook to fire -->
  <input type="hidden" name="action" value="my_custom_action" />

  <!-- Security nonce -->
  <?php wp_nonce_field( 'my_custom_action_nonce', 'security' ); ?>

  <label for="user_name">Your Name</label>
  <input type="text" id="user_name" name="user_name" required />

  <button type="submit">
    <?php esc_html_e( 'Submit', 'my-theme' ); ?>
  </button>
</form>

<div id="ajax-response-message"></div>
File Upload FormsIf the form includes <input type="file"> elements, add the enctype="multipart/form-data" attribute to the <form> tag so the browser encodes the files correctly.
JavaScript files must be registered and enqueued through WordPress’s script system — never hard-coded into templates. Use the wp_enqueue_scripts hook in functions.php (or your plugin file) to register your AJAX script and pass any PHP variables (such as the AJAX URL and the nonce) to JavaScript via wp_localize_script().
// functions.php

function my_theme_enqueue_ajax_scripts() {

    wp_enqueue_script(
        'my-ajax-script',                              // Handle
        get_template_directory_uri() . '/js/ajax.js', // Path to JS file
        [ 'jquery' ],                                 // Dependency
        null,                                         // Version (null = no cache-busting)
        true                                          // Load in footer
    );

    // Pass PHP variables to JavaScript
    wp_localize_script(
        'my-ajax-script',
        'myAjaxObj',                     // JavaScript object name
        [
            'ajax_url' => admin_url( 'admin-ajax.php' ),
            'nonce'    => wp_create_nonce( 'my_custom_action_nonce' ),
        ]
    );
}
add_action( 'wp_enqueue_scripts', 'my_theme_enqueue_ajax_scripts' );
After this runs, your JavaScript file can access myAjaxObj.ajax_url and myAjaxObj.nonce as global variables.
The handler is a standard PHP function hooked to wp_ajax_{action} and/or wp_ajax_nopriv_{action}. It reads submitted data from $_POST, validates and sanitizes it, performs the required logic, and exits with a JSON response using one of WordPress’s built-in helpers.
// functions.php

function my_custom_ajax_handler() {

    // 1. Verify the nonce
    check_ajax_referer( 'my_custom_action_nonce', 'security' );

    // 2. Sanitize input
    $user_name = isset( $_POST['user_name'] )
        ? sanitize_text_field( wp_unslash( $_POST['user_name'] ) )
        : '';

    // 3. Validate
    if ( empty( $user_name ) ) {
        wp_send_json_error( [ 'message' => 'Please provide your name.' ] );
    }

    // 4. Process & respond
    wp_send_json_success( [
        'message' => 'Hello, ' . esc_html( $user_name ) . '!'
    ] );
}

add_action( 'wp_ajax_my_custom_action',        'my_custom_ajax_handler' );
add_action( 'wp_ajax_nopriv_my_custom_action', 'my_custom_ajax_handler' );ImportantBoth wp_send_json_success() and wp_send_json_error() call wp_die() internally — meaning they automatically terminate script execution after sending the response. You donotneed to add die() or exit() after them.
Let’s put everything together in a practical example. The goal: allow a logged-in user to update a custom user meta field (user_favorite_color) without the page reloading.
<form
  class="update-color-form"
  action="<?php echo esc_url( admin_url( 'admin-ajax.php' ) ); ?>"
  method="post"
>
  <input type="hidden" name="action" value="update_favorite_color" />

  <?php
    $user_id = get_current_user_id();
    wp_nonce_field(
      'update_favorite_color_' . $user_id,
      'fav_color_nonce'
    );
  ?>

  <label for="fav_color">Your Favorite Color</label>
  <input
    type="text"
    id="fav_color"
    name="favorite_color"
    value="<?php echo esc_attr( get_user_meta( $user_id, 'user_favorite_color', true ) ); ?>"
    placeholder="e.g. Midnight Blue"
  />

  <button type="submit">Save Color</button>
</form>

<p id="color-status"></p>js/ajax.jsjQuery(document).ready(function ($) {
$('.update-color-form').on('submit', function (e) {
e.preventDefault(); // Prevent default page reload
const $form = $(this);
const $status = $('#color-status');
$status.text('Saving…');
$.ajax({
url: myAjaxObj.ajax_url,
method: 'POST',
data: $form.serialize(), // Sends all form fields, including nonce
success: function (response) {
if (response.success) {
$status.text(response.data.message);
} else {
$status.text('Error: ' + response.data.message);
}
},
error: function () {
$status.text('An unexpected error occurred. Please try again.');
}
});
});
});functions.phpfunction handle_update_favorite_color() {
$user_id = get_current_user_id();
$nonce_action = 'update_favorite_color_' . $user_id;
// Verify nonce
if (
! isset( $_POST['fav_color_nonce'] ) ||
! wp_verify_nonce( $_POST['fav_color_nonce'], $nonce_action )
) {
wp_send_json_error( [ 'message' => 'Security check failed. Please refresh and try again.' ] );
}
// Check the user is logged in and capable
if ( ! $user_id || ! current_user_can( 'edit_user', $user_id ) ) {
wp_send_json_error( [ 'message' => 'You do not have permission to perform this action.' ] );
}
// Sanitize input
$color = isset( $_POST['favorite_color'] )
? sanitize_text_field( wp_unslash( $_POST['favorite_color'] ) )
: '';
if ( empty( $color ) ) {
wp_send_json_error( [ 'message' => 'Please enter a color value.' ] );
}
// Save to user meta
update_user_meta( $user_id, 'user_favorite_color', $color );
// Return success
wp_send_json_success( [
'message' => 'Your favorite color has been updated to: ' . esc_html( $color )
] );
}
// Only logged-in users can update their own profile
add_action( 'wp_ajax_update_favorite_color', 'handle_update_favorite_color' );Since WordPress ships with jQuery, it’s the traditional choice for AJAX. However, modern browsers support the native fetch() API natively, making jQuery an optional dependency — especially for performance-sensitive front ends.
document.querySelector('.update-color-form').addEventListener('submit', function (e) {
    e.preventDefault();

    const formData = new FormData(this);
    const statusEl = document.getElementById('color-status');

    statusEl.textContent = 'Saving…';

    fetch(myAjaxObj.ajax_url, {
        method:  'POST',
        headers: { 'Content-Type': 'application/x-www-form-urlencoded' },
        body:    new URLSearchParams(formData),
    })
    .then(res => res.json())
    .then(data => {
        statusEl.textContent = data.success
            ? data.data.message
            : 'Error: ' + data.data.message;
    })
    .catch(() => {
        statusEl.textContent = 'An unexpected error occurred.';
    });
});| Factor | jQuery $.ajax() | Vanilla JS fetch() |
|---|---|---|
| Ease of use | Very easy; concise, familiar syntax | Slightly more verbose; requires Promise handling |
| Dependencies | Requires jQuery (~90 KB minified) | Zero dependencies — built into browsers |
| Browser support | Excellent, including legacy browsers (IE9+) | All modern browsers; IE requires a polyfill |
| Page weight | Higher (jQuery overhead) | Lower — no extra library loaded |
| Best for | Themes/plugins already loading jQuery; rapid development | Performance-focused builds; modern themes; headless setups |
Recommendation: if your theme or plugin already includes jQuery (which is default in most WordPress setups), use it — the convenience outweighs the overhead. If you are building a lightweight, block-based, or headless WordPress project, opt for the native Fetch API to eliminate the jQuery dependency entirely.
Robust error handling improves both user experience and debuggability. Handle errors on both sides of the request:
Server side — Use wp_send_json_error() to return structured error messages. Include a message key in the data payload so JavaScript can display it to the user.
function my_ajax_handler() {

    // Something went wrong
    if ( ! $data ) {
        wp_send_json_error( [ 'message' => 'No data was found. Please try again.' ] );
    }

    wp_send_json_success( [ 'message' => 'Success!', 'data' => $data ] );
}
Client side — Always provide an error callback (jQuery) or a .catch() block (Fetch), and inspect response.success on every successful HTTP response before treating it as a real success.
$.ajax({
    // ...
    success: function (response) {
        if ( response.success ) {
            // Handle success
        } else {
            // WordPress sent back an application-level error
            console.error('Handler error:', response.data.message);
        }
    },
    error: function (jqXHR, textStatus) {
        // Network-level error (timeout, server down, etc.)
        console.error('Network error:', textStatus);
    }
});A nonce (number used once) is a time-limited token that WordPress generates to verify that an AJAX request originates from your site and was intentionally triggered by the expected user. They are your primary defense against Cross-Site Request Forgery (CSRF) attacks.
The nonce workflow:
wp_create_nonce('my_action') or wp_nonce_field().wp_localize_script() or embed it in a hidden form field.check_ajax_referer() or wp_verify_nonce().// PHP handler — verify nonce first, before doing anything else
function my_secure_ajax_handler() {
// Method 1: check_ajax_referer (halts execution automatically on failure)
check_ajax_referer( 'my_action_nonce', 'security' );
// Method 2: manual wp_verify_nonce (gives you control over the error response)
if ( ! wp_verify_nonce( $_POST['security'], 'my_action_nonce' ) ) {
wp_send_json_error( [ 'message' => 'Security token invalid. Please reload the page.' ] );
}
// Continue processing...
wp_send_json_success( [ 'message' => 'Request verified and processed.' ] );
}
add_action( 'wp_ajax_my_action', 'my_secure_ajax_handler' );Nonce ExpirationWordPress nonces expire after approximately 12 hours by default. For long-lived pages (such as single-page applications), you may need to refresh the nonce periodically or handle the -1 error response by prompting the user to reload.
Never trust data arriving from the front end. Even with nonce verification in place, a malicious or malformed payload can cause SQL injection, XSS, or data corruption. WordPress provides a comprehensive set of sanitization functions:
// Common WordPress sanitization functions

sanitize_text_field( $input );        // Single-line plain text
sanitize_textarea_field( $input );    // Multi-line plain text
sanitize_email( $email );             // Email address
sanitize_url( $url );                 // URL
absint( $number );                    // Positive integer
sanitize_key( $key );                 // Lowercase alphanumeric key
wp_kses_post( $html );                // HTML with allowed post tags
wp_strip_all_tags( $html );           // Remove all HTML tags
Use wp_unslash() on $_POST values before sanitizing, since PHP may add magic quote slashes on some server configurations:
$clean_value = sanitize_text_field( wp_unslash( $_POST['my_field'] ?? '' ) );Validation is distinct from sanitization: after cleaning the input, check whether it satisfies your business rules (e.g., is the email address actually valid? Is the numeric value within an acceptable range?).
Nonces confirm where a request came from, they do not confirm what the user is allowed to do. Always pair nonce verification with a capability check:
function my_admin_only_ajax_handler() {

    check_ajax_referer( 'admin_only_action', 'security' );

    // Only allow administrators to proceed
    if ( ! current_user_can( 'manage_options' ) ) {
        wp_send_json_error( [ 'message' => 'You do not have permission for this action.' ] );
    }

    // Safe to proceed...
    wp_send_json_success( [ 'message' => 'Admin action completed.' ] );
}
add_action( 'wp_ajax_admin_only_action', 'my_admin_only_ajax_handler' );
Common capability checks:
current_user_can('manage_options') — Administrators onlycurrent_user_can('edit_posts') — Authors and abovecurrent_user_can('edit_user', $user_id) — Editing a specific user’s dataget_current_user_id() === $target_user_id — Restricting to only one specific userAJAX runs asynchronously on the server, so errors don’t appear in the browser like normal PHP output. Here are the most effective debugging strategies:
1. Enable WP_DEBUG — Add these lines to wp-config.php:
define( 'WP_DEBUG',       true );
define( 'WP_DEBUG_LOG',   true );  // Writes to /wp-content/debug.log
define( 'WP_DEBUG_DISPLAY', false ); // Don't show errors to visitors
2. Use browser developer tools — Open the Network tab, trigger your AJAX request, and inspect the response. The XHR/Fetch requests will show you the exact payload sent and the exact response received.
3. Log responses to the console — Add console.log(response) throughout your JavaScript to trace the flow.
4. Binary-search PHP errors with die() — If your handler silently fails, add die('checkpoint 1') at the beginning of the function. If it appears in the AJAX response, move it further down until you isolate the faulty line.
To open the browser console: press F12 (Windows/Linux) or Cmd + Option + J (Mac in Chrome) to launch DevTools, then click the Console tab.
Every AJAX request is an HTTP round-trip to your server. Keeping those trips fast and infrequent pays dividends in perceived performance and server cost.
set_transient() / get_transient()) to store expensive query results and serve cached data on repeat requests.SAVEQUERIES and optimize slow queries before they become bottlenecks.// Transients cache example — cache for 1 hour
function my_cached_ajax_handler() {
check_ajax_referer( 'my_action', 'security' );
$cached = get_transient( 'my_ajax_data_cache' );
if ( false === $cached ) {
// Expensive database query
$cached = get_posts( [ 'post_type' => 'post', 'posts_per_page' => 10 ] );
set_transient( 'my_ajax_data_cache', $cached, HOUR_IN_SECONDS );
}
wp_send_json_success( $cached );
}
add_action( 'wp_ajax_nopriv_my_action', 'my_cached_ajax_handler' );
add_action( 'wp_ajax_my_action', 'my_cached_ajax_handler' );One of the most popular AJAX use cases in WordPress is a “Load More” button that fetches and appends additional posts without reloading the archive page. Here’s a concise pattern:
let currentPage = 1;

$('#load-more-btn').on('click', function () {
    currentPage++;

    $.ajax({
        url:    myAjaxObj.ajax_url,
        method: 'POST',
        data: {
            action:   'load_more_posts',
            security: myAjaxObj.nonce,
            page:     currentPage,
        },
        success: function (response) {
            if ( response.success && response.data.html ) {
                $('#posts-container').append(response.data.html);
            } else {
                $('#load-more-btn').text('No more posts').prop('disabled', true);
            }
        }
    });
});function handle_load_more_posts() {
check_ajax_referer( 'load_more_nonce', 'security' );
$page = absint( $_POST['page'] ?? 1 );
$posts = get_posts( [
'post_type' => 'post',
'posts_per_page' => 5,
'paged' => $page,
] );
if ( empty( $posts ) ) {
wp_send_json_error( [ 'message' => 'No more posts.' ] );
}
ob_start();
foreach ( $posts as $post ) {
setup_postdata( $post );
// Render your post template partial here
echo '<article><h2>' . esc_html( get_the_title( $post ) ) . '</h2></article>';
}
wp_reset_postdata();
$html = ob_get_clean();
wp_send_json_success( [ 'html' => $html ] );
}
add_action( 'wp_ajax_load_more_posts', 'handle_load_more_posts' );
add_action( 'wp_ajax_nopriv_load_more_posts', 'handle_load_more_posts' );Load only what changes, not the entire page. This dramatically reduces bandwidth usage and time-to-interactive.
Seamless interactions keep users engaged. No jarring full-page refreshes that reset scroll position and focus.
Build instant-feedback features like live search, real-time vote counts, and inline editing that feel native.
Partial updates transfer far less data than full-page responses, freeing up server resources for other requests.
Faster pages and lower bounce rates are positive ranking signals for search engines like Google.
Mobile connections are often slower. Smaller, targeted data transfers improve perceived performance on all devices.
Update any part of the UI at any time, after a user action, on a timer, or in response to another event.
WordPress’s built-in hook system makes wiring up AJAX handlers straightforward, with minimal boilerplate.
Instant, responsive interfaces encourage users to interact more, clicking, filtering, and exploring deeper.
AJAX is the foundation of SPA-like experiences, dashboards, and complex admin tools within WordPress.
AJAX is one of the most valuable tools in a WordPress developer’s toolkit. By routing requests through admin-ajax.php, pairing PHP hooks with JavaScript callbacks, and hardening every handler with nonces, capability checks, and input sanitization, you can build dynamic, fast, and secure features that delight users.
Whether you’re building a “Load More” feed, a live-search bar, or a complex dashboard widget, the patterns covered in this guide give you a solid, production-ready foundation. Start with the step-by-step example, apply the security best practices from day one, and your AJAX-powered WordPress features will be maintainable, performant, and safe.

Hassan Tahir wrote this article, drawing on his experience to clarify WordPress concepts and enhance developer understanding. Through his work, he aims to help both beginners and professionals refine their skills and tackle WordPress projects with greater confidence.


 Lifetime Hosting
 France Lifetime Dedicated Servers
 Germany Lifetime dedicated servers
 Lifetime Game Dedicated Servers
 Chicago, US
 Singapore
 Hong Kong
 Seoul, South Korea
 Amsterdem, Netherlands
 London, UK
 Zurich, Switzerland
 Sydney, Australia
 DDOS Protection
 Submit Ticket
 Full Management
 Videos and Podcasts
 Voxfor Advanced Price Management For WooCommerce
 Voxfor AI Content Summary


