The checkout page represents the most critical moment in any online store conversion funnel. After a customer has browsed products, made selections, and navigated to the final stage, the last thing you want is friction that causes them to abandon their cart. According to research from the Baymard Institute, a staggering 70.19% of online shopping carts are abandoned before purchase completion, with 18% of those abandonments attributed to a complex checkout process.
Yet “keeping checkout simple” does not mean you should stop collecting valuable information from your customers. The key is to gather that information in a way that feels effortless. This is where a custom checkbox field becomes an indispensable tool. A checkbox offers a clear “yes or no” option that requires minimal cognitive effort from the customer while providing structured, actionable data for the store owner.
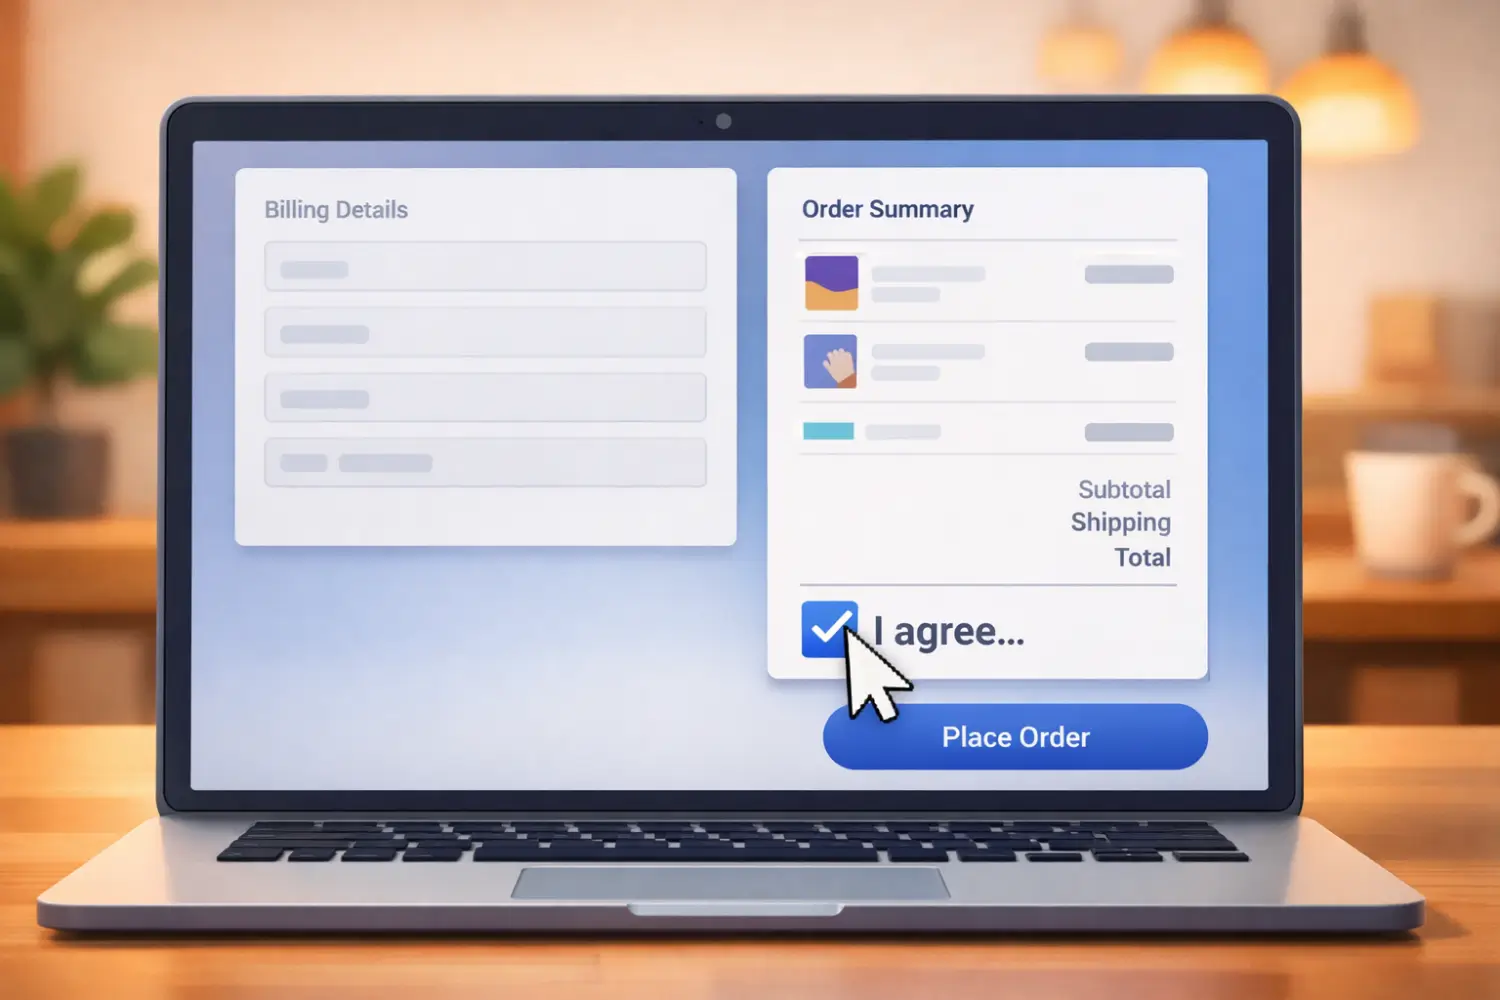
Adding a checkbox to your WooCommerce checkout page allows you to capture explicit consent for terms and conditions, obtain opt-in permission for marketing emails (crucial for GDPR compliance), identify gift orders for special handling, or simply confirm that a customer has read a specific policy. In this guide, we will explore two comprehensive methods for implementing this functionality: a code-free approach using free plugins and a custom code approach for those who want complete control over the implementation.

Before diving into the technical details, it is important to understand exactly why this small addition can have such a significant impact on your store operations and legal standing.
When a customer is on the checkout page, they are ready to buy. A well-placed checkbox captures information at this moment of peak intent, resulting in far higher engagement than follow-up emails, pop-ups, or post-purchase surveys that customers often ignore. For example, a simple “Sign me up for the newsletter” checkbox on the checkout page can dramatically increase your subscriber list compared to a separate sign-up form.
Many store owners rely on the default “Order Notes” field to collect additional information. However, order notes are inherently unstructured. Customers may leave them blank, write incomplete instructions, or provide information that requires manual interpretation by your fulfillment team. A checkbox provides a definitive “yes” or “no” response that can be seamlessly integrated into your order management workflow, CRM, or email automation platform without any guesswork.
Unlike additional text fields or dropdown menus that require typing or scanning through options, a checkbox adds virtually no cognitive load to the checkout process. The customer can decide in less than a second and continue toward completing their purchase. This is critical for maintaining conversion rates while still gathering the information you need.
From a legal and regulatory standpoint, checkboxes are often essential. Under regulations like the General Data Protection Regulation (GDPR) in the European Union, you must obtain explicit, affirmative consent from users before adding them to marketing lists or processing certain types of personal data. Pre-ticked boxes are not compliant; the customer must actively check the box themselves. A clearly labeled, unchecked checkbox is the simplest and most transparent way to meet these requirements.
Beyond compliance, custom checkboxes can improve the overall shopping experience. Consider a checkbox labeled “This order is a gift.” When checked, you could dynamically reveal additional fields for a gift message or gift wrapping options. This creates a personalized, thoughtful experience that can increase customer satisfaction and encourage repeat business.
When adding a custom checkbox to WooCommerce checkout, you have two primary options: using a dedicated plugin for a visual, code-free experience or adding custom PHP snippets to your theme’s functions.php file for maximum control. Both methods are valid, and the choice depends on your comfort level with code and your specific requirements.
| Approach | Pros | Cons |
| Plugin | No coding required; visual drag-and-drop interface; easy field reordering; supports multiple field types; reduces risk of breaking the site. | Adds a small amount of plugin overhead; may have limitations in the free version. |
| Custom Code | Complete control over field placement and behavior; no additional plugin dependency; lightweight. | Requires familiarity with PHP and WordPress hooks; must be done in a child theme to avoid losing changes during updates. |
Before proceeding, it is crucial to understand that WooCommerce now offers two distinct checkout experiences: the Classic Checkout (based on the [woocommerce_checkout] shortcode) and the Checkout Block (introduced in WooCommerce 8.9+).
The Classic Checkout is well-established and offers a rich ecosystem of PHP hooks and filters that allow developers to easily add, remove, and modify fields. The Checkout Block, while offering a more modern, block-based editing experience, relies heavily on React and JavaScript. Customizing the Block Checkout with PHP alone is more limited; adding custom fields to the Block Checkout often requires creating a custom block or using the Additional Checkout Fields API.
This guide focuses primarily on the Classic Checkout, as it remains the most straightforward environment for PHP-based customizations. If you are using the Block Checkout, you may want to consider a plugin that explicitly supports it, such as AKZ Checkout Fields Manager or Flexible Checkout Fields for Blocks.
For store owners who prefer to avoid editing theme files, a checkout field manager plugin provides a safe and user-friendly alternative. Several excellent free plugins are available in the WordPress repository.
This approach requires no coding, and the plugin handles validation, saving data to order meta, and displaying the field value in the admin order screen, all behind the scenes.
For developers and store owners who want complete control over the implementation without relying on a plugin, adding custom PHP code is the preferred method. This approach involves four key steps: adding the field to the checkout form, validating the input, saving the value to the order, and displaying the saved data in the admin interface.
Critical Precaution: Always Use a Child Theme
Before adding any code to your site, ensure you are working within a child theme. Adding custom code directly to a parent theme’s functions.php file will result in all your modifications being overwritten the next time the theme is updated. If you do not have a child theme set up, create one before proceeding.
The first step is to hook into the woocommerce_checkout_fields filter. This filter gives you access to the entire array of checkout fields, allowing you to add, modify, or remove fields as needed.
Add the following code to your child theme’s functions.php file:
/**
 * Add a custom checkbox field to the WooCommerce checkout page.
 */

add_filter( 'woocommerce_checkout_fields', 'custom_add_checkout_checkbox' );
function custom_add_checkout_checkbox( $fields ) {
    $fields['billing']['custom_gdpr_consent'] = array(
        'type'     => 'checkbox',
        'label'    => __( 'I agree to the terms and conditions and privacy policy.', 'your-text-domain' ),
        'required' => true, // Set to false if optional
        'class'    => array( 'form-row-wide' ),
        'priority' => 120,
    );
    return $fields;
}
Explanation of the Parameters:
function __() ensures the text can be localized.If you set the checkbox as required, WooCommerce will automatically prevent form submission when the box is unchecked. However, you may want to add a custom validation message or implement more complex conditional logic. The woocommerce_checkout_process action hook allows you to perform custom validation before the order is processed.
/**
 * Validate the custom checkbox field.
 */

add_action( 'woocommerce_checkout_process', 'custom_validate_checkout_checkbox' );
function custom_validate_checkout_checkbox() {
    if ( ! (int) isset( $_POST['custom_gdpr_consent'] ) ) {
        wc_add_notice( __( 'You must agree to the terms and conditions before placing your order.', 'your-text-domain' ), 'error' );
    }
}
This code checks whether the custom_gdpr_consent field has been submitted. If it has not been checked, an error notice is displayed, and the order will not be processed.
By default, WooCommerce does not save custom field data. You must explicitly store the checkbox’s value as “order meta” using the woocommerce_checkout_update_order_meta action hook.
/**

 * Save the custom checkbox value to the order meta.
 */

add_action( 'woocommerce_checkout_update_order_meta', 'custom_save_checkout_checkbox' );
function custom_save_checkout_checkbox( $order_id ) {
    $checkbox_value = isset( $_POST['custom_gdpr_consent'] ) ? 'yes' : 'no';
    update_post_meta( $order_id, '_custom_gdpr_consent', sanitize_text_field( $checkbox_value ) );
}
What This Code Does:
custom_gdpr_consent field exists in the $_POST array. If it does, the value is set to ‘yes’; otherwise, it is set to ‘no’.update_post_meta() stores the value in the WordPress database, associated with the specific order ID.sanitize_text_field() ensures the saved data is safe and free from malicious code.Alternative Approach Using WC_Order Methods: For newer WooCommerce installations, you can use the WC_Order object methods for a more modern approach:
add_action( 'woocommerce_checkout_create_order', 'custom_save_checkout_checkbox_modern', 10, 2 );

function custom_save_checkout_checkbox_modern( $order, $data ) {
    $checkbox_value = isset( $_POST['custom_gdpr_consent'] ) ? 'yes' : 'no';
    $order->update_meta_data( '_custom_gdpr_consent', $checkbox_value );
}To see the checkbox selection in your WordPress dashboard (and optionally in order emails), you need to output the saved metadata. The woocommerce_admin_order_data_after_billing_address action hook allows you to add information to the admin order details page.
/**
 * Display the custom checkbox value in the admin order screen.
 */

add_action( 'woocommerce_admin_order_data_after_billing_address', 'custom_display_checkbox_admin_order' );

function custom_display_checkbox_admin_order( $order ) {
    $checkbox_value = $order->get_meta( '_custom_gdpr_consent' );
    $display_text = ( 'yes' === $checkbox_value ) ? __( 'Yes', 'your-text-domain' ) : __( 'No', 'your-text-domain' );
    echo '<p><strong>' . __( 'GDPR Consent:', 'your-text-domain' ) . '</strong> ' . esc_html( $display_text ) . '</p>';
}
This code retrieves the saved meta value using the WC_Order object get_meta() method and displays a clear “Yes” or “No” indicator next to the billing address in the admin order view.
If you want the checkbox status to appear in the order confirmation emails sent to customers and administrators, you can hook into the email templates:
/**
 * Add checkbox value to order emails.
 */

add_action( 'woocommerce_email_order_meta', 'custom_add_checkbox_to_emails', 10, 4 );

function custom_add_checkbox_to_emails( $order, $sent_to_admin, $plain_text, $email ) {
    $checkbox_value = $order->get_meta( '_custom_gdpr_consent' );
    if ( 'yes' === $checkbox_value ) {
        echo '<p><strong>' . __( 'Consent Given:', 'your-text-domain' ) . '</strong> ' . __( 'Customer agreed to terms and conditions.', 'your-text-domain' ) . '</p>';
    }
}When adding checkboxes for consent purposes, especially in the context of GDPR compliance, several best practices should be followed:
| Issue | Likely Cause | Solution |
| The checkbox does not appear on the checkout page | Code added to parent theme instead of child theme; incorrect hook used. | Ensure you are using a child theme and that the code is placed in the correct functions.php file. Verify the hook name. |
| The checkbox value is not saved to the order | Missing woocommerce_checkout_update_order_meta hook or incorrect field name. | Double-check that the field name in the save function exactly matches the field name used in the checkout fields filter. |
| The checkbox appears in the wrong location | Incorrect section or priority value. | Adjust the ‘billing‘, ‘shipping‘, or ‘order‘ array key and modify the priority number. Lower numbers appear higher on the page. |
| The validation message does not appear | Validation hook not firing correctly. | Use error_log() to debug and confirm the validation function is being called. Ensure the field name matches. |
| Code works on staging but not on the live site | Caching plugin or theme conflict. | Clear all caches (plugin, server, CDN). Temporarily disable other plugins to identify conflicts. |
Adding a custom checkbox field to your WooCommerce checkout page is a straightforward yet powerful enhancement that can improve data collection, ensure legal compliance, and create a more personalized shopping experience for your customers. Whether you choose the simplicity of a free plugin or the flexibility of custom code, the implementation process is well within reach for most store owners and developers.
Key Takeaways:
By following the steps outlined in this guide, you can confidently add custom checkbox fields that enhance your checkout flow without introducing unnecessary friction. A well-designed checkout page is not just about taking payments, it is about building trust, gathering valuable insights, and setting the stage for a long-term relationship with your customers.

Hassan Tahir wrote this article, drawing on his experience to clarify WordPress concepts and enhance developer understanding. Through his work, he aims to help both beginners and professionals refine their skills and tackle WordPress projects with greater confidence.


 Lifetime VPS Europe
 Lifetime VPS Asia
 Lifetime Hosting
 France Lifetime Dedicated Servers
 Germany Lifetime dedicated servers
 Lifetime Game Dedicated Servers
 Chicago, US
 Singapore
 Hong Kong
 Seoul, South Korea
 Amsterdem, Netherlands
 London, UK
 Zurich, Switzerland
 Sydney, Australia
 DDOS Protection
 Submit Ticket
 Full Management
 Videos and Podcasts
 Voxfor Advanced Price Management For WooCommerce
 Voxfor AI Content Summary


