
Setting up email functionality on your WordPress site can be challenging, but Gmail SMTP provides a secure and reliable email communication solution. In this guide, you’ll learn how to configure WP Mail SMTP with Gmail on WordPress, Enabling you to send emails straight from your website with improved deliverability and security. This tutorial covers everything you need to ensure accessible email communication for your WordPress website, from installing and activating the necessary plugin to configuring Gmail API credentials.
WordPress email deliverability
SMTP setup helps WordPress messages reach users more reliably. Voxfor VPS gives your site stronger hosting control for forms, notifications, email workflows, and business growth.
The Gmail SMTP Server is a service provided by Google that allows users to send emails through Gmail’s servers from external applications, such as WordPress. Connecting your application to the Gmail SMTP Server lets you send emails securely using Gmail infrastructure. This is particularly useful for ensuring reliable email deliverability, as it helps avoid issues arising from generic hosting email services. The SMTP (Simple Mail Transfer Protocol) details for Gmail are as follows:
The SMTP (Simple Mail Transfer Protocol) details for Gmail are as follows:
Using a Gmail SMTP server is a standard method for setting up email notifications and contact form responses on websites, as it provides improved security and reliability compared to many standard hosting mail servers.
Open your WordPress dashboard by entering your email mail or username, typing your password, and clicking log in. Select the remember option if you want quicker access in the future. The dashboard is the main area for managing your site, adjusting settings, and adding features.

To add a new plugin, go to the WordPress dashboard and the Plugins menu, and choose the option to Add a New Plugin. Plugins are tools that help you add new features to your site, making it more functional and customized for your needs.

In the WordPress dashboard, go to Plugins and click on Add New. Use the search box to type “WP Mail SMTP,” then find the plugin and click Install Now. With over 4 million active installations and a solid positive rating, this plugin is a dependable option for sending emails directly from your website.

After clicking Install Now for the WP Mail SMTP plugin, the button changes to Activate. Click Activate to enable the plugin and unlock its full email-sending features. Activation is the final step to start using the plugin for reliable email delivery from your WordPress site.

In your WordPress dashboard, locate and click on WP Mail SMTP under the Plugins section. This opens the settings page, where you can adjust options to configure email sending through your Gmail server. WP Mail SMTP makes it easy to manage outgoing emails for better deliverability.

In the WP Mail SMTP settings, locate FEmailmail and enter the Gmail address linked to your account. This is the address from which all emails will be sent. Under From Name, add the Name you want recipients to see. These settings make sure your emails appear the same and professional.

In the Mailer section of WP Mail SMTP, select Google / Gmail as your mail service. This choice allows your WordPress site to send emails using Gmail secure servers. Choosing the right mailer is essential for reliable email delivery and better security.

Scroll to the WP Mail SMTP settings to enter your Client ID & Client Secret for Gmail. These details connect your WordPress site with Google servers to send emails securely. Use the provided Authorized Redirect URI to complete the setup, ensuring easy email delivery through Gmail.

To get the Client ID & Client Secret needed for WP Mail SMTP, open the Google Developer Console and create a new project. This project links WordPress with Google’s API to allow for the sending of secEmailmail. Setting up a project is the first step to enabling Gmail as your mailer.

In the Google Developer Console, click on Create Project to start a new project. This step is essential for setting up WP Mail SMTP with Gmail. Creating a project allows you to generate the Client ID and Client Secret to establish your WordPress site’s connection to Google email services.

Enter a project name in the Google Developer Console and click on Create. This project name helps identify your setup for WP Mail SMTP with Gmail. Once created, this project will empower you to obtain the Client ID and Client Secret, which are essential for seamlessly connecting WordPress to the Google email system. Exciting times ahead!

In your Google Developer Console project, scroll down to Getting Started, click on Explore, and enable APIs. This step is crucial in setting up API access for WP Mail SMTP. The API lets WordPress connect with Gmail and send emails directly from your site.

In the APIs & Services section of your Google Developer Console project, click on Enable APIs and Services. This action allows you to add the necessary Gmail API to connect WP Mail SMTP to WordPress. Enabling APIs is essential for your site’s email functionality.

Scroll down in the Google Developer Console and click on Gmail API under Google Workspace. This API enables WP Mail SMTP to use Gmail Emailmail sending in WordPress. Connecting with Gmail API provides secure and reliable email functionality for your site.

In the Google Developer Console, click on Enable for the Gmail API. This step connects WP Mail SMTP to Gmail, allowing your WordPress site to send emails through a secure and reliable platform. Activating the Gmail API is crucial for your website’s email functionality.

In the Google Developer Console, click Create Credentials to set up access to the Gmail API. These credentials will connect WP Mail SMTP with Gmail, allowing secEmailmail to be sent from your WordPress site. Creating credentials is a crucial step for easy email integration.

In the Google Developer Console, select Gmail API and choose User data as the type of access. Click on Next to proceed. This setup allows WP Mail SMTP to access Gmail to send emails through your WordPress site. Configuring credentials properly is essential for secure email functionality.

In the Google Developer Console, select OAuth Client ID and choose your application type. Enter a name for easy reference. This OAuth Client ID allows WP Mail SMTP to securely connect WordPress with Gmail for sending emails. Properly setting up the OAuth Client ID is essential for safe email integration.

Go to Authorized JavaScript origins in the Google Developer Console and click Add URL. This step lets WP Mail SMTP securely connect with Gmail for email functions on your WordPress site. Adding authorized origins is essential for a secure email setup.

Enter your website URL in the Authorized JavaScript Origins section of the Google Developer Console. This URL allows WP Mail SMTP to securely connect your WordPress site with Gmail for sending emails. Adding the correct URL is critical to secure email communication.

In the Google Developer Console, go to Authorized Redirect URLs and click Add URL. This step is essential for connecting WP Mail SMTP with Gmail on your WordPress site. The redirect URL allows secure email authentication, enabling your site to send emails through Gmail.

In your WordPress dashboard, locate the Authorized Redirect URL for WP Mail SMTP and click the copy icon. This URL is required to set up the Gmail API in the Google Developer Console. Copying the correct URL enables secure email connections between WordPress and Gmail.

Paste the Authorized Redirect URI into the designated field in the Google Developer Console and click Create. This completes the setup for your Client ID, allowing WP Mail SMTP to connect WordPress with Gmail for email sending. Finalizing the Client ID is essential for secure email integration on your site.

To copy the Client ID in the Google Developer Console, click the copy icon next to the ID. This Client ID is essential for connecting WP Mail SMTP to Gmail through WordPress. Copying it correctly ensures a secure and functional email setup for your site.

Return to your WordPress dashboard’s WP Mail SMTP settings and paste the Client ID into the designated field. This step connects your site to Gmail for sending emails and entering the correct Client ID, ensuring a secure and functional email setup.

In the Google Cloud Console, complete the Gmail API setup by clicking Done. This finalizes your credentials for connecting WP Mail SMTP to Gmail on WordPress. Clicking Done secures your setup, enabling reliable email functionality on your site.

In the Google Cloud Console, locate your OAuth 2.0 Client ID under Credentials and click the Edit icon. This feature enables you to adjust the configurations for WP Mail SMTP, facilitating a secure connection between WordPress and Gmail. Changing the Client ID can enhance your email configuration for better performance.

In the Google Cloud Console, locate the Client Secret for your OAuth 2.0 setup and click the copy icon. This Client Secret is needed for WP Mail SMTP to connect WordPress with Gmail for sending emails. Copying it accurately ensures a secure email setup on your site.

Paste the Client Secret into your WordPress dashboard’s designated WP Mail SMTP settings field. Click Connect to Google to authorize the connection between WordPress and Gmail. This step is essential for enabling email sending through Gmail on your site.

In the Google login screen, select the Google account you want to use with WP Mail SMTP. This connects your WordPress site to Gmail for sending emails. Choosing the correct account ensures secure and reliable email functionality for your site.

Click Continue to proceed with the unverified app on the Google warning screen. This step allows WP Mail SMTP to connect your WordPress site with Gmail for sending emails. This step is safe if you trust the app’s setup and improve your site email functionality.

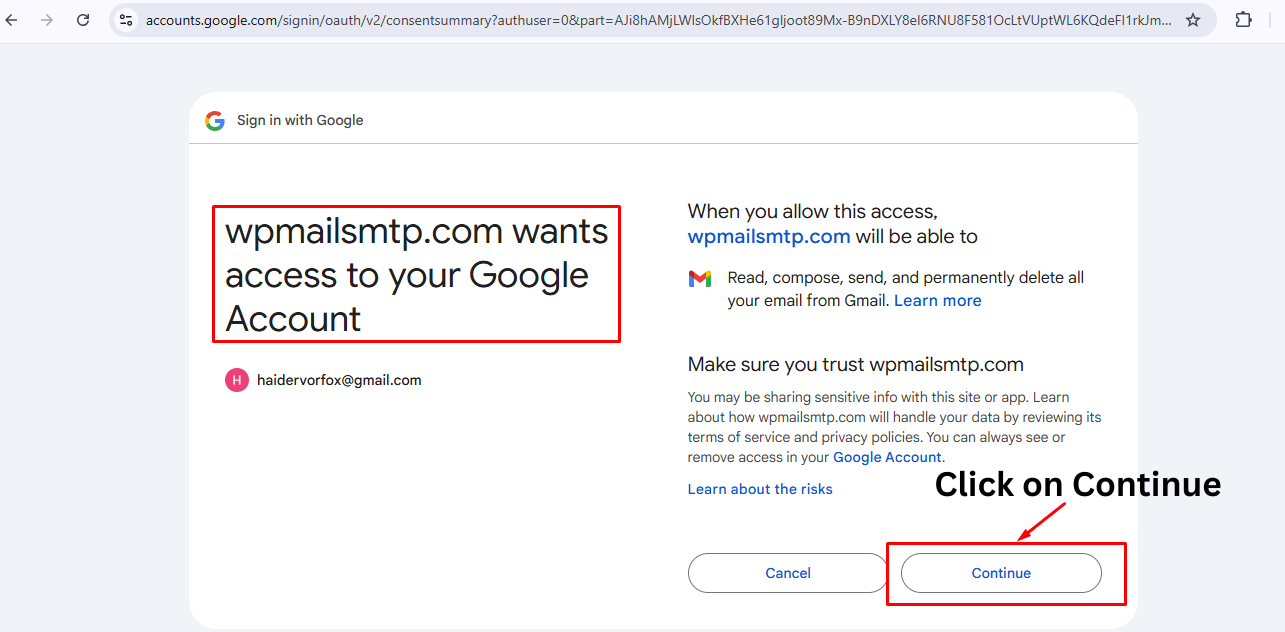
To allow WP Mail SMTP access to your Google account, click Continue on the authorization screen. This permission enables WordPress to send emails securely via Gmail. Confirming access ensures easy email functionality on your site.
Your WordPress site is now successfully connected to your Google API project through WP Mail SMTP. You can start sending emails using Gmail directly from your site. This connection ensures reliable and secure email functionality for accessible communication.

Fill in the form fields with your naEmailmail and message, then click Submit to send a test email. This confirms that WP Mail SMTP is correctly set up to use Gmail to send emails from your WordPress site.

A confirmation message shows that yEmailmail was sent successfully through WP Mail SMTP using Gmail. This confirms that your WordPress email setup works appropriately, allowing reliable communication from your site to recipients.

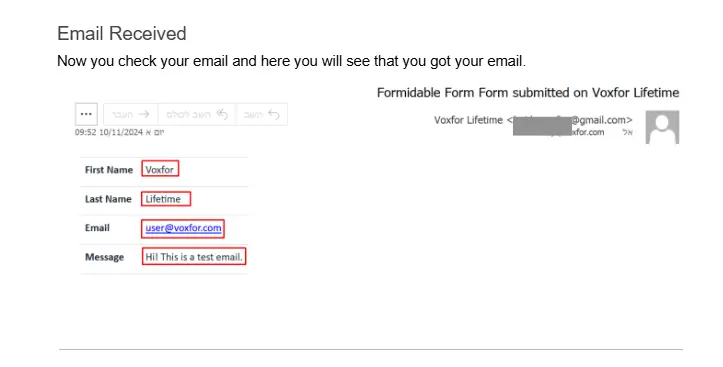
Please check your email and confirm you received the test email sent using WP Mail SMTP on WordPress. This email confirmation verifies that your Gmail SMTP integration is working correctly, allowing reliable and secure communication from your site.
You have successfully set up Gmail SMTP with WP Mail SMTP on your WordPress site. This integration enables secure and reliable email sending, ensuring that contact form responses, notifications, and updates reach recipients directly through Gmail’s servers. This setup is complete, and you can confidently manage your WordPress email functionality, creating a better experience for yourself and your users.

This article was written by Haider Aftab Abbasi. If you’re looking for more insightful content or professional collaborations, feel free to connect with Haider on LinkedIn using the provided link.


 Lifetime VPS Europe
 Lifetime VPS Asia
 Lifetime Hosting
 France Lifetime Dedicated Servers
 Germany Lifetime dedicated servers
 Lifetime Game Dedicated Servers
 Chicago, US
 Singapore
 Hong Kong
 Seoul, South Korea
 Amsterdem, Netherlands
 London, UK
 Zurich, Switzerland
 Sydney, Australia
 DDOS Protection
 Submit Ticket
 Full Management
 Videos and Podcasts
 Voxfor Advanced Price Management For WooCommerce
 Voxfor AI Content Summary


