
WordPress is an excellent platform for online presence. It is versatile and user-friendly, whether you’re a beginner, freelancer, developer, or expert. It’s perfect for those who are just starting out, wish to become developers, or even those with advanced web development skills. In this guide, we’ll explain how WordPress can be an excellent choice for users at different levels and provide a step-by-step approach to getting your website up and running.

WordPress is beginner-friendly and requires no coding knowledge. With pre-built themes and plugins, you can easily set up a professional website by customizing the design, adding content, and installing important features like contact forms or social media integrations. The simple dashboard makes managing and updating your site simple.
Freelancers benefit from WordPress by creating custom portfolios or business sites quickly. You can showcase your work, manage bookings, and even accept payments through plugins like WooCommerce. The platform is SEO-friendly, making optimizing content and improving search rankings easy and helping freelancers reach a wider audience.
WordPress offers a robust development environment, allowing developers to create highly customized solutions. With its open source, naNaturedevelopers can build custom themes and plugins and even integrate advanced tools like the WordPress REST API to create a dynamic website that fits your needs.
For experts and large-scale users, WordPress is scalable to handle high-traffic websites. Managed hosting solutions ensure security and performance, while advanced features like WordPress Multisite allow managing multiple websites from a single dashboard. WordPress also works efficiently with enterprise-level tools, making it suitable for complex projects.
Our Managed WooCommerce Hosting offers a perfect solution for businesses looking to improve their store performance. Whether you’re starting fresh or revamping, we provide fast setup, unmatched speed, and secure payment options that keep your business running effectively. With over 17 years of experience, we have the expertise to support small and large e-commerce stores. Our hosting services are trusted by thousands of satisfied customers, offering high bandwidth, fast uplink speeds, and reliable performance.
We provide Flexible hosting plans for all needs. Whether you prefer monthly payments or long-term savings, our plans can help you save up to 99%. The hosting options range from Standard, Premium, to Elite, each offering unique features such as unlimited email accounts, free SSL certificates, daily backups, and unlimited databases. Our Premium and Elite plans come with extra storage and website support, giving larger businesses the resources to scale without worrying about slowdowns.
In addition to security features like DDoS protection, automated malware scans, and SSL encryption, our hosting will protect your WooCommerce store. Setting up your store is quick with WooCommerce pre-installed, and we offer free website migration for those switching from other providers. Furthermore, our platform supports various payment gateways like PayPal, Google Pay, and Apple Pay, giving you the flexibility to handle transactions securely. With fast checkouts and real-time speed updates, our hosting services will help your business grow and provide an excellent shopping experience for your customers.
Various tools and plugins can help optimize your site functionality when setting up a WordPress website. Yoast is an excellent choice for SEO improvements to ensure your content ranks well. Adding custom code snippets becomes a breeze with WPCode, while LiteSpeed Cache significantly boosts website speed. Securing your site is essential, and WordFence Security provides a reliable firewall to protect against cyber threats. For those looking to build an eCommerce store, WooCommerce offers a robust platform for managing online sales. You can also create customizable forms using Contact Form 7 and design your site easily with the drag-and-drop Elementor page builder. Check out our in-depth guides on each of these plugins to get started!
Now, let’s start with our step-by-step guide. We’ll ensure every part is easy to understand so you can follow along without trouble. Whether you’re new or familiar with the process, this guide will walk you through everything in a simple way. Let’s get started and make it all super clear for you!
To pick the right hosting, open your web browser and visit the official Voxfor website. In the address bar, type voxfor.com and hit Enter on your keyboard. This will take you directly to the Voxfor site, where you can explore different hosting options for your new WordPress website.

The voxfor.com website offers three different WordPress hosting plans: Startup, Professional, and Growth. Each plan has its features and pricing. Pick the plan that fits your needs. Once you’ve chosen, click the Purchase Plan button to set up your WordPress website’s hosting.

The voxfor.com website offers three different WordPress hosting plans: Startup, Professional, and Growth. Each plan has its features and pricing. Pick the plan that fits your needs. Once you’ve chosen, click the Purchase Plan button to set up your WordPress website’s hosting.

After choosing your WordPress hosting plan, you must select your billing cycle. Explore your options and choose from Monthly, Quarterly, Semi-Annual, or Annual. Once you’ve selected your billing cycle, Click “Continue” to proceed.

To create your Voxfor Lifetime hosting account, Click the SignUp button. You’ll need to fill in your personal information, such as your name, email, and phone number. After that, complete the Billing Address section with your address details. Once all fields are filled, you’ll be ready to move forward with your hosting setup.

Scroll down to the Account Security section. You can select to create your password or click on Generate password to have one made for you. Next, Select your payment method from the Payment Details section, like PayPal Basic. Remember to check the box for Terms of Services to agree. Finally, click the Complete Order button to finish your purchase and activate your hosting.

After completing your order, You’ll get an order confirmation email during the signup process. This email will contain your Order Number, details about your hosting plan, and payment information. Please keep this email for reference, as it includes important details about your purchase and setup.

Once you log in to your cPanel using the link provided by your hosting company, you will see the cPanel dashboard. This dashboard gives you various tools for managing your website and hosting. From here, you can install WordPress and set up other features like email accounts and security options. The dashboard makes it simple to manage all the essential aspects of your site.

In the cPanel search bar, type “wp” and choose WP Toolkit from the dropdown menu. This will tdropdownto the WP Toolkit page, where you can control your WordPress installations, set up updates, and customize your website features. This toolkit makes managing your WordPress site quick and easy.

In the WP Toolkit section of cPanel, click on the Install button. This will start installing a new WordPress instance on your website. The WP Toolkit helps manage installations, updates, and themes, making setting up and managing your WordPress site simple.

In the Install WordPress window, fill in the required details, such as your installation path, username, password, and email address. Make sure all the information is correct. Then, click on Next to continue. Finally, press the Install button to start installing your WordPress website.

While the system downloads and Unpacks, it gets and saves all the files needed for the WordPress installation. This process happens in the background; you just need to wait for it to finish. Once this is done, the setup will continue, creating the database and configuring other settings.

Once the installation is complete, you will be taken to the WordPress Dashboard. You’ll see a message that says, “Welcome to WordPress!” confirming that your WordPress website is successfully installed and ready to use. From here, Start customizing and adding content.

To delete any plugins you don’t need, go to the Plugins section in the WordPress Dashboard. Hover your mouse over Plugins and click on Installed Plugins. From there, you can select the plugins you want to remove and delete to free up space and improve your site performance.

To select all the plugins immediately, check the box at the top of the Plugins page in the WordPress Dashboard. This allows you to apply bulk actions like deleting or deactivating multiple plugins simultaneously, making it easier to manage your site plugins easily.

To deactivate plugins in bulk, click the bulk actions dropdown menu on the Plugidropdown. Select Deactivate from the list, then click on the Apply button. This will deactivate all the selected plugins, allowing you to manage them easily without having to do it individually.

To delete plugins in bulk, go to the bulk actions dropdown menu on the Plugidropdow, Select Delete, and then click the Apply button. This will remove all the selected plugins from your WordPress site, helping to free up space and improve performance.

After selecting and deleting the plugins, A confirmation box will appear. Click “OK” to proceed. This will finalize the deletion of the selected plugins from your WordPress site.

To open your WordPress website, hover your mouse over the site name (in this case, Voxfor Lifetime) in the top left corner of the WordPress Dashboard. Click on Visit Site to view your website and see your changes.

On your WordPress website, you can see the default Sample Page. This page is usually included when you first install WordPress, allowing you to view how your site looks with a basic setup. You can customize or delete this page to suit your website design.

To delete the Sample Page or any other page on your site, go to the Pages section in the WordPress Dashboard. Click on All Pages to view and manage all the pages on your website. From here, you can choose which pages to edit or delete.

To select all pages on your website simultaneously, check the box at the top of the Pages list in the WordPress Dashboard. This allows you to apply bulk actions, like deleting or editing multiple pages simultaneously, making page management easier.

To delete pages from your website, move them to the trash. In the Bulk actions menu, select Move to Trash and click the Apply button. This will remove the selected pages from your website.

To access the pages you’ve moved to the trash, click on the Trash link in the Pages section of the WordPress Dashboard. From here, Permanently delete or restore pages.

To permanently delete pages from your website, go to the bulk actions dropdown menu in the Trashdropdown. Select Delete Permanently, and then click on the Apply button. This will remove the selected pages from your site for good.

To go to the Post section, hover your mouse over Posts in the WordPress Dashboard and click on All Posts. This will allow you to view, edit, or Manage your WordPress posts.

To delete a post, hover over the post you want to remove, then click on the Trash link. This will delete the post, which you can restore or permanently delete later.

To view the posts you’ve moved to the trash, click on the Trash link in the Posts section of your WordPress Dashboard. This allows you to manage deleted posts, choosing to restore or permanently delete them.

To permanently remove a post from your WordPress website, click the Delete Permanently button under the post in the Trash section. This action thoroughly removes the post, which cannot be restored afterward.

You can easily add and manage plugins to expand your WordPress website functionality. Begin by navigating to the Plugins section on the left side of your dashboard. Click on Add New Plugin to access the WordPress Plugin Repository. Whether you need migration tools, security features, or social media integrations, plugins help you customize and extend your website capabilities. Once added, you can manage or activate them under the Installed Plugins option. This process makes managing your site features simple.

To install the All in One WP plugin for WordPress, type “All in One WP” in the plugin search bar. This plugin is commonly used, with over 5 million active users and a rating above 4.5 stars. Click “Install Now” to begin. This simple step highlights the plugin’s reliability through its high user count and excellent reviews.
If you want to see the complete guide for the ‘All in One WP plugin for WordPress,’ you can click on the All in One WP plugin for WordPress to follow our full step-by-step guide.

After installation, the ‘Install’ button will automatically change to ‘Activate.’ Click the ‘Activate’ button. This step will ensure that the All-In-One WP Migration and Backup plugin is fully functional and ready to use.

If you want to know how to use the ‘All in One WP plugin for WordPress’ to import and export your website backup, you can click on this ‘All in One WP plugin for WordPress and follow all the steps.
Return to your dashboard to change the title and tagline. From there, click on Visit Site to see how your current title and tagline appear. You can then return to the Settings section to update them to show on your website purpose.

To view your site title and tagline, hover over your website name in the browser tab. You’ll see your current title (in this case, Voxfor Lifetime) and your tagline (Lifetime Hosting Services). These appear in the browser and on your website homepage. You can update them if needed from the Settings section in WordPress.

To return to the WordPress Dashboard from your site, click on your website name (in this case, Voxfor Lifetime) at the top of the screen. This will go to your dashboard, where you can manage your site settings and content.

In WordPress’s General Settings, you can change essential details like your Site Title, Tagline, Site Icon, WordPress Address (URL), Site Address (URL), and Administration Email Address. These settings help shape your website’s look and function. Update the fields with the information you want and save your changes.

Remember to save it after making any changes to the page. This will ensure that all your updates, such as site title or tagline changes, are applied to your WordPress website.

To manage your website design, go to the Appearance section in the WordPress Dashboard and click on Themes. This will allow you to choose, activate, or customize themes to change the look and feel of your WordPress site.

To add a new theme, go to “Appearance” > “Themes” and click “Add New.”

To install the Astra theme, type Astra into the search bar in the Themes section. Once you find the Astra theme, click on the Install button. This will add Astra to your WordPress website, allowing you to customize it for your design needs.

After installing Astra, click “Activate” to begin customizing your site.

You can easily add and manage plugins to expand your WordPress website functionality. Begin by navigating to the Plugins section on the left side of your dashboard. Click “Add New” to search for plugins. Whether you need migration tools, security features, or social media integrations, plugins help you customize and extend your website capabilities. Once added, you can manage or activate them under the Installed Plugins option. This process makes managing your site features simple.

To install the Starter Templates plugin, go to the Plugins section and type starter into the search bar. When you see the Starter Templates plugin, Click “Install Now.” This plugin will help you quickly set up templates for your website.

After installing the Starter Templates plugin, the Install Now button will change to Activate. To use templates, activate the plugin.

To use the Starter Templates, go to the Appearance section in the WordPress Dashboard. You will see an option for Starter Templates. Click on it to see a variety of pre-designed templates.

To start building your website with Elementor, select it from the dropdown dropdown menu inthe dropdown section. This will allow you to use the Elementor drag-and-drop interface to customize and design your WordPress website.
For a more detailed step-by-step guide on installing and setting up Elementor with WordPress, click here to explore our comprehensive tutorial: Elementor Installation and Setup for WordPress.

Now, you can browse through all the Starter Templates available. Some of these templates are paid, while many are free. You can identify paid templates by the Premium label. The free templates offer a wide variety of beautiful designs and are just as impressive as the paid options.

To find a specific template, type the template name (for example, Nature into the search bar. Once the results appear, select the template you want to use by clicking on it. This will allow you to preview and install the template for your WordPress site.

To see your website’s full home page, click on the icon on the screen’s left side, as shown in the image. This action will expand the preview and allow you to view the entire page. You can use this to check your website’s layout, design, and functionality before finalizing it. The preview mode will ensure that everything is in place before going live.

To visit your website’s About page, go to the home page and click the About button in the top navigation bar. This will take you to the section where you can share more details about your website or business. The About page is crucial for introducing your brand to visitors, so ensure it’s clear and engaging.

Here, you can see the About Us page, which provides visitors with information about your business or team. It’s a great place to highlight your collaborative and supportive team and explain how you work to get the best results for your clients. The About page helps build trust and connect with your audience.

To view the Services page on your website, Click “Services.” This page showcases your business’s services and helps visitors understand your solutions.

Here, you can see the Services page, which outlines your business’s services. This section is essential for helping visitors understand what you provide and how your services can meet their needs. Make sure your Services page is clear and informative to attract potential clients.

To visit the Contact page of your website, click on the Contact button in the top navigation bar. This page is essential for allowing visitors to reach out to you, whether it’s for questions, support, or collaboration opportunities.

Here is the Contact Us page, where visitors can contact your business. This page is vital for providing users a way to get in touch, whether for questions, support, or potential partnerships. Make your Contact page clear and informative.

Now, return to the Home Page for any necessary modifications or updates. The Home Page is an integral part of your website as it’s often the first impression for visitors. Make sure it’s well-organized and easy to navigate.

To make changes to your website, click the modification icon on the left-hand side, as shown in the image. This will allow you to access the modification section, where you can adjust your pages’ layout, content, and design to fit your needs better.

In this section, you can easily change your website’s color palette. To do this, select the desired color option from the palette on the left. This allows you to customize your site look and make it visually appealing. Changing colors can help reflect your brand or personal style.

After picking your desired color palette, you can customize the font style to match your website theme. Select a new font from the list on the left-hand side. Changing the font style allows you to create a more engaging and professional look, ensuring your website stands out. This step is essential for improving your site’s readability and visual appeal.

After choosing your website’s perfect color palette and font style, click the Continue button to proceed. This will save your design choices and allow you to move forward with further customization. Clicking Continue will ensure your selections are applied to your site, helping you maintain a better look.

Once you’ve completed customizing your website, it’s time to click the Submit & Build My Website button. This final step will create your site based on your design and settings. Make sure your details are correct before proceeding. In a few moments, you’ll begin turning your vision into a live website by clicking Submit.

You can easily monitor your website’s progress through various setups. During this phase, necessary themes, plugins, and forms are installed. The percentage displayed helps you track how much of the process is completed. This will ensure that you’re always informed about the progress of your website creation. Stay relaxed as your website is being built!
Congratulations! Your website is ready to be viewed after a quick and easy build process. To visit your website, click the button that says “View Your Website.” This step allows you to see the final version of your site in action. Get ready to explore and share your brand-new website with the world!

To customize your website, click the “Customize” button at the top of your homepage. This option allows you to make necessary modifications, such as changing your site’s theme, colors, fonts, and layout. Customizing will ensure your website reflects your brand identity and looks precisely how you want it to.

To make changes that apply across your entire site, click on “Global” in the customization menu. Global settings allow you to adjust the style, including fonts, colors, and spacing. This option is essential for maintaining your website’s design and brand identity.

To improve your site readability and maintain a consistent look, click “Typography” under the Global settings. Typography settings allow you to modify the fonts used throughout your site and will ensure a visually appealing and user-friendly experience. Customize font types, sizes, and styles to match your brand identity.

Adjust your website heading fonts and body fonts for a visual look. The heading font is used for more prominent Text elements like titles, while the body font increases readability for paragraphs and smaller Text. Customize both to match your site style and create an identical user experience.

To return to the Global Settings section after adjusting typography, click on the back arrow. This allows you to explore and modify other global elements like colors or

You can easily access the Colors section by clicking on Colors from the Global Settings. Choose a brand color palette. Customizing colors helps make your website attractive and fits with your brand identity.

Easily change the colors of your web pages using WordPress’s color customization feature. You can adjust the theme, accent, headings, body Text, and more. Customize each page individually to create a unique and matching color scheme for your website.

Once you have made all the necessary adjustments to your website colors in WordPress, click the ‘X’ icon in the top left corner to return to the previous section. This step is simple yet essential, so save your changes to continue. Adjusting your site colors is vital in personalizing your brand appearance making your website stand out with the right visual appeal. Remember to finalize your choices before moving on!

To start customizing your WordPress website using Elementor, click on the ‘Edit with Elementor’ button at the top of your page. Elementor is a powerful drag-and-drop tool that allows you to design your site visually, offering flexibility and ease. With Elementor, you can make instant changes to your layout, add new sections, and customize your design without touching any code.

To start customizing your WordPress website using Elementor, click on the ‘Edit with Elementor’ button at the top of your page. Elementor is a powerful drag-and-drop tool that allows you to design your site visually, offering flexibility and ease. With Elementor, you can make instant changes to your layout, add new sections, and customize your design without touching any code.

In Elementor, you can easily customize button Text and links. On the left side, you’ll find multiple options to edit button settings based on what you select on the right. Clicking on the button, like the ‘Explore’ button, will open options to modify its Text and where the button links. With a simple drag-and-drop interface, this feature lets you control how your visitors interact with your website and where they are directed, increasing your site user experience.

Changing the background image in Elementor is easy. To begin, click on the six dots at the top of the section where the background image is displayed. This allows you to access the settings to modify the background to match your site design. You can update your WordPress website visuals with just a few clicks for a more professional look.

To change your WordPress website’s style using Elementor, click the Style button in the settings panel. Next, click on the current background image to select the one you want to update. This step allows you to easily replace the image with a new one, giving your website a refreshed and customized appearance. It’s a simple way to ensure your website design matches your branding.

To upload images to your WordPress website with Elementor, click the Select Files button under the Insert Media section. Drag and drop or browse to upload. Once the files are selected, your media will be added to the WordPress Media Library, ready for visual performance across your site. Adding custom images is essential for creating a professional-looking website.

To select and upload images in WordPress using Elementor, click on the image you want to upload from your computer. After choosing the photo, click the Open button to start uploading. This method allows you to easily add custom images to your WordPress website, helping to improve the visual appeal of your pages. Ensure the pictures are correctly optimized for WordPress hosting for faster load times and better user experience.

After choosing the image in WordPress, click on the Select button. This action allows the selected image to be inserted into your WordPress page or post, improving the visual content. Ensure your images are optimized with proper alt Text and descriptions for improved SEO and accessibility. This step is essential in making your website visually engaging and search engine friendly.

The Drag & Drop option in WordPress Elementor allows you to rearrange your content easily. Please select the desired section and drag it to the new location on your webpage. This tool offers flexibility in customizing layouts and improving your website structure to be visually appealing. Mastering the drag-and-drop feature can enormously increase user experience and improve website design. Use this feature to adjust content placement and maintain a well-structured site.

The Drop Here feature in Elementor allows you to place sections exactly where you want them on your webpage. After dragging your desired section, drop it into the highlighted area for exact placement. This powerful feature offers customization flexibility, letting you create the perfect layout for your WordPress website. Master the drop function to quickly build engaging and attractive pages and improve your site user experience.

Removing unwanted sections in Elementor is simple. To delete a container:

Easily adjust the Spacing in your Elementor design to increase the layout of your WordPress website. Go to the Advanced tab, as shown in the image, to modify the Spacing around your elements. Proper Spacing is critical to good design.

In Elementor, fine-tuning your website layout by adjusting margins and padding is essential for a professional design. Navigate to the Advanced section and modify the layout by setting the margin and padding values as shown in the image. These settings allow you to control the space around your content, confirming your website has a clean and organized appearance. Properly adjusting margins and padding improves user experience and design.

In Elementor, adding widgets to your design is evident. Click on the + Icon (shown in the image) to open the widget panel, where you can choose from various widgets to improve your page. Whether it’s Text blocks, images, or interactive elements, widgets help you create a more professional website. Customize your page by quickly dragging and dropping widgets into place.

The spacer widget makes adjusting the Spacing between elements in Elementor simple. You can drag and drop the spacer to increase or decrease the space between sections. Adjusting the slider shown in the image allows you to control the exact amount of space, Enhancing your design’s appearance. Proper Spacing is critical to improving the readability and structure of your website layout.

To delete the item, right-click on it and select “Delete.”. This process lets you quickly adjust the layout by removing unnecessary space between elements.

To preview your website and your changes in Elementor, click on the eye icon at the top of the screen. This allows you to see how your site will look to visitors without publishing changes immediately. Previewing your website will ensure that your adjustments appear correctly and improve the user experience before going live.

Once your changes are finalized, you can view your website’s live page to see how it appears to users in real-time. This is the final step in ensuring that your design, layout, and content are displayed correctly before putting your site into production. By reviewing your live page, you confirm that everything is visually aligned and ready for launch.

To create a new section in Elementor, scroll down to any part of the page, hover over an area, and press the + Icon. This feature lets you easily add new elements to your page, customize layouts, and adjust the design of your WordPress website. Adding sections is essential for building structured and visually appealing web pages and ensuring each part of your site looks professional and functional.

Selecting the proper structure is critical when building your WordPress website with Elementor. You can add a new section with one or multiple columns by choosing a predefined layout. This feature lets you customize the design and layout of your pages to suit your content. Click on the structure icon and select the layout that fits your needs, making your website more organized and user-friendly.

Adding a background image is essential to personalizing your WordPress page. In Elementor, this process is easy—click on the six dots in the section’s toolbar to access the container settings. You can upload and customize your background image from here to increase your website’s visual appeal.

Learn how to customize your WordPress website by adjusting background styles in Elementor. Selecting the Style tab and clicking the background icon can modify the background type to suit your design. Whether you want to apply a solid color, gradient, or image, this feature gives you complete control over the look and feel of your site. Follow these simple steps to improve your design.

Using Elementor, you can easily upload background images to increase the visual appeal of your WordPress site. Click on the + Icon under the background section, choose your desired image, and transform your page’s look in seconds.

Learn the simple steps to upload files in Elementor on your WordPress website. You can easily choose and upload images, videos, or other media files to improve your site design by clicking the Select Files button in the Insert Media section.

Easily add images to your WordPress Elementor design by choosing a file from your computer. Click Select Image, browse your folders, choose the relevant image, and then click Open to upload it to your website.

To add a custom background image in WordPress Elementor, select the image you want from the Insert Media section. Once you choose the image, click Select to upload it as your background.

You can see the background image we just uploaded in WordPress Elementor here. The image has been successfully applied to the section, giving your website a professional look. This preview shows how custom photos can improve your site’s visual appeal, making it more attractive for visitors.

To improve the look of your background image, go to the Advanced section. Here, you can add space around the image. This will help show more of the image and make your website look nice. Adding space is a simple way to improve your website design.

To display the background image correctly, you need to adjust the padding. Enter 250 in the padding field, giving enough space around the image to make it visible. This simple adjustment will increase the look of your site and improve the overall design.

To add Text to your WordPress page using Elementor, click the + icon first. Then, drag the Text widget to where the Text appears. This is an easy way to place new content on your website. You can also adjust and edit the Text later to match your style.

To add Text areas to your website in Elementor, you must first select a structure. The structure helps organize how the content will be displayed. Pick the layout that you like best. This will set up the place where you can place your Text or other elements.

To add Text to WordPress using Elementor, drag and drop the Text Editor widget onto the desired section of your page. This easy drag-and-drop feature allows you to place Text exactly where you want, creating a more user-friendly layout for your website. Once the editor is in place, adjust the Text content as needed.

In Elementor, you can easily add Text by selecting the Text Editor widget. First, type your Text in the specific area, and it will immediately appear on the preview page. Customize Text and see live changes, ensuring your WordPress site displays precisely what you want.

Using the Elementor + icon, you can easily add multiple sections to your WordPress website to create a more dynamic layout. Click on the icon, and a new section will be added to your page. This feature helps you organize content and customize your design, improving the user experience on your site.

In Elementor, you can easily choose the four-column structure for your website. This helps to make the page look more organized and clear. You click on the structure you like, and it divides your content into four equal sections. This layout can increase user engagement because the content will be more accessible to read and navigate.

Once you’ve selected the four-column structure, it will appear on your page layout. This structure acts as a framework where you can add elements like Text, images, or widgets to design your website. Adding and customizing structures makes your website more organized and user-friendly. Developing your website correctly will ensure better navigation and a clean visual layout for your visitors.

To insert images into your Elementor section, click the plus (+) icon. This will open options for adding elements, including images. By selecting the image element, you can upload and place visuals within the structure, improving your website’s overall design. Adding images increases the user experience and makes your website visually appealing.

To add an image to your Elementor section, Drag the image icon into the container. This method allows for easy placement of images, making your website more interactive and visually engaging. Once dropped, you can adjust the image settings to match the design of your page, improving the overall user experience.

To add an image to your Elementor page, click the Choose Image button within the Edit Image section. Select or upload a photo, ensuring the content fits your website style. Customizing images adds more visual appeal to your page, improving its overall design and user engagement.

To add an Elementor image, click Select Files within the Insert Media window. You can select a file or drop it directly into the uploader. Using the right images improves your site’s visual impact and increases user engagement, making it more attractive and responsive.

You can quickly upload multiple images to Elementor by selecting all the photos from your computer simultaneously. Hold Ctrl (Windows) or Cmd (Mac) while choosing numerous photos, then click Open. This is a fast way to increase your website’s visual content and improve site performance by adding several pictures in one step.

To insert an image in Elementor, select the image you want from the Media Library. After choosing the image, click the Select button to insert it into your page. This step helps to quickly add visuals to your website, improving its visual appeal and user engagement.

To resize an image in Elementor, click the Style tab after selecting your image. This option lets you adjust the image’s dimensions, ensuring it fits your website layout correctly. Properly sizing images improves your website’s visual consistency and user experience.

In Elementor, you can quickly duplicate an image setting by right-clicking the image and selecting Copy. This handy feature allows you to apply the same styling and adjustments to other photos, saving time during the design process.

After copying the image settings in Elementor, you can easily paste them into other sections for consistent styling. To do this, right-click in the new section and choose Paste. This feature helps you save time and maintain the same look across your website by applying the same image settings to different areas.

To update images in Elementor widgets, select the widget where the image is placed. Next, click Choose image and select a new image from the media library. This feature allows for quick and easy image replacement across your website, ensuring a fresh visual experience.

To choose an image in Elementor, go to the media library. Click on the image you want and then click “Select.” This will add the desired image to your website page or widget, ensuring it matches your visual goals. This simple process helps keep your site visually appealing with relevant photos.

To choose an image in Elementor, navigate to the media library. Click on the image you want and then click “Select.” This action will add the image to your website page or widget, ensuring it aligns with your visual goals. As part of this process, it’s essential to include ALT-text (alternative Text), which briefly describes the image. ALT-text not only helps those unable to see the image, such as users depending on screen readers, but it also assists search engines in realizing the image content. This improves your website accessibility, SEO, and overall user experience, boosting search result rankings on images.

To add Text below an image in Elementor, click the + icon at the top of your editing panel. This allows you to insert a Text widget directly under the image, providing space for descriptions or additional content. Adding Text to images can help improve your site’s SEO by improving context and boosting user engagement.

To place a heading Text below an image in Elementor, drag the Text Heading widget from the Elements section and drop it below it. This method allows you to create a clear and structured layout for your website. Adding headings below images can improve the site’s SEO by improving readability and making the content more accessible for users.

Type your desired Text in the Heading Text field to add a name below an image in Elementor. This Text will appear under the picture, making it easier for users to identify the image context. This step is essential for improving user engagement and SEO ranking, as properly labeled images make content more accessible and improve overall site structure.

To center-align your Text below an image in Elementor, click on the Style tab within the Heading settings. Adjust the Text alignment to the center for a balanced, professional look. Centered Text is essential for readability and can increase the visual appeal of your website, improving user experience and engagement.

Click the Alignment option under the Style tab to adjust or center-align your Text in Elementor. Centering Text is a crucial design element that improves the visual balance on your page. Use this feature to make your Text look more professional and enhance user engagement. Aligning content properly helps maintain readability and boosts your site performance.

In Elementor, you can easily copy Text and format by right-clicking on the Text element and selecting Copy from the drop-down menu. This methodropdownyou to easily duplicate the same Text style across multiple sections, saving time during page design. By copying the Text, you can ensure consistency in your site’s visual appearance and brand messaging across all elements.

After copying Text in Elementor, you can easily paste it into other elements by right-clicking and selecting Paste. This action allows for quickly duplicating the same content style across different images or sections, ensuring a consistent look and feel across your website. By pasting the copied Text, you maintain the sequence in your site design, saving time and effort.

To change the Text of an image in Elementor, click on the Text you want to edit and update the Title section with new content. This feature lets you quickly adjust descriptions and titles, ensuring each image accurately reflects its purpose. Repeat the process for other images to maintain consistency across your site.

To preview your website changes before publishing, click on the eye icon at the top of the Elementor panel. This feature gives you a live preview of your updates, helping you ensure that everything looks right before making your site live. You can catch any errors and make final adjustments by checking this preview.

Here is your live website preview after making changes in Elementor. The preview shows your hosting services layout, including sections we created, such as Web Hosting, VPS Hosting, Hosting Service, and Hosting Servers. By viewing this, you can confirm that your website is visually appealing and functions well before publishing it live for visitors.

Check your website’s mobile responsiveness to ensure that it looks great on mobile devices. In Elementor, click the mobile icon, as shown in the Image. See how your design looks on different devices.

In Elementor, you can easily check how your website appears on mobile devices. By switching to the mobile view, you can see the adjustments made for small screens and make sure that your site is user-friendly. This feature helps make your site look great on smartphones and tablets.

In Elementor, adjusting the Text size for the mobile view helps improve readability on smaller screens. You can easily resize Text to ensure it fits well on mobile devices, providing a better user experience. Follow simple steps to change font size and make your site more accessible to all users.

Learn how to adjust the Text formatting and size for mobile view in Elementor. Follow these easy steps to ensure your Text looks perfect on smaller screens, improving the overall user experience and readability for mobile visitors. It is ideal for anyone optimizing their WordPress site for mobile users.

Learn how to quickly resize or adjust your Text in Elementor by accessing the Typography settings. The pencil icon in front of Typography will help you ensure yourTextt looks perfect on all screen sizes, particularly on mobile devices. This is perfect for optimizing your WordPress website design and readability.

Learn how to resizeTextt in Elementor for mobile responsiveness. Adjusting the Text size to 28px using Typography settings will make your Text look much better on smaller screens. Follow these simple steps to improve the mobile version of your WordPress website, improving readability and user experience.

Click “Publish” in Elementor to easily view your website on mobile. This step will ensure that all your design updates, including Text resizing and formatting, are live on your WordPress site, enhancing your website’s mobile experience.

To navigate to your website’s About page, simply click the About button from the home page. This will show you how to easily access important sections like the About page, which provides key information for your visitors to learn more about your services or company background.

To modify your website About Us page, click the Edit with Elementor button. These simple steps walk you through quickly updating your content, layout, or images using the Elementor page builder for a professional and polished look.

To add testimonials to your website using Elementor, click on the starter template icon, as shown in the Image. This will open a variety of pre-designed testimonial layouts. After selecting a layout, you can customize it by adding your content or images. This method is very simple and saves you time when designing testimonials manually.

Click on the Blocks tab at the top of the starter template screen. The Blocks section offers a variety of pre-designed sections like headers, footers, and content areas to add to your site easily. Browse through the available templates and select the one that best fits your design needs. These Blocks help speed up the website-building process while ensuring professional-looking layouts.

Click on the highlighted Section to select the Testimonial Block. This block is perfect for displaying feedback or reviews from your customers. By adding it, you can quickly showcase testimonials that build trust and credibility for your website. Find the perfect design for your vision, easily fitting into your page layout.

To import a block in Elementor, follow these simple steps. Importing pre-designed blocks is a great way to improve your website design without spending hours building from scratch. First, locate the block you want to use. Next, click the Import Block button, as highlighted in the Image. This allows you to instantly add the block to your Elementor editor, which is ready for further customization. Using pre-built blocks, you can speed up your workflow and ensure a professional look for your website. Whether creating a new page or updating an existing one, this feature is essential for a perfect design experience.

In Elementor, you can easily change the title of any section to suit your website content and SEO needs. To edit a heading, click on the title you want to modify and update the Text in the Elementor sidebar. Select the appropriate HTML tag for the title (e.g., H1, H2) to improve your site’s search engine ranking. Using relevant keywords in your headings can boost your website’s SEO performance and create more engaging, descriptive content for your audience. Customizing titles allows you to improve the user experience while aligning with SEO best practices for enhanced visibility.

Change the Text of your Testimonial Block by editing the heading section. Type your desired Text in the Title field, and It will appear instantly. This is a great way to personalize the testimonial section with honest client feedback. Use words that connect with your audience to create a strong impact.

Easily update the Image, title, and Description in your Testimonial Block using Image Box settings. Click on Choose Image to replace the picture, type a new Title in the field provided, and edit the Description for a personalized message. This allows you to customize the testimonial section and make it more relevant to your content.

To add a new section to your About Page, click on the “+” icon. This option allows you to insert additional content such as Text, images, or widgets to increase your page. Adding more sections can better organize your website and highlight critical information, engaging visitors.

To insert an FAQ section on your page, click the “S” icon in the Starter Template. This feature lets you quickly add pre-made templates with frequently asked questions. Using this, you can save time and offer valuable information to your visitors, improving the overall user experience.
In the Starter Template, click on the Blocks tab at the top. This will give you access to various pre-designed sections that can easily be added to your website. These Blocks include layouts like headers, footers, and other design elements that speed up your website-building process, giving you a professional look without extra effort.

To add a FADropdown to your page, click on the dropdown menu in the Blockdropdown from the options and choose FAQ to display a pre-designed FAQ layout on your website. This is a quick way to address common questions and improve user involvement with helpful information on your page.

Select any FAQ section for your website from the available list. Adding an FAQ section can answer common questions your visitors may have, improve their overall experience, and save time by addressing key points directly on your site.

Click the Import Block button to add the FAQ section to your About Page. This will quickly set the FAQ template on your page, Improving user experience with FAQs. Adding an FAQ helps to simplify the flow of information on your site.

You can easily change the FAQ by editing the Toggle Items and Title fields to match your needs. This allows you to provide relevant information clearly and organized, ensuring visitors find the answers they are looking for quickly. Personalizing the FAQ section improves the overall user experience on your site.

To see your updates, click on the eye icon at the top right of the screen. Preview changes in real-time, giving you a clear view of the FAQ section’s appearance before publishing it live. Using the preview feature helps ensure everything appears exactly how you want it.

Here is the Testimonial Section displayed on your page. This Section features feedback from different clients, providing authority and trust to your website. Testimonials are a powerful way to highlight positive experiences and build confidence among your visitors.

This is the recently added FAQ section. It displays commonly asked questions and their answers, helping visitors find information quickly. Including a well-structured FAQ section increases the user experience and keeps your audience informed about important details.

To visit the Services Page, click on the Services link in the menu bar. This page will provide detailed information about your business’s services. Direct access to the Services Page helps visitors quickly find what they need and improves the navigation experience on your website.

To make changes to the Services Page, click on the Edit with Elementor button at the top. This will open the page in Elementor, allowing you to customize the layout, Text, and design elements. Using Elementor makes it easy to adjust your page content to suit your business needs better.

Scroll down to the bottom of the Services Page and click on the S icon to open the Starter Template. This lets you quickly add pre-built layouts and sections to your page, speeding up customizing the design to meet your needs.

In the Pages Section, click on the dropdown menu and select Fdropdow in the list of options. This will filter the available page templates, allowing you to choose from a variety of free layouts for your website. Using these free templates helps speed up the website design process without additional costs.

To add the Services Page, click on the Services template from the available options. This template will showcase the services you offer, making it easy for visitors to learn more about your business. Selecting the right Services Page helps present your content clearly and organizedly.

Click “Import Template“. This will upload the selected template and place it on your site, allowing you to start customizing it now. Importing templates makes it simple to add professionally designed pages without needing to build from scratch.

As you import the new page to the Services Section, you may need to delete some containers you don’t require. Click the “X” to remove them. This will help you keep your page clean and organized by only displaying the content relevant to your services.

Change the heading Text to match the services offered on your Services Page. Click on the Text and replace it with something relevant, such as your service or business name. This helps keep the page content aligned with your offerings, making it easier for visitors to understand what you provide.

To update the Text on your Services Page, click the Title field and type in the new Text that matches your services. Personalize the heading to ensure that the content is aligned with what your business offers and helps visitors quickly understand your services.

To add extra space at the top of your Services Section, click the Advanced tab in the settings menu. You can also adjust section spacing and layout, which will help improve your page’s overall design and readability.

To add extra space at the top of your Services Section, type 80 in the Padding field. This will create additional space, improve the layout, and make your content easier to read. Adjusting padding helps improve your page’s overall design and visual appeal.

Click on the current Image and Text to remove them, then upload a new image that better fits your website. Customize the Text according to the services you offer. This process helps keep your Services Section updated and relevant, as discussed in the previous Section about editing the home page.

To change the Contact Page, go to the menu and click the Contact button from the Services Page. Open the Contact Page, where you can update information, add forms, and make it easy for visitors to contact you.

You can update your Update your contact info. Click on the corresponding fields to edit them and provide accurate information so visitors can quickly contact you. Keeping your Contact Page updated ensures that you communicate with your audience.

You can easily update your social profile details by clicking on the social icons section. Change the social profile name and add the correct link to your profile. This lets visitors connect with you on platforms like X, Instagram, or YouTube, helping you build your online presence.

To show your location on a map to your Contact Page, click the “+” icon to open the widget options. Adding a map helps visitors easily find your location, improving the user experience and providing a visual reference for your business address.

To choose the layout for your map, click on the “+” icon and select the structure that best fits your Contact Page. This structure defines how the map and other elements will be displayed, ensuring your page looks clean and organized.

To add a Google Map, click the “+” icon and select the Google Maps element. Then, drag and drop it into the desired location on the page. This makes it easy for visitors to find your business and navigate to your location.

You can change the location on your Google Map by editing the Location field. Additionally, you can adjust the zoom level and height of the map to fit your page layout and provide a better view for visitors. These adjustments ensure that the map accurately displays your business location and improves the user experience.

You can adjust the spaces on the left and right of your Google Map to ensure that it fits well within your Contact Page layout. This helps create a balanced design, making your page attractive and easy to navigate for visitors.
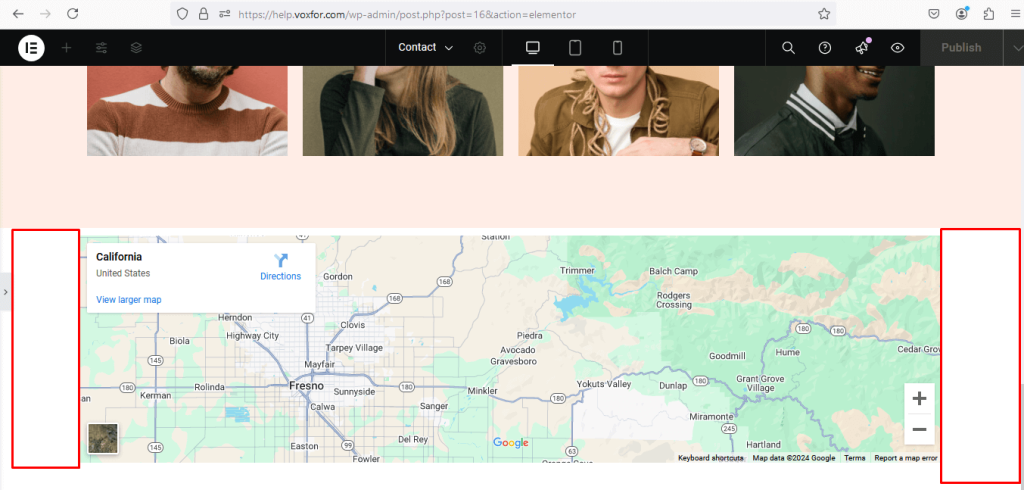
Click on the six dots above the Google Map to change the spacing and layout. This allows you to adjust the placement and ensure that the map fits perfectly within your Contact Page design, improving both the look and functionality.

To adjust the spacing on the left and right of your Google Map, select Full Width from the Content Width option. This will extend the map to fit the entire page width, creating a balanced and perfect-looking layout on your Contact Page.

The Google Map looks much better, with no spaces on the right or left sides. This full-width layout improves the design, providing a clean and professional look to your Contact Page and making it easier for visitors to view your location.

To zoom in on your Google Map, double-click on the map. This provides a closer view of the area and helps visitors get a more detailed look at your location. The zoomed-in map offers better navigation for users looking for specific directions.

When we import a demo, all the necessary plugins are automatically installed. The contact form on this page was created using WPForm. If you want to learn more about contact forms, follow our website’s step-by-step guide for the Contact Form 7 plugin.
To update the email on your Contact Page, click on the field and enter your new email address.

To change your Contact Form, click on the form field you want to edit. You can adjust the Text, layout, or other settings to ensure the form meets your needs. This makes it easy for visitors to reach out and connect with you through your website.

Click the Edit Selected Form button to edit the contact form. This allows you to customize the form fields, layout, and design to fit your needs.

You can easily edit your Contact Form using the Form Builder from this screen. Add or remove fields, adjust field types like Single-Line Text, Dropdown, or Email, and cuDropdownthe form to match your business needs. This makes it simple to create a user-friendly form that helps visitors reach you easily.

To remove any field from the Contact Form, hover your mouse over the field you want to delete and press the Delete button. This allows you to customize the form by removing extra fields, keeping it simple and relevant to your needs.

After clicking the Delete button, a dialogue box will appear asking for confirmation. Click OK to proceed with removing the field. This step will ensure you are sure about deleting the field before it is permanently removed from the Contact Form.

To add a new field to your Contact Form, drag the desired field from the Standard Fields section and drop it into the form. This allows you to easily customize your form by adding fields like Multiple Choice, Dropdown, or other options for your needs.

The Multiple Choice section has been successfully added to your Contact Form. This feature allows users to select from multiple options, making it easier for visitors to provide specific information. You can customize the choices.

Click on the field to change the question and the options in the Multiple Choice section. You can edit the choices to fit your needs, allowing users to select the most relevant options when filling out your form.

You can easily edit the questions and choices in the multiple-choice section to meet your specific requirements. Simply click on the field and adjust the Text, allowing you to gather more relevant information from your visitors.

To ensure that the email notifications are set correctly, click on Settings and then select Notifications. This allows you to manage who receives emails when a form is submitted, ensuring that important messages are directed to the right inbox.

In the Email Settings, you can customize where the form submissions are sent. WordPress uses the default admin email, but you can update it by entering another email address in the Send To Email Address field. This will ensure that when a visitor fills out the form, the notification goes to the correct inbox.

After adjusting your Notification Settings, click the Save button to ensure that all changes are applied. This will update the email address, subject line, and other notification preferences for your Contact Form and ensure that the settings are correctly stored.

To create a new page for your website, go to your dashboard by clicking on your website name, “Voxfor Lifetime,” at the top left. This will take you to the main dashboard, where you can easily add and manage new pages.

To add a new page, go to your website dashboard. Hover over the Pages section in the menu on the left, then click on Add New Page. This will open up the editor, allowing you to create a new page.

Enter your desired page name in the editor to build your new page. Once done, click the Edit with Elementor button to open the Elementor editor and customize the page design.

To quickly design your page, you can add a new template or block from the options available in Elementor. Drag and drop the desired widget into your layout to customize your page. This is faster than designing everything manually.

I will share another method that can save you a lot of time. In Elementor, you can easily copy a container or section by right-clicking and selecting Copy. This allows you to quickly duplicate elements without redesigning them from scratch.

To save time in Elementor, move to the projects page, right-click where you want to paste the content and select Paste from the menu. This allows you to quickly duplicate and reuse elements on your WordPress site without recreating them.

If you want to copy the entire page in Elementor, you can save the page as a template. By clicking on the Save as Template option in the dropdown menu, you can drop down the template to reuse it on other WordPress sites, saving time and effort.

To save a page as a template in Elementor, enter the template’s name and click the Save button. This will allow you to reuse the design on other pages or websites, providing an efficient way to replicate your content layout.

To delete a section in Elementor, click on the X icon at the top of the section you want to remove. This action will allow you to remove sections you don’t need from your webpage, keeping your layout clean and organized.

To add a new template on any Elementor page, click on the + icon. This allows you to easily insert pre-designed templates or create new layouts, saving time and effort when building your webpage.

Click on the My Templates tab to use a previously saved template in Elementor. This allows you to easily access your saved designs and insert them into your pages, making the process easier.

To add a previously saved template in Elementor, select the template from the My Templates tab and click Insert. This will import your saved design into your current page, helping you quickly reuse designs and manage your workflow.

A dialogue box will appear after selecting your template in Elementor, prompting you to apply the page’s settings. Click the Apply button to import the template’s layout, design, and settings to the current page, making your website-building process reliable and saving time.

With Elementor, your entire webpage is loaded in just a single click. This image showcases the Voxfor Hosting Services page, highlighting its status as one of the best hosting service companies in the United States. Featuring services like Web Hosting, Cloud Solutions, and Data Management, the page layout is designed to provide a professional and user-friendly experience.

In this section, we show how to change the title of the project page from “Voxfor Lifetime” to “Our Project” using Elementor. This image highlights the process of editing the title in the Elementor editor, making sure that the page better aligns with the content purpose. The new section focuses on projects, making the WordPress Hosting page more accessible.

To remove any section from your web page, click on the “X” icon at the top of the section you no longer need. This is a quick and simple way to clean up your page. By removing unnecessary parts, your site will look cleaner and load faster, making it more user-friendly. Remember to save your changes once you’re done to keep everything updated!

You can add projects related to different hosting services to this section. For example, include Web Hosting, VPS Hosting, Hosting Services, and Hosting Servers to give a clear view of what your business offers. This helps highlight your expertise and shows potential clients the range of services available. An image like this makes your website more attractive and attractive to users, driving them to learn more about your services.

Here, we are adjusting the background of the project section to make it transparent. The current white background will be changed to blend effortlessly with the rest of the design, making your website more professional and perfect-looking. A transparent background improves the page’s look, allowing the main elements, like the title and images, to stand out. This simple change improves the webpage’s overall user experience and visual flow, making it more attractive for visitors.

To remove the white background, click on the Edit Page option. This action allows you to make necessary changes to the background settings, providing more control over the visual design. Removing unnecessary backgrounds improves your website’s visibility and gives it a clean, professional look. This step is essential to ensure a clean layout for your content, making the project section more engaging and user-friendly.

To remove extra spaces in your WordPress site using Astra Settings, click on the highlighted A icon. This step will ensure that your page layout looks clean and organized. Properly removing unnecessary spaces will help create a more appealing and user-friendly interface, improving the visual flow of your website. This small adjustment improves the overall design and keeps the content properly aligned, providing a better user experience.

To fine-tune your page layout, scroll down slightly and click on Advanced Settings in the Astra panel. This option gives you complete control over your container style and allows you to adjust the layout to your preferences. Using the Advanced Settings helps you customize how your WordPress site looks, making sure it has a more professional and clean design. By optimizing these settings, you can improve the user experience and make your content stand out.

To make your header transparent, go to Advanced Settings and click on Transparent Header. Then, switch the setting to Enabled. This will give your page a clean, modern look, combining your header and content for a perfect design. A transparent header improves the overall appearance of your website and makes it more attractive.

Once you’ve made your changes, click the Publish button to make them live on your website. This will ensure that your updates are visible to your visitors in real-time. Regularly publishing updates keeps your website fresh and improves user engagement. Always double-check before you hit Publish to make sure everything looks great!

To check all the updates you’ve made, click on the View Page icon. This lets you see your changes in real-time, ensuring everything appears as you want before it goes live. Reviewing your updates helps you catch any last-minute errors and gives visitors a polished final result.

Removing unwanted spaces from a WordPress website creates a cleaner and more professional look. As seen on the live page, the spaces have been removed successfully, improving user experience and design. Follow these quick and easy steps to ensure your website is polished, with better readability and a more organized design. Removing gaps helps optimize your layout, keeping visitors engaged and focused on your content.

The menu bar displays links like Home, About, Services, and Contact, but the newly added project page needs to be visible. To fix this, you need to update your WordPress menu. Go to your WordPress Website, navigate to appearance, and select Menus. You can easily add the missing page by checking it in the Pages section and clicking Add to Menu. This will ensure the new page is on your website menu for easy access.

First, you must access your website’s dashboard to add a project page to your menu bar. Click on the Voxfor Lifetime logo at the top left corner to open the dashboard. This will allow you to manage your WordPress Website settings and update your menu. Following this, you can easily add the new page, making it visible to your visitors in the menu bar.

Once in the WordPress Website dashboard, look for the Appearance tab on the left-hand side. Click on it, and then select Menus from the dropdown list. This section allows you to customize your website menu and easily add new pages. By following these steps, you can manage the menu items on your site for visitors to navigate.

To add a new page to your menu, go to the Pages section and find the page you want to add, like WordPress Hosting. Check the box next to the page and click on Add to Menu. This will move the selected page into your menu structure, making it visible on your website. Once added, you can drag and drop to rearrange the menu items in your preferred order.

After adding the new page to your menu, save the changes. To do this, click the Save Menu button at the bottom of the Menu Settings section. This will ensure that the new page, like WordPress Hosting, is now part of your site navigation and visible to all visitors.

The WordPress Hosting page has now been successfully added to the menu bar. You can see it alongside other menu items like Home, About, Services, and Contact. This will ensure visitors can easily access the WordPress Hosting page directly from the main navigation, improving the site’s usability.

You can create a submenu by returning to the Menu settings and dragging the WordPress Hosting page slightly to the right under the About section. This makes it a submenu instead of a main menu item. After positioning it, click on Save Menu to apply the changes. The WordPress Hosting page will now appear as a dropdown option under Aboudropdownving your site navigation.

To see the newly created submenu, hover over the About section in the menu bar. The WordPress Website Hosting page will now appear as a dropdown option under About us whicht has been successfully added as a submenu. This increases the organization of your menu and makes navigation more manageable for your visitors.

If you want to create your logo, start by clicking on the Customize button in the top menu of your WordPress Website. This opens the customization options where you can upload or design your logo to represent your website. Customizing your logo helps make your brand more recognizable and professional.
Click the Header Builder option in the customization menu to add your logo. This tool allows you to easily upload and position your logo in the header area of your website. Using the Header Builder, you can customize the look and feel of your site, making your brand stand out to visitors.
In the Header Builder section, click on Site Title & Logo to customize the Text and logo for your website. This is where you can add or update your site logo and adjust the site title to fit your branding. Customizing these elements is crucial for giving your website a professional look and helping visitors easily recognize your brand.
To remove your logo, click the Remove button in the logo section of the customization panel. This will instantly take the logo off your website, allowing you to upload a new one or leave it blank. This feature lets you easily update or change your site branding whenever needed.
To design your logo, go to your browser, type canva.com in the URL section, and then press enter. Once on the Canva homepage, click on the Create a Design button. Canva provides various templates and tools that make designing a custom logo easy and fun, even if you’re not a professional designer.
To create a logo in Canva, click the Logo option under the Create a Design section. This opens a canvas specifically sized for logo creation, allowing you to use templates and design tools to craft a custom logo that fits your brand’s style. Canva makes the process simple and accessible for everyone.
Click on the Templates tab to select your desired logo template from the available options in Canva. Then, customize it to suit your brand needs. Canva offers a variety of logo designs that you can adjust by editing colors, fonts, and icons to create a unique logo for your business.
Choose a logo template that fits your website from the list of options in Canva. Once selected, you can easily edit the logo by adjusting colors, fonts, and other elements to match your branding. Canva lets you quickly customize any logo design to create a professional and personalized look for your business or website.
Once you’ve completed your logo design, click the Share button in the top-right corner of the Canva window. After that, click on the Download button to save your logo to your device. This will ensure that your custom logo is ready for use on your website or for other branding purposes.
Before downloading your logo, check the box for Transparent background to ensure it has no background color. This is important for placing the logo on different surfaces, like your website or promotional materials. Once selected, click the Download button to save your logo in PNG format, which is ideal for maintaining quality and transparency.
To upload the logo you designed, click the Select Image button in the customization panel. This allows you to browse your device and choose the logo file. Once selected, your new logo will be applied to your website’s header, giving it a fresh, professional look. Remember to click Publish to save your changes.
Click on Select Files to upload your logo from your device. This will open a file browser where you can choose the logo file you just created. Once the file is selected, it will be uploaded to your WordPress media library and ready for use on your website. This step will ensure your custom logo is applied to your site design.
To upload your logo, navigate to the folder where your logo image is saved. Click on the image to select it, then click the Open button. This will upload the logo to your WordPress Website, making it ready for use on your website header or other sections.
After uploading your logo, click on the image from your media library to select it. Once selected, click the Choose Image button to apply it to your website. This will set the logo in the designated spot, ready to be displayed on your site header or other areas.
After making all your changes and uploading your logo, click the Publish button to save and apply the updates to your website. This will ensure your new logo and other customizations are live for everyone on your site. Always remember to publish your changes to make them visible to your visitors.

To update the contact number on your website, locate the number in the header section of your page. Click on the number to make changes and replace it with your new phone number. This is a simple way to ensure that your contact information is always up-to-date and visible to your website visitors.

To change the contact number, enter the new number in the Text box provided in the customization panel. This will update the phone number displayed on your website. Remember to publish your changes after entering the new number so they are saved and visible to your visitors.

Click the Design tab in the customization panel to modify the button’s design. This will allow you to change the button style, color, size, and other design elements. Adjusting the button design improves your site’s look and user interaction. After making your changes, remember to publish them so you can apply the new design.

You can easily adjust the Text color button by selecting the Text color option in the design settings. Choose the color that matches your website style, and the Text color will be updated accordingly. This allows for better customization and ensures that your website button design aligns with your overall branding. After making the changes, click on Publish to save them.

You can modify the border radius of the button to create sharp or rounded corners. Adjust the values in the Border Radius settings to change the button’s appearance. This customization allows you to match your button design with the overall style of your website. Once the changes are made, click Publish to save the updates.

To change the menu Text color, navigate to the customization panel and select the color options for the menu. This allows you to adjust the color to fit your website design better. Changing the menu Text color improves readability and the design of your site. Remember to publish your changes once you’re satisfied with the new color.

To change other settings, such as the menu Text color, go back by clicking on the back arrow in the customization panel. This will take you to the previous options, where you can further adjust your site design. Navigating the customizer is easy and lets you switch between sections quickly for better customization. Once done, make sure to publish your updates.

To adjust the menu Text color, click the Transparent Header option in the customization panel. This setting allows you to change the appearance of the header and menu, including the Text color. Modifying the transparent header helps create a cleaner, more modern look for your website. After making the changes, be sure to click Publish to save them.

To change the menu Text color, click the Design tab in the Transparent Header section. This option allows you to modify the Text color of your menu, helping it stand out against the background. Once you’re happy with the changes, click Publish to apply the new design to your website.

In the menu color settings, you can change the menu Text color, background color, and hover color. These options allow you to fully customize the appearance of your menu to match your website style better. Once you have made the adjustments, click Publish to apply the changes and improve the user experience.

To make changes to your website’s mobile version, click on the mobile icon in the customization panel. This will allow you to preview and adjust the site’s appearance for mobile devices. Once you’ve made the necessary changes, click Publish to save them and ensure your site looks great on all screen sizes.

To customize the site title and logo for the mobile version of your website, click on the Site Title & Logo option in the customization panel. This allows you to adjust how your logo and title appear on smaller screens, ensuring a clean and professional look on mobile devices. Once you’re satisfied with the changes, remember to click Publish to save your updates.
To view how your logo appears on mobile, click on Hide Controls and Hide Builder at the bottom of the customization panel. This will give you a clear preview of your mobile screen view without the customization tools obstructing the display. Once you’re done reviewing the changes, click Publish to save your updates for the mobile version of your website.

Once your logo is visible in the mobile preview, click on the icon at the bottom to return to the customization options. This will ensure that your logo displays appropriately on mobile devices. After confirming everything looks good, click Publish to save your changes and make them live on your website’s mobile version.
To adjust the width of your logo in the mobile view:
To modify the design for tablet view, click on the tablet icon at the bottom of the customization panel. This will allow you to preview and adjust the layout for tablet screens, ensuring your website looks great across all devices. Once you’re done making changes, click Publish to save your updates for the tablet view.

To change the logo width for the tablet view:
To adjust your website’s footer, return to the desktop version and click the Footer Builder option in the customization panel. This tool allows you to customize the footer’s layout, style, and content easily. Once you’ve made the necessary changes, click Publish to save and apply your updates to your website.

To adjust the copyright information in the footer of your website, click on the Copyright section within the Footer Builder menu. This allows you to customize the Text, such as adding your business name or the current year. Once you’ve updated the copyright Text, click Publish to apply the changes to your site footer.

To add or update your website name in the footer’s copyright section, type the name in the provided Text box. This will ensure that your brand name is displayed prominently at the bottom of your site. Once the changes are made, click Publish to save the updated information in the footer.

To update the logo icon in the footer, click on the HTML 1 section in the Footer Builder. This allows you to add or replace the logo using HTML or inserting a new image. Once the changes are made, click Publish to save your updated footer, ensuring your logo is displayed correctly at the bottom of your site.
To insert a logo or any other media in the footer, click the Add Media button in the HTML 1 section. This allows you to upload images or select existing media from your library. After adding the media, click Publish to ensure your new content is displayed in your website’s footer.

To add your logo or media to the footer:

To adjust the image size in the footer, click the pencil icon to edit the image. This allows you to modify the dimensions and placement of the image to better suit the footer’s design. Once you’ve made the necessary changes, click Publish to apply the updates to your website.

To adjust the image size, choose Custom Size and set the width and height to your desired values. After adjusting the size, click the Update button to apply the changes. This will ensure the image fits perfectly in your website’s footer. Once satisfied, click Publish to finalize the updates.

To add a link to the icon in the footer:
After making your edits, click the Publish button to view and apply all the changes to your website footer. This will ensure your new content, including icons, links, and other modifications, is live and visible to your visitors. Once published, your updates will be shown on the site.

To log out from your WordPress dashboard, click on your profile name in the top right corner. From the dropdown menu, select Log dropdown, which will securely sign you out of your WordPress account and return you to the login page if you need to log in again later.
WordFence is a security plugin for WordPress Websites that protects your website from hackers and malware. It scans your site for any security issues and blocks dangerous threats. With WordFence, you can also track who is visiting your site and block the wrong visitors. It’s easy to set up and helps keep your website safe. You can follow simple steps to install and use WordFence to protect your website from problems.

Building a WordPress website doesn’t have to be complicated. You can create a fully functional and professional website by following these simple steps. From selecting the right hosting plan to customizing your site design and layout, everything can be done with ease. Remember to publish your changes regularly and update your content for the best user experience. Now that your WordPress website is live, you can start sharing your ideas and services with the world!

This article was written by Haider Aftab Abbasi. If you’re looking for more insightful content or professional collaborations, feel free to connect with Haider on LinkedIn using the provided link.


 Lifetime Hosting
 France Lifetime Dedicated Servers
 Germany Lifetime dedicated servers
 Lifetime Game Dedicated Servers
 Chicago, US
 Singapore
 Hong Kong
 Seoul, South Korea
 Amsterdem, Netherlands
 London, UK
 Zurich, Switzerland
 Sydney, Australia
 DDOS Protection
 Submit Ticket
 Full Management
 Videos and Podcasts
 Voxfor Advanced Price Management For WooCommerce
 Voxfor AI Content Summary


